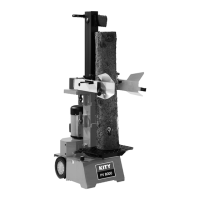
17
Montage du plateau, Fig.6
En fonction de la longueur du bois à fendre, le plateau
peut être placé à 3 hauteurs différentes 52 cm, 78 cm
et 104 cm.. A chaque hauteur, il y a 2 crochets de ver-
rouillage A de la position.
PositionnezleplateauàlahauteurBsouhaitée.Tournez
lesverrouillagesAde90°verslebasdechaquecôtéan
de verrouiller le plateau.
Instructions particulières
Limitation de la course pour du bois court,Fig.7
Positionnez le coin de fente 10 cm au dessus du plateau
• Amenezlecoinàlapositionvoulue
• Lâchezunbrasdecommande
• Coupezlemoteur
• Lâchezledeuxièmebras
• Dévissezlavisdemaintien
• Tirezlatigederéglagedecourseverslehautjusqu’à
ce qu’elle soit stoppée avant le ressort
• Revissezlavisdemaintien.
• Remettezlemoteurenmarche.
• Vériezlapositionhaute..
Réglage du plateau, Fig. 8
Position haute du plateau pour les bûches allant jusqu’à
52 cm,
Position médiane du plateau pour les bûches allant
jusqu’à 78 cm,
Position basse du plateau pour les bûches allant jusqu’à
104 cm
Remarque: Lors de l’utilisation de la croix de fente, la hau-
teur utile se réduit d’environ de 2 cm.
• Ouvrezlesverrouillages10.
• Sortezleplateau.
• Positionnezleplateauàunepositionàpeuprèséqui-
valente à la longueur de la bûche.
• Refermezlesverrouillagesdeblocageduplateau.
Vérification du fonctionnement
Toujourseffectuerun contrôledufonctionnementavant
chaque utilisation.
Action: Résultat:
Abaissez les deux poig-
nées vers le bas
Le coin de fente descend vers le
bas jusqu’à environ 10 cm du
plateau
Lâchez une poignée Le coin de fente reste à la positi-
on voulue
Lâchez les deux poignées Le coin de fente remonte en haut
Vérifiez le niveau d’huile avant chaque utilisation, voir le
chapitre « Entretien » !
Fitting the table, Fig. 6
Thetablecanbettedatthreeheights(52,78and104
cm) suiting the length of the logs. There are locking hooks
at every position.
PlacethetableinthedesiredsupportsB.Forlockingthe
table, swing the locking hooks A on both sides down by
90°.
Working hints
Stroke limit for short logs, Fig. 7
Lower splitting knife position about 10 cm above table.
• Movesplittingknifetothedesiredposition
• Releaseoneoperatingarm
• Switchmotoroff
• Releasethesecondoperatingarm
• Releasethelockingscrew
• Pushthestrokesetrodtothetopuntilitisstopped
by the spring
• Retightenthelockingscrew
• Switchmotoron
• Checkupperposition
Setting the table height, Fig. 8
Upper table position for logs up to 52 cm,
centre table position for logs up to 78 cm,
lower table position for logs up to 104 cm.
Note: When using the splitting cross, the clearance is re-
duced by 2 cm.
• Releasethelockinghooks10.
• Pullthetableout.
• Fitthetableinapositionneartheloglength.
• Securethetablewiththelockinghooks.
Functional test
Test the function before every use.
Action: Result:
Push both handles towards below. Splitting knife goes
down to approx. 10 cm
above the table.
Let one handle loose, then the
other.
Splitting knife stops in
the desired position.
Let both handles loose. Splitting knife returns to
upper position.
Check the oil level before every use – see chapter “Mainte-
nance“.
Splitting
BA PV 8000.indd 17 28.09.11 12:04