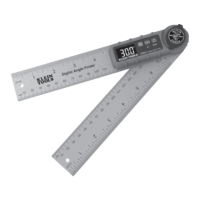
The Klein Tools 935DAA measures angles from true level. It can also be
set by the user to notify when a desired angle is reached. The magnetic
base attaches to pipes, table saws, and other ferromagnetic surfaces. The
V-grooves easily align to the axes of conduit and pipes.
GENERAL SPECIFICATIONS
• Measurement Range: Dual: 0-90° and 0-180°
• Accuracy: ±0.1° from 0° to 1°, 89° to 91°, 179° to 180°;
±0.2° at all other other angles (when measuring using the
Magnetic Base
3
).
• Operating/Storage Altitude: 6562 ft. (2000 m)
• Operating/Storage Temperature: 32° to 122°F (0° to 50°C)
• Operating/Storage Humidity: <85% relative humidity
• Dimensions: 2.83" × 1.78" × 1" (71.85mm × 45.2mm × 25.4mm)
• Weight: 3.2oz (91 g) with batteries
• Batteries: 2x AAA (Included)
• Drop Protection: 6.6ft (2m)
• Ingress Protection: IP54 Dust & Water Resistant
Specifications subject to change.
WARNINGS
Read, understand, and follow these instructions to ensure safe operation.
Failure to observe these warnings can result in serious injury and/or
property damage.
• Always wear approved eye protection.
CAUTION
No user-serviceable parts; do not attempt to repair.
WARNING SYMBOLS ON PRODUCT
Warning or Caution Strong Magnetic Field
Wear approved eye protection Read instructions
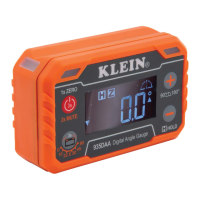
FEATURE DETAILS (FIG. A)
DEVICE
1. LED Display 5. Battery Door
2. Power / ZERO Button 6. Angle Alert Button
3. Magnetic Base 7. Angle Target Increase / Range Button
4. V-Groove(s) 8. Angle Target Decrease / Hold Button
LCD DISPLAY
A. Measurement Value F. Range Setting (90°/180°)
B. Low Battery Icon G. Degree Symbol
C. HOLD Icon H. Inclination Icons
D. ZERO Icon I. Sound Icon
E. Angle Target
BUTTONS AND FUNCTIONS
POWER ON/OFF: Press the Power/ZERO Button
2
to turn the 935DAA
on. The 935DAA will begin displaying the degree of offset of the Magnetic
Base
3
relative to true level. Press and hold the Power/ZERO Button
2
to turn off.
NOTE: 935DAA will automatically power off after 10 minutes of inactivity.
ENGLISH
SPEAKER: The audio beep can be turned on and off by pressing the Power/ZERO
button
2
quickly twice. The state of the speaker can be seen by the sound icon
I
on the LCD screen.
ZERO:
To set a reference plane, press the Power/ZERO button
2
once.
The measurement value on the display will blink once and change to 0.0°
and the ZERO icon
D
will show on the display. At this point, all new
measurement values will be in reference to this user-set reference plane. To
return to measuring true level, press the Power/ZERO Button
2
.
HOLD: To hold a measurement value on the display, press the ANGLE
TARGET DECREASE / HOLD Button
8
. When the hold function is active,
the hold icon
C
will be illuminated on the Display. The measurement value
will remain on the display until the ANGLE TARGET DECREASE / HOLD
Button
8
is pressed again.
NOTE: The user cannot hold while in Angle Alert mode.
RANGE: The 935DAA can display measurements from 0-90° or 0-180°. To
change between these ranges, press and hold the ANGLE TARGET INCREASE /
RANGE Button
7
. When measuring from 0-90°, the 90° Range Setting icon
F
will be shown on the display. When measuring from 0-180°, the 180° Range
Setting icon
F
will be shown.
NOTE: The range cannot be changed while in Angle Alert Mode.
RECALIBRATION: With the DAA powered up, press both Angle Target Increase
7
and Decrease buttons
8
at the same time. The screen with display "
" momentarily. On a flat surface press the Angle Target Increase button
7
once
(display facing user). "
" will flash on the display 3 times. Rotate the DAA on
the same surface 180
°
(display facing away from user). Press the Angle Target
Increase button
7
again. " " will flash 3 times marking the end of the
recalibration procedure.
INCLINATION: The Inclination Icons
H
indicates the direction the 935DAA
must rotate in order to measure either 0° or 90°:
• In FIG. B, the 935DAA on the left must rotate clockwise in order to reach
0°; the 935DAA on the right must rotate counter clockwise to in order to
reach 0°.
• In FIG. C, the 935DAA on the left must rotate clockwise to in order to
reach 90°; the 935DAA on the right must rotate counter clockwise in
order to reach 90°.
• In FIG. D, When no inclination icons are shown, the measurement value
is 0° or 90°.
ERROR: " " will be displayed when the device is tilted 30° backward
or forward (FIG. E). At these angles, the 935DAA is not able to provide
accurate measurements.
HOW TO USE ANGLE ALERT MODE
1. Hold down the Angle Alert Button
6
.
2. Use the Angle Target Increase or Decrease Buttons to set the desired angle,
or press the Angle Alert Button
6
to cycle through preset angles (0°, 10°,
22.5°, 30°, 45°, 90°).
3. Wait until the LEDs turn on.
Now the user is in Angle Alert mode.
LEDs will show red when beyond 5° of the target angle and beep slowly.
LEDs will show flashing orange when within .2° to 5° of the target angle and
beep quickly.
LEDs will show green at 0°, and at the target angle within +/- 0.2° and will
continuously beep.
• In FIG. F, an example of the three different LED states is shown when the
target angle is 45°.
To change the target angle when in Angle Alert mode, the user can either:
• Press the Angle Alert button to cycle through the presets again.
• Press the "+"
7
or "-"
8
to select a new angle, or hold to increase/decrease the
angle quickly.
NOTE: The user cannot hold while in Angle Alert mode.
NOTE: The user cannot change the range while in Angle Alert mode.
NOTE: The buzzer can only be turned on and off while in Angle Alert Mode.
BATTERY REPLACEMENT
The Low Battery icon
B
will appear when the batteries need to be replaced:
1. Loosen the screw and remove the Battery Door
5
.
2. Properly dispose of spent batteries and install two new AAA batteries, noting
proper polarity.
Replace Battery Door
5
and secure with screw.
CLEANING
Be sure device is turned off and wipe with a clean, dry, lint-free cloth.
DO NOT use abrasive cleaners or solvents.
STORAGE
Remove batteries when device is not in use for a prolonged period of time.
Do not expose to high temperatures or humidity. After a period of storage
in extreme conditions exceeding the limits mentioned in the General
Specifications section, allow the device to return to normal operating
conditions before using.
FCC & IC COMPLIANCE
See this product’s page at www.kleintools.com for FCC compliance information
Canada ICES-003 (B) / NMB-003 (B)
WARRANTY
www.kleintools.com/warranty
DISPOSAL / RECYCLE
Do not place equipment and its accessories in the trash. Items must be properly
disposed of in accordance with local regulations. Please see epa.gov/recycle for
additional information.
OPERATING INSTRUCTIONS
SEE OTHER SIDE
CUSTOMER SERVICE
KLEIN TOOLS, INC.
450 Bond Street, Lincolnshire, IL 60069 1-800-553-4676
customerservice@kleintools.com www.kleintools.com
 Loading...