1601 W. DEER VALLEY RD. PHOENIX, AZ 85027 | T. 800-552-5669 | TECHSUPPORT@KNOXBOX.COM | KNOXBOX.COM | PAGE 7
OPE-ESYSLR-0325-F
©Knox Company. All rights reserved.
KEYSECURE
®
5 & 6
ADMIN & USER GUIDE
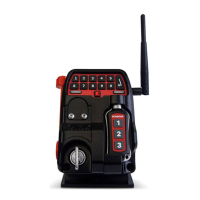
Battery and Mounting Installation
Before using the KeySecure, the battery must be installed. To access the battery compartment, the back
cover must be removed.
1. Always remove power from the KeySecure before attempting to replace the battery. Ensure the
vehicle is powered down and disconnect the device power cable.
2. Remove the technician access lock (tech-lock):
a. Locate tech-lock cover plate below the keypad
b. Using security screw wrench, remove two security screws from the tech-lock cover
c. Remove tech-lock cover plate
d. Insert tech-key into tech-lock and turn counter-clockwise until the lock is loosened and remove the lock
3. Using 5/32 Allen wrench, remove the socket cap bolts on either side of unit by turning
counter-clockwise.
4. Rotate bottom out, then lift unit up and o back cover.
NOTE: Unit should slide easily o the back cover. Do not force. Contact Knox Customer Technical
Support for assistance at 1-800-552-5669 x 3.
5. To install the battery (battery included with shipment):
a. Remove plastic circuit board cover
b. Locate the Battery socket in the upper right-hand corner of the circuit board
c. Slide battery, with positive (+) terminal facing the outer edge, into the battery socket
d. Replace circuit board cover
e. Install/reinstall on back cover
NOTE: When replacing the battery, use a 1/16” Allen wrench to move the battery down and out of the
battery socket. Install new battery as described above.
6. When mounting a KeySecure 6 with the mounting bracket:
a. Follow instructions included with the mounting bracket shipment
b. Do not place washers under hardware inside back cover - FAILURE TO OBSERVE THIS
REQUIREMENT MAY RESULT IN DAMAGE TO THE UNIT!
NOTE: To mount flat, use the KSM-FM to protect the circuit board and battery.
7. To re-install the KeySecure back cover:
a. Hook unit onto back plate and insert two (provided) #10-32 x 2” socket cap screws and
tighten to snug, being careful to avoid the coin cell battery when hooking unit onto back plate
b. Tighten tech-lock
c. Replace cover and tighten security screws
8. Attach antenna to male connector on top right side of unit.
9. Wire pigtail to power wire connected to vehicle power and ground (crimp-on butt connectors
and heat shrink included).
10. Plug pigtail connector and Ethernet cable (if applicable) into back of KeySecure device.