Video Doorphone Wiring Diagram
Component
Precautions for Operation
Installation Precautions
Monitor and camera must be installed away from direct
light and counter light.
Camera must be installed at a place free from rain.
Standard height of monitor must be 1,450mm~1,500mm
from ground, centered around brawn tube.
Camera should be installed on the wall in which cement
is completely dry.
If installed during winter season at temperature below
-5, condensation might be generated inside monitor and
camera due to temperature difference between indoors
and outdoors. To prevent breakdown due to such
condensation, connection should be made in 2 hours or
more after installation.
Do not install monitor and camera in locations subject to
direct heating as harmful gases may subsequently be
emitted in significant amounts.
WARNING
To Reduce the risk of fire orelectric shock Do not expose this appliance to rain ormoisture
CAUTION To prevent electric shock, match wide blade of plug to wide slot, fullt insert.
Stopping up pipe as above minimizes
temperature difference between indoors
and outdoors, and also eliminates moisture
and condensation on door camera window.
Stop up P.V.C. pipe using
adiabatic substances, to
prevent air circulation
Name of each part
Surface-mounting Door Camera Installation
DOOR CAMERA INSTALLATION
After attach the body supporter with 2
screws(4x10mm),
put the Door Camera into the grooves of
body supporter,
and then fix it with a screw(2.6x6mm).
After attach the body supporter with 2
screws(4x10mm), insert the upward
support into the upward groove of body
supporter, and then fix it with a
screw(2.6x6mm).
Looking “Upward” Installation
Looking “Downward” Installation
Straight Ahead Installation
After attach the body supporter with 2
screws(4x10mm), insert the Door Camera
into the downward control groove, and
then fix it
with a screw(2.6x6mm).
Standard Height of Door Camera
Standard height of the door camera is 1,400mm
1,450mm from the bottom of one camera to the floor.
In case that the height of Door camera exceeds the
range of min. 1,250mm1,550mm, it is
impossible to control the screen picture with only the
lens angle, and therefore, be careful of the height of
camera installation.
Downward control
groove
Upward control
groove
Upward control
groove
(unit:mm)
Door camera Installation
Bottom base of
One hall Box
Surface mount
Flush mount
bady support
Upward support
Wall
Screw(4x10mm)
Screw(2.6x6mm)
Camera Front
notice
Don’t install the set on a weak or ceiling surface such as plaster or press board, please install the set
on the hard wall or ceiling like firm timber or concrete.
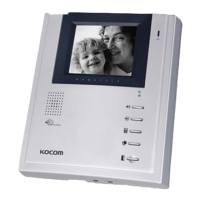
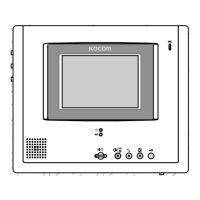
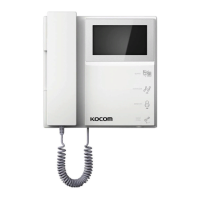
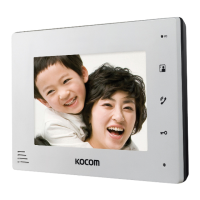
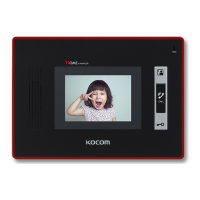
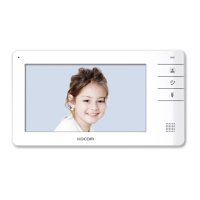
KIV-101 Monitor
KC-C61 Camera & KC-D30 Metal Pinhole Camera
C-Mic
To communicate
with camera or
guardroom
Communication Button
To communicate with
camera or guardroom
Priority
communication Button
To communicate with
camera first
Camera Button
To see the visitor
Guadroom Button
To communicate with
guardroom
Door Release Button
To open the door
Power Lamp
4 inch screen
To identify
visitor
Brightness Control Knob
To control brightness of
monitor screen
Contrast Control Knob
To control contrast of
monitor screen.
Call Signal
Volume Control
Knob
To control calling
signal volume.
Speaker Volume
Control Knob
To control speaker
volume.
AUTO-REC
C-Mic
To communicate with Monitor
Power Lamp
To check power ON/OFF status
Speaker
When visitor calls, the voice from monitor
comes out of the speaker.
Call Button
By pressing the button, the
related house will be called.
Camera Lens
Clear picture quality realized
by adopting 1/3" CCD
Option
Keep away from humidifier and
stove. High temperature and
humidity can cause breakdown.
When cleaning, never use wet
hands, volatile benzene or paint
thinner.
Keep picture clear by cleaning
camera window frequently with
soft cloths.
As this device consists of
electronic precision
components, and high voltage is
generated internally, do not
attempt to disassemble.
Do not drop monitor or door
camera, and avoid strong impact.
Keep away from devices
generating strong magnetic field
(TV, Speaker, etc.) (Picture can be
disturbed or blurred and breakdown
can result)
KC-C61 KC-D30
Power source
Power consumption
Ambient temperature
Braun tube
Communication system
Call signal sound
Output Impedance
Wiring
Max Wiring Distance
DC12V 1V(power from Monitor)
-10~50
Diagonal 120 Diagonal 90
0.1Lux (LED ON)
F:2.0, f=3.0mm F:3.5, f=3.8mm
95(W)127(H)34(D)mm 95(W)127(H)33(D)mm
Monitor Accessories
Screws for fixing
(4x25mm)
Wall hanger panel
Camera Accessories
Monitor & Camera
Main body supporter
Upword adjusting
Supporter for lens angle
Screw for fixing camera
to panel (2.6x6mm)
Screw for fixing camera
main body supporter
(4x25mm)
Upward adjusting
supporter for adjusting
lens angle upward
Specifications
MONITOR
(KIV-101)
CAMERA
(KC-C61)
Metal Pinhole
Camera
(KC-D30)
Power source
Ambient temperature
Angle of picture
Min. Illumination
Lens
Dimension
Power Built-in AC 120V 60Hz
Max.15W, Stand by : 1W
0~+50
4 inch Flat Tube (B/W)
Hands-free system
Camera:Ding-dong, guardroom: Melody
Picture : 75ohm, Voice : 600ohm
4 Wired in polarity / guardroom Wired in non-polarity
0.65 Single Cable/50m Guardroom:IV 0.9mm
Wiring Diagram
When system is attached to 1 rectangular switch box
Basic Installation method of Monitor
Standard height monitor
Wall hanger panel
for fixing Monitor
Wall hanger panel
for fixing Monitor
ScrewWall
1 Rec tangular
switch box
Standard height of monitor is ranged 1,450 ~ 1,500
from bottom to the center of monitor screen.
For installation, avoid the places where there is any
excessive humidity,magnetic force, dangerous
chemicals, direct ray of sun, and any places near a
heater which can cause break down.
Monitor Installation
(unit:mm)
Screw
Caution for wiring
Wiring between videophone and camera is 4 wire in polarity and use 0.65mm or more single cable
Connecting wiring between monitor and door camera should not be installed near other electrical cable,
norbe horizontal.(In such case, clear picture can not be expected due to interruption by electrical noise)
(Option)
Bottom of
1Rectangular
switch box
Center of monitor