LOADING
THECAMERA
Each
pack
of
KODAK
Instant
Color
Film
contai ns a fi
1m
cover and fi
1m
for
10
color
exposures. Before loadi ng the camera,
check
to see
that
the
rollers
contained
in
the film
door
are clean. If you see residue
or
any
foreign
material on the rollers, see
page
15
for
cleaning
instructions. Load the
camera
as
shown in steps 2 and 3 on the
inside
front
cover
.
We do not recommend removing and re-
inserting
a
partially
used
film
pack
(or a
full
pack
after
the
film
cover
has been
ejected)
because at least one
of
your
pic-
tures
will
be
spoiled
. Also, when you re-
insert the
pack
, the
exposure
counter
will
be reset to
[!)
.
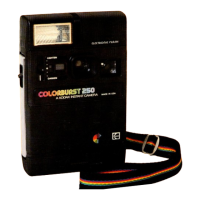
VIEWFINDER
Hold the
camera
up to
your
eye in a com-
fortable
position
so that the
rubber
EYECUP
rests against
your
face
and you can see all
four
corners
of
the
VIEWFINDER
. The area
that
you see
within
the
viewfinder
will
be
included
in
your
picture.
The red
caution
light, located at the
top
of
the
viewfinder
, may
appear
as you
pa
rtially
depress
the
shutter
release. See
page 7
for
important
information.
4
TAKING
PICTURES
1. Be sure
that
your
subject
is at least 4
feet from the
camera
.
2.
Check
to see
that
the
LIGHTEN/DAR
K
EN
CONTROL
is in the
center
position
. Most
of
your
pictures
will
be taken
with
the
con-
trol
in
this
position
. (See page 8.)
3.
Frame
your
subject
within
the
view-
finder. Keep
your
fingers away from the
lens and the
ELECTRIC
EYES
.
4.
Hold the
camera
steady and
partially
depress
the
shutter
release. If the red cau-
tion
light
doesn't
appear
in the
viewfinder
,
slowly
press the
shutter
release
down
and
allow
it to return. If the red
light
appears,
see page 5.
5. The
print
will
be
automatically
ejected
from the camera. Don't
obstruct
the
exit
slot
with
your
fingers
or
by resting the bot-
tom
of
the camera on any s
urface
as the
print
is ejected.
NOTE: Be sure not to depress the
shutter
release again
while
the
camera
motor
is
running, as this may spoil
your
picture
.
6. When the
motor
has
fully
ejected
the
print
,
simply
grasp
the
print
by the bottom
edge and remove it from
the
slot
before
taking
another
picture.
The exposure
coun
t
er
will
indicate
the
numbers
of
the exposures from 1
through
10
as
you take
pictures
.
Don't
leave
prints
in
direct
sunlight
or
on a
hot
surface
during
development
or
they
will
become
too
dark.
An image
will
begin
to
appear
in about
30 seconds
under
normal
temperature
conditions
.
IMPORTANT:
Handle
prints
with
care
,
especially
during
the
first
10
minutes
after
exposure
. Hold them by
the
borders
, and
never bend,
cut
,
or
attempt
to
fold
them.
See " Caution
,"
page 14.
 Loading...