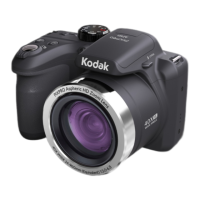
Why does my Kodak PIXPRO AZ521 Digital Camera turn off suddenly?
- MMary SkinnerSep 4, 2025
If your Kodak Digital Camera turns off suddenly during operation, the batteries may be depleted. Recharge the battery to resolve this issue.
Why does my Kodak PIXPRO AZ521 Digital Camera turn off suddenly?
If your Kodak Digital Camera turns off suddenly during operation, the batteries may be depleted. Recharge the battery to resolve this issue.
Why does the flash flash on the LCD screen of Kodak Digital Camera?
If the flash flashes on the LCD screen of your Kodak Digital Camera, it means the current shooting environment requires flash. Turn on the flash.
Why Kodak PIXPRO AZ521 says too many movies to process?
If your Kodak Digital Camera displays 'Too many movies to process', it means the number of pictures or folders in the memory card exceeds the specifications. Delete unwanted files to resolve this.
Why is saving data to memory card slow on Kodak PIXPRO AZ521 Digital Camera?
If your Kodak Digital Camera is slowly saving data to the memory card, it might be because you're using a memory card below Class 4. Using a memory card with write Class higher than 4 should improve performance.
What to do if images will not print from Kodak PIXPRO AZ521 Digital Camera?
If your Kodak Digital Camera is not printing from the connected printer, first check the connection between the camera and the printer. Ensure you are using a PictBridge compatible printer. Also, make sure the printer has paper and ink, and check for and remove any jammed paper.
Why does the flash flash on the LCD screen of my Kodak PIXPRO AZ521?
If the flash flashes on the LCD screen of your Kodak Digital Camera, the current shooting environment requires flash. Turn on the flash.
What causes 'Too many movies to process' error on Kodak PIXPRO AZ521?
If you are getting a 'Too many movies to process' error on your Kodak Digital Camera, the number of pictures or folders in the SD memory card exceed the specifications, so the playback of data folder can not be displayed. Delete unwanted files to resolve this.
Why is saving data to memory card slow on my Kodak Digital Camera?
If saving data to the memory card is slow on your Kodak Digital Camera, using a memory card below Class 4 may result in slower recording times. Use an SD card with write Class higher than 4 to improve performance.
Why won't my Kodak PIXPRO AZ521 Digital Camera print to my printer?
If images will not print from your Kodak Digital Camera to the connected printer, check the connection between the camera and printer. The printer may not be PictBridge compatible, so use a PictBridge compatible printer. Also, ensure the printer has paper and ink, loading paper or replacing the ink cartridge if needed. Finally, check for and remove any jammed paper in the printer.
How to fix a Kodak PIXPRO AZ521 that does not turn on?
If your Kodak Digital Camera doesn't turn on, it could be due to a depleted battery. Try recharging the battery. Alternatively, the battery might not be inserted correctly. Ensure the battery is correctly reinstalled.
Statement of compliance with regulations for product safety and standards.
Guidelines for safe handling and operation of the camera to prevent damage or injury.
Precautions for the safe use, handling, and disposal of the camera's battery.
Guidelines for safe handling, use, and care of memory cards to prevent data loss or damage.
Additional safety precautions for operating the camera in various situations and environments.
Lists the items included in the camera package for initial setup and use.
Instructions for attaching the lens cap and neck strap to the camera for protection and portability.
Identification of the different buttons, controls, and features of the camera body.
Step-by-step guide on how to properly insert the battery and memory card into the camera.
Procedure for connecting the camera to a power source for charging the battery.
How to power the camera on and off for operation and standby modes.
Explanation of icons and symbols used in the camera's interface for better understanding.
Guide for setting the camera's language, date, and time after initial setup.
Instructions on how to change or reset the camera's language settings.
Procedure to correct or update the camera's date and time settings.
Options to customize the information displayed on the camera's LCD screen during shooting.
Overview of the icons and information presented on the camera's LCD screen in photo mode.
Detailed explanation of icons representing different shooting modes and camera settings.
Explanation of icons displayed on the LCD screen when recording video.
Description of icons shown on the LCD screen when viewing photos and videos.
Guide to navigating and selecting different shooting modes using the camera's mode dial.
Instructions for using the camera's automatic mode for simple, point-and-shoot photography.
How to use Program AE mode for flexible control over exposure settings like ISO and EV.
Guide to setting shutter speed manually while the camera adjusts aperture for correct exposure.
How to adjust aperture manually while the camera sets shutter speed for desired depth of field.
Comprehensive guide to manually controlling all camera settings for creative photography.
Using the mode to enhance facial features like skin softness and eye brightness in portraits.
Steps for capturing and stitching multiple images to create a wide panoramic photo.
Selecting pre-set shooting modes optimized for specific scenes and lighting conditions.
Storing and recalling frequently used shooting modes and parameter settings for quick access.
How to use the optical and digital zoom levers to magnify subjects while composing shots.
Selecting different autofocus methods like Single-AF, Multi-AF, and Object Tracking.
Enabling macro mode for close-up photography of small subjects with precise focusing.
Using the self-timer for delayed shots, including smile detection for automatic capture.
Selecting various flash modes such as Auto, Force Flash, Slow Sync, and Red-Eye Reduction.
Adjusting color temperature to accurately represent colors under different lighting conditions.
Capturing multiple shots in quick succession, including high-speed and time-lapse options.
Adjusting exposure value to control image brightness and overall exposure compensation.
Fine-tuning picture brightness for high-contrast scenes to achieve balanced exposure.
Setting the camera's sensitivity to light, affecting image brightness and noise levels.
Controlling shutter speed to freeze motion or create motion blur effects for dynamic photography.
Adjusting the lens aperture to control depth of field and light exposure for creative effects.
Starting and stopping video recording quickly using the dedicated shortcut button.
Accessing and adjusting image color effects and other quick settings via the 'i' button.
Methods for reviewing and navigating through captured photos and video clips on the camera.
Displaying multiple small preview images of photos and videos for quick browsing.
Magnifying still pictures during playback to examine details or specific areas of the image.
Procedure for deleting unwanted photos and video clips from the camera's memory.
Viewing stored images automatically in a sequence as a slideshow presentation.
Playing back sequences of continuously captured photos as a group for review.
Viewing captured panoramic images with animation effects, showing the shooting direction.
Accessing and configuring various shooting parameters through the camera's menu system.
Selecting image resolution for printing and storage, balancing quality with file size.
Activating Optical Image Stabilization to reduce blur caused by camera shake.
Enabling continuous autofocus for tracking moving subjects during shooting.
Using High Dynamic Range to capture detail in both bright and dark areas of a scene.
Applying beauty effects to portraits, such as skin softening and eye brightening.
Selecting specific scene modes (e.g., Night Portrait, Landscape) for optimized shooting.
Accessing detailed settings within shooting modes for fine-tuning exposure and image parameters.
Using the AF-assist beam to improve focus accuracy in low-light conditions.
Enabling or disabling digital zoom to extend focal range beyond optical limits.
Adding date and time stamps directly onto captured photos.
Setting the duration for immediate post-capture review of photos on the LCD screen.
Saving current shooting mode and parameters for quick recall and application.
Accessing and configuring settings specific to video recording, such as exposure metering.
Selecting the resolution and frame rate for video recording, affecting quality and file size.
Configuring advanced settings for video recording, including digital zoom and playback options.
Accessing and managing playback options such as display modes and file sorting.
Applying High Dynamic Range processing to photos to improve detail in highlights and shadows.
Correcting red-eye effect in photos by applying a pre-flash or post-capture retouch.
Changing the orientation of a photo by rotating it 90 degrees clockwise or counter-clockwise.
Adjusting the dimensions of a photo to a new resolution, saving it as a separate file.
Changing the picture's color effect during playback using the 'i' button menu.
Configuring various playback options, including display modes and file management.
Locking photos and videos to prevent accidental deletion, with options for single files or groups.
Removing photos and video files from the camera's memory, with options for single or bulk deletion.
Selecting photos for printing via DPOF on a memory card for direct printing.
Cropping photos to adjust composition and saving the trimmed image as a new file.
Accessing general camera settings like sound, power saver, language, and date/time.
Adjusting the camera's audio feedback, including volume levels for operations and alerts.
Configuring automatic power-off timers for the LCD screen and camera to conserve battery.
Setting or changing the camera's display language for menus and messages.
Displaying local time in different time zones for international travel convenience.
Setting or adjusting the camera's date and time for accurate photo metadata.
Adjusting the brightness of the LCD screen for optimal visibility in different lighting conditions.
Erasing all data from the memory card and internal memory, including protected files.
Transferring files from the camera's internal memory to an SD memory card.
Resetting the file numbering sequence for newly saved photos and videos.
Restoring camera settings to their original factory defaults to resolve issues.
Checking the current firmware version of the camera and options for updating.
Using a USB cable to connect the camera to a computer for transferring photos and data.
Configuring the camera's USB port to connect to a PC or a printer.
Steps for copying photos and videos from the camera to a computer via USB connection.
Adjusting video output settings (NTSC/PAL) for connecting the camera to a TV.
Information on connecting the camera to TVs using HDMI for high-quality video output.
Enabling wireless connection for Eye-Fi memory cards for photo transfer.
Procedure for connecting the camera to an HDMI-compatible television for viewing.
Printing photos directly from the camera to a PictBridge-compatible printer without a PC.
Configuring USB mode for printer connection to ensure successful PictBridge printing.
Steps for establishing a physical connection between the camera and a printer via USB.
Navigating the PictBridge menu to select printing options and start the printing process.
Printing photos with embedded date and time information, as recorded by the camera.
Printing photos without any date or time stamps, for a cleaner image presentation.
Printing an index sheet containing small previews of all photos stored on the camera.
Printing selected photos based on DPOF settings stored on the memory card.
Exiting the PictBridge menu and disconnecting the USB cable safely.
Detailed technical specifications of the camera, including sensor, lens, and dimensions.
| Brand | Kodak |
|---|---|
| Model | PIXPRO AZ521 |
| Category | Digital Camera |
| Language | English |
