AUFSTELLANLEITUNG
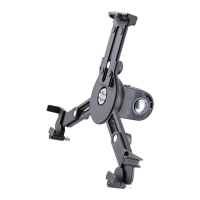
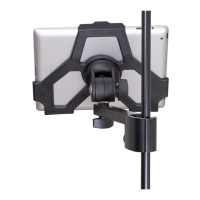
19744 Tablet-PC-Stativhalter
19744 »Biobased«
BESTIMMUNGSGEMÄSSER GEBRAUCH
- Universeller Tablet-Halter für alle Tablets mit einer Größe von ca. 10" bis 16"
- Besonders geeignet auch für Tablets mit Schutzhülle oder Case bis zu 20 mm
- Mit Tragarm und Klammer zur seitlichen Befestigung an Stativen, Rohren, Stangen
MERKMALE & FÄHIGKEITEN
- Flexibel und solide! Ihr Tablet-PC wird wunderbar in Szene gesetzt
- Gleichermaßen geeignet für Bühne, Heim, Proberaum und Studio
- Die Klemmmechanik (inklusive seitlichem Sicherungswinkel) ermöglicht
- die einfache, effektive und sichere Montage Ihres Tablet-PC.
- Übergreifende Klemmbacken mit integrierter Moosgummiauflage sorgen
- für sicheren Halt, eliminieren Vibrationsgeräusche und schützen das Tablet-Gehäuse
- Mit 3/8" bzw. 5/8" Innengewinde auf jedes Mikrofonstativ aufschraubbar
- Mit Verstellmöglichkeiten die keine Wünsche offenlassen:
- Tablet-Größe, Neigungswinkel, Ausrichtung, Hoch/Querformat: alles individuell einstellbar
- Klemmbereich: Höhe 158-280 mm, Breite 150-330 (430) mm, Tiefe max. 20 mm
SICHERHEITSHINWEISE
- Das Stativ muss ausreichend standfest sein und über einen passenden Gewindebolzen verfügen:
- z.B. K&M-Mikrofonstative 199, 200, 21020, 21090, 210/6, 210/8, 252, 259, 260, 260/1, 27105 etc.
- Halterung ordnungsgemäß auf Stativ schrauben: wir empfehlen ca. 3 Umdrehungen
- Das Tablet wie beschrieben sorgfältig in der Halterung befestigen und auf sicheren Sitz prüfen
- Halterung umsichtig handhaben; v.a. bei Änderungen der Einstellungen (Neigung, Format und
- Ausrichtung) ist auf sicheren Halt des Tablets zu achten
Vielen Dank, dass Sie sich für dieses Projekt entschieden haben. Bitte lesen und beachten Sie sorgfältig diese
Anleitung. Sie informiert Sie über alle wichtigen Schritte die für einen sicheren Aufbau und Betrieb erforderlich
sind. Wir empfehlen, sie auch für den späteren Gebrauch aufzubewahren.
1. BESTANDTEILE
2. MONTAGE des SCHWENKGELENKS am STATIV
3. HALTERUNG VOREINSTELLEN
4. SICHERUNGSWINKEL
4. EINSETZEN
STATIV VORBEREITEN (s.o.: Sicherheitshinweise)
1. BESTANDTEILE
Bitte Sichtprüfung vornehmen, ob alle Teile
vorhanden und in Ordnung sind - soweit erkennbar.
a SCHWENKGELENK
a (mit Stativ-Anschlussgewinde)
b TABLET-HALTERUNG
b (Grundkörper, Schieber, Klemmung)
c SICHERUNGSWINKEL
c (mit Filz und Gummikappe)
2. MONTAGE des SCHWENKGELENKS
2. am STATIV
2.1 Verfügt das Stativ über eine Rändelscheibe
2.1 so wird diese zunächst bis zum Anschlag auf
2.1 den Gewindebolzen gedreht
2.2 SCHWENKGELENK a nun ebenfalls auf
2.2 den Gewindebolzen des Stativs schrauben
2.2 - nicht ganz bis zum Anschlag
2.2 (ca. 2 - 3 Umdrehungen)
2.3 Rändelscheibe wieder zurückdrehen, so
2.3 dass diese mit dem Schwenkgelenk spielfrei
2.3 verspannt ist
2.4 Flügelmutter festziehen
3. HALTERUNG VOREINSTELLEN
3.1 Klemmmutter etwas lösen…
3.2 …und Schieber bis zum Anschlag ausfahren
3.3 Klemmmutter wieder festziehen
4. SICHERUNGSWINKEL EINSETZEN
4.1 SICHERUNGSWINKEL c in die
4.1 entsprechende Aussparung des
4.1 SCHWENKGELENKS a einlegen.
HINWEISE:
4.2 Die Position des Winkels so wählen,
4.2 dass das Tablet-PC mittig auf der
4.2 Halterung sitzt und seitlich am
4.2 Gummi des Winkels anschlägt
4.2 (siehe auch Kapitel 8)
4.3 Der Sicherungswinkel sollte mit
4.3 mindestens 2 Bohrungen im
4.3 Schwenkgelenk abgesteckt sein.