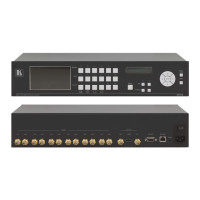
Viewing the Window/Input Display:
When MV-6 is powered on, the unit performs a self-test and then, the display shows the letters of each output window and,
underneath each letter, the input that corresponds to that window:
Adjusting the Size of an Output Window:
1. Press the relevant WINDOW button.
The selected button lights.
2. Press either the H Size or V Size button to adjust the width or height of the selected window.
3. Use the left (◄) and right (►) buttons to adjust the window width and use the up (▲) and down button (▼) to adjust
the window height.
4. Press MENU twice to exit the window size setting.
Adjusting the Position of a Window:
1. Select the required window by pressing the relevant WINDOW button.
The selected button lights.
2. Press either the H POSITION or V POSITION button to move the window.
3. Use the left (◄) and right (►) buttons to move the window horizontally and use the up (▲) and down button (▼) to
move the window vertically.
4. Press MENU twice to exit the window position setting.
Defining and Saving a Custom Window Layout:
1. Adjust the windows to the required configuration.
2. Press and hold either the U1 or U2 LAYOUT button until the button flashes once.
The window layout is stored in the relevant memory.
Loading a Window Layout:
Press one of the four predefined LAYOUT buttons or one of the two user-defined LAYOUT buttons (U1 or U2) to load a
window layout onto the screen.
The selected button flashes three times and the relevant window layout is displayed on the screen.