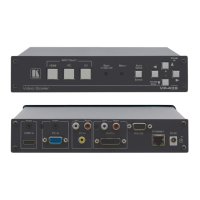
5.3 Connecting to the VP-439 via RS-232
You can connect to the VP-439 via an RS-232 connection using, for example, a
PC. Note that a null-modem adapter/connection is not required.
To connect to the VP-439 via RS-232, connect the RS-232 9-pin D-sub rear panel
port on the product unit via a 9-wire straight cable (only pin 2 to pin 2, pin 3 to pin 3,
and pin 5 to pin 5 need to be connected) to the RS-232 9-pin D-sub port on your PC
5.4 Operating via Ethernet
You can connect to the VP-439 via Ethernet using either of the following methods:
Directly to the PC using a crossover cable (see Section 5.4.1)
Via a network hub, switch, or router, using a straight-through cable (see
Section 5.4.2)
Note: If you want to connect via a router and your IT system is based on IPv6,
speak to your IT department for specific installation instructions.
5.4.1 Connecting the Ethernet Port Directly to a PC
You can connect the Ethernet port of the VP-439 directly to the Ethernet port on
your PC using a crossover cable with RJ-45 connectors.
After connecting the VP-439 to the Ethernet port, configure your PC as follows:
1. Click Start > Control Panel > Network and Sharing Center.
2. Click Change Adapter Settings.