VS-211X / VS-411X Quick Start
VS-211X and VS-411X Quick Start Guide
This guide helps you install and use your VS-211X / VS-411X for the first time.
Go to www.kramerav.com/downloads/VS-411X to download the latest user manual and check if firmware
upgrades are available.
Step 1: Check what’s in the box
VS-211X / VS-411X 4K Auto Switcher
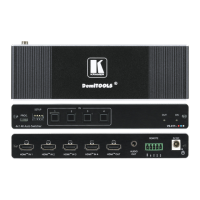
Step 2: Get to know your VS-211X / VS-411X
The terms HDMI, HDMI High-Definition Multimedia Interface, and the HDMI Logo are trademarks or registered trademarks of HDMI Licensing Administrator, Inc.
Connect to upgrade the firmware.
Set the operation DIP-switches (see Setting the DIP-Switches).
Press to select an HDMI input (button lights orange).
Lights green when an HDMI output is connected.
Lights green when the device receives power.
Connect to an HDMI source (2 for VS-211X, 4 for VS-411X).
Connect to an HDMI acceptor.
AUDIO OUT3.5mm Mini Jack
Connector
Connect to an unbalanced stereo audio acceptor.
REMOTE IN Terminal block Connector
Connect to contact closure switches by momentary contact between the desired
pin and common GND pin to select an input.
Connect to the power supply and to the mains electricity.
Step 3: Install VS-211X / VS-411X
Install VS-211X / VS-411X using one of the following methods:
• Attach the rubber feet and place the unit on a flat surface.
• Fasten a bracket (included) on each side of the unit and attach it to a flat surface
(see www.kramerav.com/downloads/VS-411X).
• Mount the unit in a rack using the recommended rack adapter
(see www.kramerav.com/product/VS-411X).
• Ensure that the environment (e.g., maximum ambient temperature &
air flow) is compatible for the device.
• Avoid uneven mechanical loading.
• Appropriate consideration of equipment nameplate ratings should be
used for avoiding overloading of the circuits.
• Reliable earthing of rack-mounted equipment should be maintained.
• Maximum mounting height for the device is 2 meters.