# Feature Function
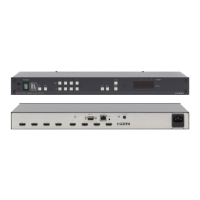
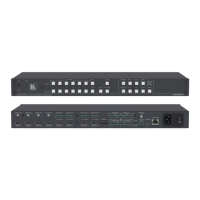
INPUT 1–4 HDMI Input Connectors
Connect to up to four HDMI sources.
11 REMOTE IR Opening Connect to an external IR receiver for controlling the device via an IR remote controller.
Covered by a cap. The 3.5mm mini jack at the end of the internal IR connection cable fits
into this opening.
12 REMOTE INPUT TO OUT 1
4-pin Terminal Block + Ground
Connect to up to four remote, contact-closure input selection switches for Output 1.
13 REMOTE INPUT TO OUT 2
4-pin Terminal Block + Ground
Connect to up to four remote, contact-closure input selection switches for Output 2.
RS-232 3-pin Terminal Block
Connect to a PC/serial controller.
15 SETUP 8-way DIP-Switch Sets the device configuration.
Connect to a PC to upgrade the firmware.
17 FACTORY PROG
VIA RS-232 Upgrade Switch
Press to upgrade the firmware via the RS-232 port, release for normal operation.
Connect to a PC via a LAN.
19 RESET Switch Press while power-cycling the device to reset to factory default parameters.
Connect to the power adapter, center pin positive.
21 OUT 1 and OUT 2 HDMI Output
Connectors
Connect to up to two HDMI acceptors.
Step 3: Install VS-42H2
Attach the rubber feet and place on a table or mount VS-42H2 in a rack (using an optional RK-T2B rack mount).
Step 4: Connect the inputs and outputs
switch OFF the
power on each device
before connecting it to your
VS
-42H2. For best results,
we recommend that you
always use Kramer high
-
performance cables to
connect AV equipment to
VS
-42H2.

 Loading...