Rev. Date: 3/14/18 Page 13
MODEL #500
Electrical Operation
PRESS KILL SWITCH TO IMMEDIATELY STOP MACHINE AT ANY TIME!
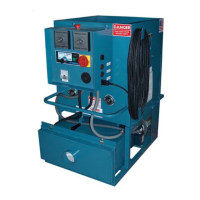
1. Make sure Kill Switch is out by pulling. (See illustration G)
2. Turn red Main Disconnect Switch to ON position. (See illustration G)
3. Set 4-Position Selector Switch to OFF. (See illustration G)
4. Press green start Button. Machine will not run unless start button is pressed after Kill Switch is out and red Main
Disconnect Switch is on. (See illustration G)
5. Select operating mode on 4-Position Selector Switch from one of the following options:
Remote: Remote control hand pendant will control machine.
Off: Machine will not run. (overrides remote hand pendant)
Blower: Only the blower will run continuously. (manual control at machine)
Agitator-Feed/Blower: Both the blower and the agitator-feed will run continuously. (manual control at machine)
Main Control Panel (lid closed)
6. When operating in Remote mode, the 4-Position Selector Switch must be set to Remote position. (See illustration G)
7. Remote control hand pendant positions will be selected from the following:
BLOWER-FEED - operates both blower motor and agitator-feed motor simultaneously
OFF - (middle position) all functions stop
BLOWER - operates the blower motor only
8. If using optional Internal Wetting System (IWS), connect IWS cord to 24 VAC Outlet on Main Control Panel.
9. Adjust blower(s) and slidegate to desired settings. (See page 14)
Main Control Panel (lid open)
(illustration I)
10. To adjust alarm time, follow the procedure below: (See illustration I)
a) Unplug machine from power source.
b) Turn off red Main Disconnect Switch, loosen two screws in door,
and open Main Control Panel lid.
c) Turn Timer Relay knob to desired setting. (clockwise to increase
warning time)
d) Close lid, tighten two screws in door, plug in machine, turn on red
Main Disconnect Switch and press green Start Button.
e) Retest machine.
(illustration H)
(illustration G)