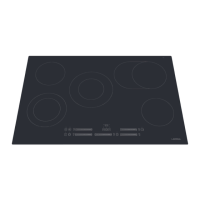
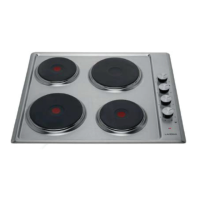
This document describes the Lamona LAM1704 Ceramic Side Control Hob, an appliance designed for domestic cooking purposes.
Function Description:
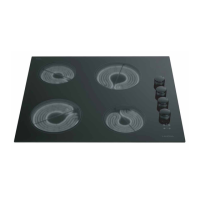
The Lamona LAM1704 is a ceramic hob with four radiant cooking zones, controlled by side-mounted knobs. It is intended for built-in installation in a worktop and provides various heat settings for different cooking needs, including warming, simmering, frying, and boiling. The appliance is designed to be electrically isolated by a switch after installation.
Important Technical Specifications:
- Model: LAM1704
- Type of Hob: Electrical, Radiant Cooking Zone
- Number of Cooking Zones: 4
- Total Electric Power: 4875 - 5800 W
- Supply Voltage: 220V - 240V~50Hz
- Cable Type: H05V2V2 2.5mm², 3 core (1.4m)
- Outer Dimensions:
- Width: 580(+2)mm
- Depth: 510(+2)mm
- Height: 71mm
- Cutout Dimensions:
- Width: 560mm
- Depth: 490mm
- Cooking Zone Wattage and Diameter:
- Front Left Zone: Ø180-1700W (suitable for 7" or 18cm diameter saucepan)
- Rear Left Zone: Ø140-1200W (suitable for 6" or 15cm diameter saucepan)
- Front Right Zone: Ø140-1200W (suitable for 6" or 15cm diameter saucepan)
- Rear Right Zone: Ø180-1700W (suitable for 7" or 18cm diameter saucepan)
- Energy Consumption (per cooking zone):
- Front Left Zone: 194.3 Wh/kg
- Rear Left Zone: 194.1 Wh/kg
- Front Right Zone: 194.1 Wh/kg
- Rear Right Zone: 194.3 Wh/kg
- Energy Consumption (total hob): 194.2 Wh/kg
Usage Features:
- Controls: Each cooking zone has a dedicated side-mounted rotary knob. Rotating the knob in either direction switches on the zone and allows selection of one of 6 fixed heat settings.
- Heat Settings:
- Setting 1: Warming
- Settings 2-3: Simmering
- Settings 4-5-6: Frying/Boiling
- Hot Hob Indicator Lights: These lights indicate which zone is operating and/or hot. They turn off when the zone's surface temperature drops below 64°C. A red indicator light on the control panel illuminates when any heating zone is active.
- Pan Sizing: Always match the pan size to the heat zone; do not use large pans on small zones or vice versa. Pans should be positioned over the center of the heat zone. Never use pans smaller than 100mm (4") or larger than 250mm (10").
- Safety Precautions:
- Accessible parts become hot during use; avoid touching heating elements.
- Children under 8 years old should be kept away unless continuously supervised.
- Cooking processes should be continuously supervised.
- Do not spray aerosols near the appliance during operation.
- Do not store or use flammable liquids or items near the appliance.
- Do not use steam cleaners.
- Turn pan handles to a safe position to prevent knocking over or grabbing by children.
- Never use double pans, rim-based pans, old or misshapen pans, or any pan that is not stable on a flat surface.
- Avoid commercial simmering aids or heat diffusers as they can damage the hob surface.
- Do not use the hob for purposes other than cooking food.
- Never store items or leave plastic utensils on or near the hob.
- Never leave a cook zone on without a pan covering it.
- Do not use the hob surface as a chopping board or food preparation area.
- Do not place metal cooking utensils, cutlery, knives, or other metal objects on the hob.
- Never leave aluminum foil on the hob top.
- Never heat a sealed tin of food on the hob.
- Never leave pans overhanging the edge of the hob.
- Only use hob guards designed by the manufacturer.
- The appliance is not intended for operation by external timers or remote control systems.
- Do not modify the appliance.
- Never leave cooking fat or oil unattended.
- If the glass surface is cracked or broken, do not use the appliance due to the risk of electric shock.
Maintenance Features:
- Cleaning the Hob Top:
- Clean with a clean, damp cloth or kitchen paper.
- Avoid used dishcloths or sponges, which can leave a film leading to discoloration.
- Ensure elements are fully cooled before cleaning to prevent steam burns.
- A specialist ceramic cleaner can be used sparingly to restore the surface, followed by polishing with a dry, clean cloth.
- For stubborn marks, a specialist hob scraper can be used.
- Do not use abrasive products, bleach, hob cleaner spray, pan scourers, steam cleaners, or high-pressure cleaning equipment.
- Regular cleaning prevents salt and mineral accumulation and discoloration.
- Wipe up spillages as soon as possible.
- Clean regularly to prevent grease buildup, which can be a fire hazard.
- Immediately remove foods with high sugar content (toffee, fruit juice, jam, etc.) that boil over or spattered sugar stains using a scraper, even if hot.
Installation Requirements:
- Installation must be carried out by a qualified installer or engineer in accordance with local regulations.
- Visually check the product for damage before installation.
- The hob is designed for installation in Howdens kitchen cabinets.
- Surfaces, synthetic laminates, and adhesives used must be heat resistant.
- Kitchen cabinets must be level and fixed.
- If a drawer is beneath the oven, a shelf must be installed between the oven and drawer.
- Clearances:
- Minimum distance between carcasses must be equal to the width of the hob.
- 400mm minimum clearance above the hob.
- 55mm minimum clearance from the side.
- 50mm minimum clearance between the rear edge of the hob and the rear wall (or >60mm to the cut-out aperture). This clearance must be maintained up to 650mm above the worktop.
- No shelf or overhang of combustible material closer than 650mm directly above the hob.
- Minimum height to extractor as recommended in the extractor instruction manual.
- Worktop Preparation:
- Apply a special varnish or adhesive to the cut edge to protect and seal it from moisture ingress.
- Place the hob in the aperture, ensuring it covers the worktop on all four sides and the front edge is parallel with the worktop front.
- Secure the hob to the worktop using the provided brackets, accounting for worktop thickness.
- Self-Adhesive Seal: Apply the self-adhesive seal to the underside edges of the hob glass, as close to the edge as possible, trimming at corners for a neat join. Do not use silicone sealant instead of the self-adhesive seal.
- Installation Above an Oven: If installed above an oven, leave at least 15mm of ventilation, unless specified otherwise in oven installation guidelines.
- Installation Without an Oven Below: If the underside of the hob is accessible, a wooden shield must be installed at least 15mm below the hob unit.
- Electrical Connection:
- Ensure electricity supply is switched off before connecting.
- Connect to fixed wiring via a double pole switched outlet with at least 3mm contact separation. The isolation switch must be accessible after installation.
- An RCD device is recommended for additional protection.
- Connection should be done by a qualified electrician.
- The mains lead wires are colored as follows: Blue (Neutral), Brown (Live), Green and Yellow (Earth).
- Connect Blue to the terminal marked 'N' or 'BLACK'.
- Connect Brown to the terminal marked 'L' or 'RED'.
- Connect Green and Yellow to the terminal marked with the earth symbol.
- The mains lead must not be clamped, bent, trapped, or come into contact with hot parts of the appliance.
- If the mains lead is damaged, it must be replaced by a qualified person (cable not longer than 2m for safety reasons). It should be routed away from the appliance and not trapped between the appliance and the wall.
Guarantee:
The appliance comes with a comprehensive manufacturer's guarantee covering breakdown repairs, valid with proof of purchase. The guarantee requires correct installation and operation for normal domestic purposes. It does not cover accidental damage, misuse, alterations, or repairs by unauthorized persons. The product's model and serial number are located on the base of the hob.