LMH Series Rotary Lasers • 17
5. LMH SERIES BATTERY REPLACEMENT
When the Battery Low LED is lit (Fig. 7), or the
LMH operates erratically, replace the batteries.
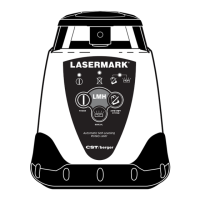
1: Remove the battery tray by unscrewing the
plastic nut around the mounting thread on the
bottom of the unit (Fig. 8).
2: Remove the old batteries and replace with four
new “D” cell Alkaline batteries.
3: Replace the battery tray. Make sure the battery
contacts between the battery pack and the unit compartment
are aligned.
NOTE: Do not mix old and new batteries. Replace all batteries
at the same time with new batteries. Remove batteries before
storage of the instrument.
Rechargeable Battery Pack
When using a rechargeable battery pack
(included with Cat. #57-LMHD [120V] or
#57-LMHE [230V]), the batteries will
begin to perform optimally after fi ve full
charges and discharges.
You may charge the battery pack within
the LMH. Ensure that the power is off,
and connect the charging plug to the
charging jack on the bottom of the
battery pack. Then plug the charger into
the appropriate 120/230V AC outlet.
Charge time is typically around 8 hours.
The LMH can be charged and used at the
same time, but only a minimal charge will
be applied to the battery pack.
Fig. 8
Fig. 7