EasyManua.ls Logo

Leica Z2X - Setting Data Back Parameters; Configuring Date and Time Imprinting

Leica Z2X
47 pages
Print Icon
To Next Page IconTo Next Page
To Previous Page IconTo Previous Page
Loading...
iF:ff
EI
,5;l'5
I
ll
['5
I
'5-f
fi f-i
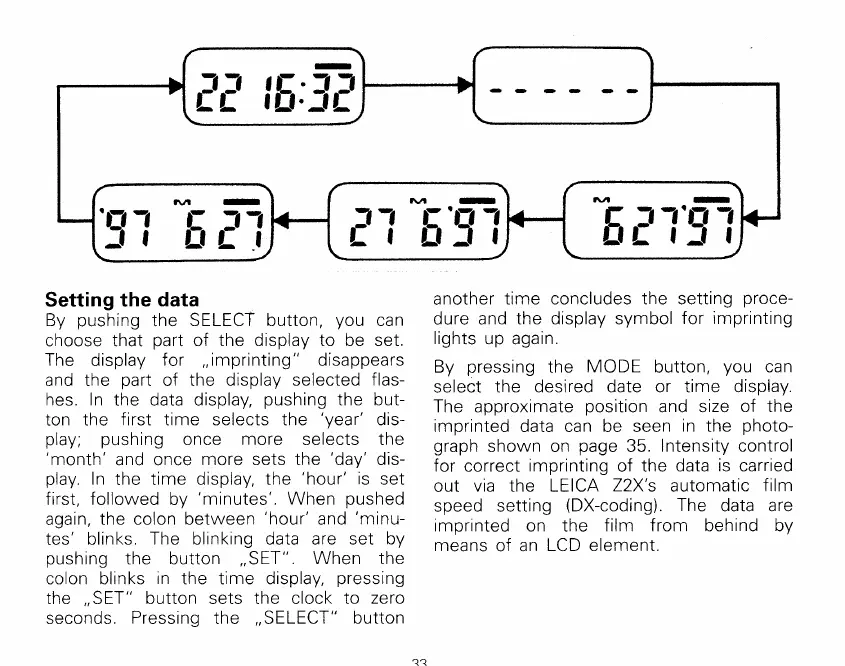
Setting the
data
By
pushing
the
SELECT button,
you
can
choose that
part
of
the display to be set.
The
display
for,,imprinting" disappears
and the
part
of the display
selected flas-
hes. In
the data display,
pushing
the but-
ton the
first time selects the
'vear'
dis-
play;
pushing
once more selects the
'month'
and once
more sets the
'day'
dis-
play
In
the time
display, the
'hour'
is
set
first, followed by
'minutes'.
When
pushed
again,
the colon between
'hour'
and
'minu-
tes'blinks.
The blinking data are set by
pushing
the button
,,
SET"
. When
the
colon blinks
in
the time display,
pressing
the
,,SET"
button sets the clock to
zero
seconds.
Pressing
the,,SELECT"
button
another
time concludes the setting
proce-
dure and
the display symbol
for imprinting
lights
up again.
By
pressing
the
MODE
button,
you
can
select
the desired date or time display.
The approximate
position
and size
of the
imprinted data can be seen
in the
photo-
graph
shown on
page
35.
lntensity control
for correct
imprinting
of the data
is carried
out via the LEICA
72X's
automatic
film
speed setting
(DX-coding).
The
data are
imprinted
on the
f ilm f rom behind by
means
of an
LCD element.