Page 53
V- SYSTEMS SERVICE CHECKS
A-Cooling System Service Checks
LCH units are factory charged and require no further adjust
ment; however, charge should be checked periodically using
the approach method. The approach method compares actual
liquid temperature with the outdoor ambient temperature. See
section IV- CHARGING.
VI-MAINTENANCE
The unit should be inspected once a year by a qualified ser
vice technician.
Electric shock hazard. Can cause
injury or death. Before attempting to
perform any service or maintenance,
turn the electrical power to unit OFF
at disconnect switch(es). Unit may
have multiple power supplies.
WARNING
!
CAUTION
Label all wires prior to disconnection when servicing
controls. Wiring errors can cause improper and danger
ous operation. Verify proper operation after servicing.
A-Filters
Units are equipped with temporary filters which must be
replaced prior to building occupation. See table 27 for
correct filter size. Refer to local codes or appropriate ju
risdiction for approved filters.
Approved filters should be checked monthly and replaced
when necessary. Take note of air flow direction marking on
filter when reinstalling filters.
TABLE 27
Unit Qty Filter Size - inches (mm)
036, 048 4 16 X 20 X 2 (406 X 508 X 51)
060, 072, 074 4 20 X 20 X 2 (508 X 508 X 51)
NOTE-Filters must be U.L.C. certified or equivalent for use
in Canada.
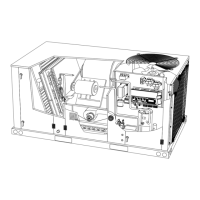
FIGURE 15
REMOVE FILTERS
PULL TO
REMOVE
FILTERS
B-Lubrication
All motors are lubricated at the factory. No further lubrica
tion is required.
C-Evaporator Coil
Inspect and clean coil at beginning of each cooling season.
Clean using mild detergent or commercial coil cleanser.
Flush coil and condensate drain with water taking care not to
get insulation, filters and return air ducts wet.
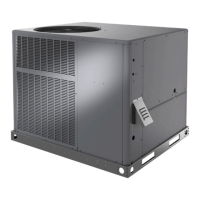
FIGURE 16
CLEAN CONDENSER COIL
TOP VIEW
CONDENSER
COILS
BLOWER
CONDENSER ACCESS PANEL
ENDPLATE IS SECURED
TO MULLION
SUPPLY
AIR
1- Remove unit top panel and condenser section access
panel.
2- Remove screws securing coil end plate to mullion.
3- Remove wire ties connecting coils slabs and separate
slabs 3-4” (76-102mm).
4- Clean coils with detergent or commercial coil cleaner.
5- Rinse thoroughly with water and reassemble
. Use
field-provided wire ties to connect coil slabs.