Page 46
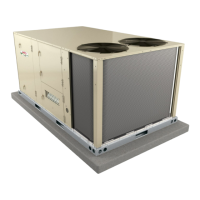
UVC ASSEMBLY
UVC ASSEMBLY
ASSEMBLY SECURED
WITH 3 SCREWS
DOOR
SWITCH
UVC LAMP
FIGURE 37
R- UVC Light
in a foam sleeve. The lamp is attached to the UVC light
lamp and install into the UVC light assembly as shown in
steps 2 through 11.
Annual Lamp Replacement
WARNING
Personal Burn Hazard.
Personal injury may result from hot lamps. During
replacement, allow lamp to cool for 10 minutes
energy production diminishes over time.
1 -
germicidal light model.
2 - Disconnect power to the rooftop unit before
servicing the UVC kit.
3 - Open the blower access door.
4 - Remove the screw in wire tie from the UVC
assembly and disconnect the 4-pin connector from
the lamp end.
Remove and retain the (3) screws securing the
UVC assembly. Carefully slide the complete UVC
assembly out through the blower access door. See
 Loading...