EasyManua.ls Logo

Leuze GSU14E - User Manual

Default Icon
11 pages
Print Icon
To Next Page IconTo Next Page
Loading...
GSU14E
Ultrasonic label fork
Leuze electronic GmbH + Co. KG
info@leuze.com
In der Braike 1 73277 Owen Tel.: +49 7021 573-0
We reserve the right to make changes – 2020/04/23 – 50143645
www.leuze.com
Question and Answer IconNeed help?

Do you have a question about the Leuze GSU14E and is the answer not in the manual?

Summary

Overview of Operating Structure

Standard Function

Normal operation after switch-on.

Manual Teach

Can be executed as dynamic teach.

Set Switching Behavior

Configures light/dark switching.

Manual Locking;Unlocking of Buttons

Prevents accidental button presses.

Manual Teach Button Operations

Press Teach Button 2-7 Seconds

Pressing teach button for 2-7 seconds.

Press Teach Button > 12 Seconds

Pressing teach button for over 12 seconds.

Teach Input Signal Durations

Press Teach Button < 2 Seconds

Pressing teach button for less than 2 seconds.

Press Teach Button > 7 Seconds

Pressing teach button for over 7 seconds.

Signal Timing Diagrams

Illustrates signal timing for various operations.

Advanced Teach Input Signals

Teach Input Lock;Unlock Signal

Signal to lock/unlock buttons via teach input.

Intended Use and Operation

Function and Device Operation

How label material affects precision and reliability.

Label Alignment

Positioning label tape for high switching accuracy.

GSU 14 E Standard Functions

LED Indicators

Description of ON, OUT, and WARN LED states.

Dynamic Manual Teach

Procedure for manual teach with passing label tape.

Adjusting Switching Behavior

Set Light;Dark Switching

Changing the output switching behavior.

easyTune - Sensitivity Adjustment

Manual fine tuning of the switching threshold.

Recommended Settings and Button Locking

Sensitivity Adjustment Recommendations

Settings for optimizing sensitivity based on observation.

Manual Button Locking;Unlocking

Protecting buttons from accidental actuation.

Sensor Adjustment via Teach Input

Teach Input Signal Durations

Duration of teach signal determines function.

Teach Function Mapping

Mapping teach signal duration to specific functions.

Locking Buttons via Teach Input

Teach Input for Button Locking

Using teach input for tamper protection of buttons.

Overview

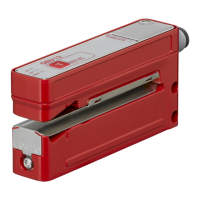
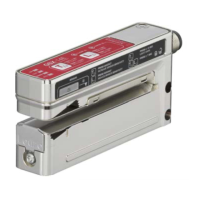
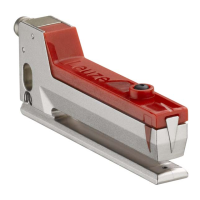
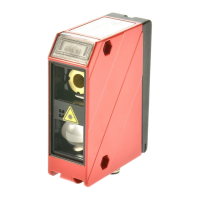
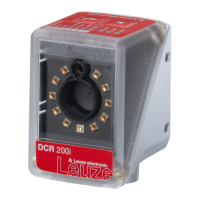
The Leuze GSU 14E is an ultrasonic label fork sensor designed for contactless detection of the gap between two consecutive labels on a carrier tape. It operates by emitting ultrasonic waves and detecting their reflection, allowing for precise and high-speed label gap detection.

Function Description:

The GSU 14E functions as an ultrasonic sensor for detecting label gaps. It is not a safety sensor and is not intended for personnel protection. The device is designed for industrial applications where accurate label positioning and counting are crucial. The sensor's operation depends on the label material, which influences the achievable precision and reliability of gap detection. It supports two switching behaviors: light switching, where the signal is in the label gap, and dark switching, where the signal is on the label.

Important Technical Specifications:

The sensor features a robust design, as depicted in the provided images. While specific numerical technical specifications like operating voltage, current consumption, or detection range are not explicitly stated in the provided pages, the operational descriptions imply a fast response time suitable for conveyor belt applications. The sensor's ability to detect label gaps at speeds up to 50 m/min highlights its suitability for high-speed production lines.

Usage Features:

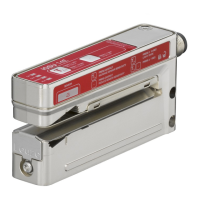
  • Standard Function: During normal operation, the sensor is in standard function mode, detecting label gaps with high precision and speed. The yellow OUT LED indicates the switching signal, turning ON when a label gap is detected. The green ON LED is constantly ON when operating voltage is applied. The red WARN LED indicates errors: OFF for error-free operation, and continuous red light for teaching errors caused by unfavorable label material.

  • Manual Teach (Dynamic): This feature allows the sensor to be taught while the label tape is passing through.

    1. Insert the label tape into the sensor.
    2. Press the teach button until the green ON LED and yellow OUT LED flash synchronously (2-7 seconds).
    3. Release the teach button.
    4. Allow the label tape to advance through the sensor at a maximum speed of 50 m/min. The sensor indicates belt transport by a more rapid synchronous flashing of the green ON LED and yellow OUT LED.
    5. Briefly press the teach button to end the manual teach. The sensor then switches to the standard function. Approximately 3 to 7 labels should pass through the sensor for stable switching points. A 2-point calibration is performed on both the carrier and the label during this process. If the teach event is faulty (e.g., due to unfavorable material or uneven transport), the red WARN LED illuminates, indicating a need to repeat the teach event or use the easyTune function.
  • Adjusting Switching Behavior (Light/Dark Switching):

    1. Press the teach button until only the green ON LED flashes (2-7 seconds).
    2. Release the teach button.
    3. The green ON LED flashes for another 2 seconds, and the yellow OUT LED indicates the changed switching behavior for 2 seconds.
      • Yellow OUT LED ON: Light switching (signal in the label gap).
      • Yellow OUT LED OFF: Dark switching (signal on the label).
  • easyTune – Manual Fine Tuning of the Switching Threshold: This function allows for adjusting the sensor's sensitivity, comparable to a potentiometer, to optimize performance, especially with inhomogeneous label material.

    • Increase Sensitivity: Briefly press the teach button (+). A single flash of the green ON LED confirms actuation.
    • Reduce Sensitivity: Briefly press the minus button (-). A single flash of the yellow OUT LED confirms actuation.
  • Manual Locking/Unlocking of Buttons: To prevent accidental operation, the buttons on the device can be locked.

    1. Press the teach button (+) and the minus button (-) simultaneously until the green ON LED flashes at approximately six times per second (more than 7 seconds).
    2. Release both buttons. The buttons are now locked and cannot be operated.
    3. To unlock, use the same button combination. Note that this locking is stored in volatile memory.
  • Sensor Adjustment via Teach Input (Pin 5): The device also supports teach-in functions via a teach signal applied to pin 5. The duration of the low-level teach signal determines the specific teach-in function. Before applying a low level, a high level must be applied for at least 20 ms.

    • Buttons Locked (A): A static high signal (≥ 20 ms) on the teach input locks the buttons, preventing manual operation. This locking cannot be canceled by the button combination. If the teach input is not connected or has a static low signal, the buttons are unlocked.
    • Buttons Can Be Operated (B): This state is implied when buttons are not locked.
    • Teach is Started (C): Initiated by a specific teach signal duration.
    • Teach Duration (D): During this period, the label tape must be transported through the sensor for dynamic teach.
    • Teach is Ended (E): The completion of the teach process.

    Specific teach signal durations (T) correspond to different functions:

    • 220 ... 280 ms: Configure light switching behavior.
    • 320 ... 380 ms: Configure dark switching behavior.
    • 420 ... 480 ms: easyTune (-), reduce sensitivity.
    • 520 ... 580 ms: easyTune (+), increase sensitivity.

Maintenance Features:

The manual provides guidance on troubleshooting common issues related to switching accuracy and reliability.

  • Flickering Output on Label: If the yellow LED and switching output flicker when a label is moved through the sensor, it indicates low function reserve on the label. The recommended action is to repeatedly press the minus button (-) briefly to reduce sensitivity until stable detection is achieved.
  • Flickering Output on Carrier Tape: If the yellow LED and switching output flicker when a blank carrier tape is moved through the sensor, it indicates low function reserve on the carrier. The recommended action is to repeatedly press the teach button (+) briefly to increase sensitivity until stable detection is achieved.
  • Faulty Teach Event: If the red WARN LED illuminates after a teach event, it suggests an unfavorable material combination, uneven transport, or jittering. The solution is to repeat the teach event or use the easyTune function. If the fault persists, the label material may not be detectable by the device.

The device is designed to be user-friendly with clear LED indicators for status and operation, facilitating both setup and troubleshooting. The easyTune function provides a flexible way to optimize the sensor's performance for various label materials and conditions.

Leuze GSU14E Specifications

General IconGeneral
BrandLeuze
ModelGSU14E
CategoryAccessories
LanguageEnglish

Related product manuals