Do you have a question about the Leuze IGSU 14E and is the answer not in the manual?
Explains how label material affects precision and gap detection.
Two-point calibration while label tape passes through.
One-point calibration on blank carrier without label transport.
Configure output switching for label gap (light) or label (dark).
Manually control the Auto Level Control (ALC) feature.
Fine-tune switching threshold for better function reserve.
Lock/unlock device buttons to prevent accidental operation.
Mapping teach signal durations to specific device functions.
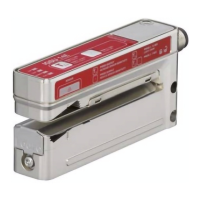
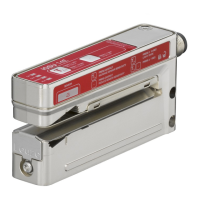
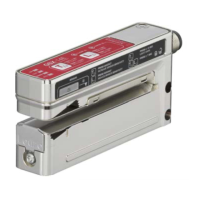
The Leuze IGSU 14E is an ultrasonic label fork designed for contactless detection of gaps between consecutive labels on a carrier tape. This device functions as an ultrasonic sensor, providing high precision and speed in label gap detection.
The IGSU 14E operates by emitting ultrasonic waves to sense the presence or absence of a label, thereby identifying the gap. It supports both light switching (signal in the label gap) and dark switching (signal on the label), with the label material influencing the achievable precision and reliability of gap detection. The sensor is always in its standard function during operation, indicating label gaps via a yellow OUT LED and the switching output.
The device offers several operational modes and adjustment capabilities, primarily managed through teach and minus buttons.
Easy Teach (Dynamic): This is the preferred method for detection reliability. It involves a two-point calibration on both the carrier and the label while the label tape is passing through the sensor. To initiate, the teach button is pressed until the green ON LED and yellow OUT LED flash synchronously. After releasing the button, the label tape is advanced through the sensor at a maximum speed of 50 m/min. The sensor indicates belt transport by a more rapid synchronous flashing of the LEDs. Once sufficient teach values are determined, the sensor automatically enters standard mode. Approximately 2-10 labels should be transported for optimal teaching. If the teach event is faulty due to unfavorable material or uneven transport, the red WARN LED illuminates.
Static Teach: This method performs a one-point calibration on the blank carrier without transport, which is advantageous as no labels are lost. To perform a static teach, one or more labels are pulled off the carrier, and the blank area is inserted into the sensor. The teach button is then pressed until the green ON LED and yellow OUT LED flash alternately.
Adjusting Switching Behavior (Light/Dark Switching): The switching output behavior can be configured. Pressing the teach button until only the green ON LED flashes allows for this adjustment. After releasing the button, the green ON LED flashes for 2 seconds, and the yellow OUT LED indicates the changed switching behavior. Yellow OUT LED ON signifies light switching (signal in the label gap), while Yellow OUT LED OFF signifies dark switching (signal on the label).
easyTune (Manual Fine Tuning of Switching Threshold): This function allows for manual adjustment of the sensor's sensitivity, comparable to a potentiometer. It is particularly useful for inhomogeneous label material to achieve a better function reserve. Briefly pressing the teach button (+) increases sensitivity (confirmed by a single flash of the green ON LED), while briefly pressing the minus button (-) reduces sensitivity (confirmed by a single flash of the yellow OUT LED). Note that using easyTune temporarily deactivates the ALC function, which is reactivated after teaching again.
ALC (Auto Level Control) Function: The ALC function automatically corrects the switching threshold to ensure maximum function reserve during operation. It is active by default and indicated by the illumination of the yellow ALC LED. This function optimizes the switching threshold based on digitally determined signal values from each teach event. The ALC function can be manually deactivated or activated by pressing the minus button (-) until the green ON LED and yellow OUT LED flash synchronously. The manual deactivation/activation of ALC is stored in non-volatile memory.
Sensor Adjustment via Teach Input (Pin 5): The device also supports teach-in functions via a teach input (pin 5). The duration of a low-level teach signal on this input determines the specific teach-in function. A high level must be applied for at least 20 ms before a low level is applied for teaching. Different signal durations correspond to various functions, including easy Teach, Static Teach, configuring light/dark switching, easyTune adjustments, and activating/deactivating the ALC function.
The IGSU 14E includes features to protect against erroneous operation and ensure consistent performance.
Manual Locking/Unlocking of Buttons: To prevent accidental button presses that could trigger easyTune or teach-in processes and deactivate ALC, the device buttons can be locked. This is achieved by simultaneously pressing the teach button (+) and the minus button (-) until the green ON LED flashes approximately six times per second. Releasing both buttons locks them. The same combination unlocks them. This locking state is stored in non-volatile memory.
Locking Buttons via Teach Input (Pin 5): For enhanced protection against tampering, the buttons can also be locked via the teach input (pin 5). Applying a static high signal (≥ 20 ms) to the teach input locks the buttons, preventing manual operation. In this state, the buttons cannot be unlocked using the described button combination. If the teach input is not connected or has a static low signal, the buttons remain unlocked and operable. The buttons can also be locked/unlocked via IO-Link.
Error Indication: The WARN LED (continuous red light) indicates error-free operation when OFF. If ON, it signals a teaching error due to unfavorable label material or a faulty ALC function.
Material Change Considerations: When changing to a different type of label, a new adjustment (teaching) is generally required to maintain optimal performance. Signal changes can occur with each roll change, even with seemingly identical labels, due to material variations affecting acoustic impedance or changes in dynamic system parameters like tape tension or jitter. The ALC function helps mitigate these issues by continuously optimizing the switching threshold.
| Category | Accessories |
|---|---|
| Current consumption | ≤ 50 mA |
| Housing material | Plastic |
| Operating voltage | 10-30 V DC |
| Connection | M12 plug connector |