6
7
5
8
3
4
1
2
9
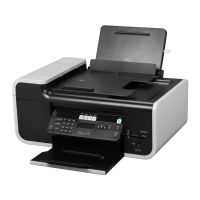
Use the To
1
Top cover Access the scanner glass.
2
Scanner glass Scan and copy photos and documents.
3
Scanner unit
• Access the print cartridges.
• Remove paper jams.
4
Print cartridge carrier Install, replace, or remove a print cartridge.
5
EXT Port
Connect additional devices, such as a data/fax
modem, telephone, or answering machine, to the
printer. This connection method may not be
available in all countries or regions.
Note: Remove the plug to access the port.
6
LINE Port
Connect the printer to an active telephone line to
send and receive faxes. The printer must be
connected to a telephone line to receive incoming
fax calls.
Note: Do not connect additional devices to the LINE
port, and do not connect a DSL (digital subscriber
line), ISDN (integrated services digital network), or
cable modem to the printer.
7
Power supply with port Connect the printer to a power source.
Setting up the printer
22
 Loading...