Do you have a question about the Lexmark E120n and is the answer not in the manual?
Instructions for unpacking the printer and preparing it for initial setup.
Step-by-step guide for installing the toner cartridge into the printer.
Guide to connecting necessary cables including USB, power, and network.
Instructions on how to turn on the printer after setup.
Guidance on installing printer drivers and accompanying software.
Instructions for establishing a network connection for the printer.
Information regarding the Federal Communications Commission (FCC) compliance.
This document provides comprehensive instructions for setting up, using, and maintaining the Lexmark E120n laser printer. It covers both initial installation and ongoing operational and maintenance tasks, ensuring users can effectively utilize and care for their device.
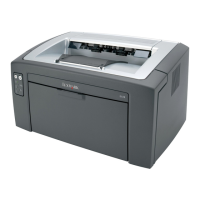
The Lexmark E120n is a monochrome laser printer designed for personal or small office use. Its primary function is to produce high-quality black and white prints quickly and efficiently. The printer connects to a computer via a USB cable and is managed through software installed on the host system. It is capable of handling various paper sizes and types, making it versatile for different printing needs, from standard documents to envelopes. The E120n is built for reliability and ease of use, aiming to provide a straightforward printing experience.
Initial Setup and Software Installation: The setup process begins with unpacking the printer and removing all protective packaging materials. This includes tape, foam inserts, and any plastic sheets that secure internal components during shipping. Once unpacked, the toner cartridge needs to be prepared and installed. This typically involves shaking the cartridge gently to distribute the toner evenly and then inserting it into the designated slot within the printer until it clicks into place.
After the hardware is set up, the printer is connected to a power source and then to the computer using a USB cable. The next crucial step is software installation. The Lexmark E120n comes with a Software and Documentation CD. Users are guided to insert this CD into their computer's optical drive. The software installation wizard provides options to "Install Printer and Software," "Register Product," "View User's Guide and Documentation," "Contact Lexmark," and "Change Language." Selecting "Install Printer and Software" initiates the driver installation process, which is essential for the computer to recognize and communicate with the printer. This step ensures that the printer driver and any accompanying utility software are correctly installed, enabling the user to send print jobs from their applications. The installation process may also include options to save install scripts for silent installations, which can be useful in managed environments.
Loading Paper: Loading paper correctly is vital for smooth operation and to prevent paper jams. The Lexmark E120n features an adjustable input tray. To load paper, the user pulls out the paper tray, adjusts the paper guides to match the width of the paper being used, and then places the stack of paper into the tray. It is important not to overfill the tray beyond the maximum fill line. For different media types, such as envelopes or thicker paper, specific loading instructions might apply, often involving the use of a manual feed slot or adjusting the paper guides to accommodate the media. The output tray is located on top of the printer, where printed pages are collected.
Basic Printing Operations: Once the printer is set up and connected, and the software is installed, users can initiate print jobs from any application on their computer. The printer's control panel typically includes a power button and status indicators. The E120n is designed for simple operation, with most settings managed through the printer driver interface on the computer. This allows users to select print quality, paper size, number of copies, and other print-specific options before sending a document to print.
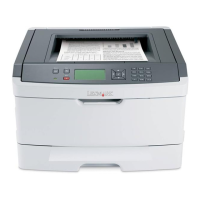
Network Connectivity (E120n specific): The "n" in E120n indicates network capability. This model can be connected to a local area network (LAN), allowing multiple users to share the printer. The setup for network connectivity involves connecting the printer to a network router or switch using an Ethernet cable. The software installation process would then include steps to configure the printer for network access, assigning it an IP address, and installing network drivers on client computers. This feature enhances productivity in small office environments by centralizing printing resources.
Toner Cartridge Replacement: Regular maintenance for the Lexmark E120n primarily involves replacing the toner cartridge when it runs out. The printer's status indicators or software utilities will typically alert the user when toner levels are low. To replace the cartridge, the user opens the front cover of the printer, removes the old toner cartridge by pulling it out, and then inserts a new, genuine Lexmark toner cartridge. It is important to handle toner cartridges carefully to avoid spills and to dispose of used cartridges responsibly, often through Lexmark's recycling programs.
Clearing Paper Jams: Paper jams are a common issue with printers and the Lexmark E120n is designed with accessible areas to clear them. The manual provides clear steps for identifying and resolving paper jams. This usually involves opening various covers (front cover, rear access door), carefully pulling out any jammed paper in the direction of the paper path, and ensuring no small pieces of paper are left inside. It is crucial to turn off the printer before attempting to clear a jam to prevent injury and damage to the printer. The design allows for access to the paper path from multiple points, including the input tray area, the fuser unit, and the output area.
Cleaning the Printer: Periodically, the printer may require cleaning to maintain optimal performance and print quality. This includes wiping down the exterior with a soft, lint-free cloth. For internal cleaning, especially if print quality issues arise, users might need to clean the paper path rollers or the fuser area. The manual provides specific instructions for these tasks, often recommending the use of a dry, lint-free cloth or specialized cleaning sheets. Regular cleaning helps prevent dust and toner buildup, which can lead to print defects or mechanical issues.
Firmware Updates: While not explicitly detailed in the provided images, modern printers like the E120n often support firmware updates. These updates can improve printer performance, add new features, or fix bugs. Firmware updates are typically downloaded from the Lexmark support website and installed via a utility on the connected computer.
Troubleshooting: The documentation provided with the Lexmark E120n includes troubleshooting guides to help users diagnose and resolve common issues. This might cover problems like poor print quality, connectivity issues, or error messages. The "Contact Lexmark" option in the software installer also points users to support resources for more complex problems.
In summary, the Lexmark E120n is a user-friendly laser printer designed for efficient monochrome printing. Its features emphasize ease of setup, straightforward operation, and simple maintenance, making it a reliable choice for everyday printing tasks in a home or small office environment. The network capability further enhances its utility by allowing shared access among multiple users.
| Internal memory | 16 MB |
|---|---|
| Sound power level (standby) | 26 dB |
| Sound pressure level (printing) | 49 dB |
| I/O ports | Ethernet 10/100BaseTX (RJ-45) USB |
| Mac compatibility | Yes |
| Networking features | LPR/LPD, Direct IP (Port 9100), IPP, HTTP, Enhanced IP (Port 9400), FTP, TFTP |
| Standard input trays | 150 |
| Standard media sizes | 10 envelop (4, 125 x 9, 5\ |
| Compatible operating systems | Apple Mac OS X Apple Mac OS 9.x Microsoft Windows 2000 (Professional/Server/Advanced Server) Microsoft Windows Me Microsoft Windows XP (Home, Professional) Microsoft Windows Server 2003 (Standard, Enterprise) Microsoft Windows 98 2nd Edition Microsoft Windows XP Professional x64 Microsoft Windows Server 2003 (Standard, Enterprise) running Terminal Server Microsoft Windows 2000 Server running Terminal Services Microsoft Windows Server 2003 (Standard, Enterprise) x64 Edition Microsoft Windows Server 2003 x64 Edition (Standard, Enterprise) running Terminal Services |
| Maximum print size | 210 x 297 mm |
| Media types supported | Card Stock, Envelopes, Paper Labels, Plain Paper, Transparencies |
| Maximum ISO A-series paper size | A4 |
| Color | No |
| Print technology | Laser |
| Maximum resolution | 600 x 600 DPI |
| Time to first page (black, normal) | 8 s |
| Print speed (black, normal quality, A4/US Letter) | 19 ppm |
| Maximum input capacity | 165 sheets |
| Supported network protocols (IPv4) | TCP/IP IPv4 |
| Maximum duty cycle | 10000 pages per month |
| Sustainability certificates | ENERGY STAR |
| Operating altitude | 0 - 2500 m |
| Operating temperature (T-T) | 16 - 32 °C |
| Operating relative humidity (H-H) | 8 - 80 % |
| Certification | FCC Class B, UL 60950-1 3rd Edition, U.S. FDA, IEC 320-1, CSA, ICES Class B, Energy Star, CE Class B, CB IEC 60950-1, IEC 60825-1, GS (TÜV), SEMKO, UL AR, CS, TÜV Rh, N Mark, ACA C-tick Class B, CCC Class B, BSMI Class B, MIC, EK Mark, PSB, VCCI |
| Dimensions (WxDxH) | 388 x 370 x 250 mm |
|---|