2.4 The Controls and their
Functions
2.4.1 Overview of the Controls and
Displays
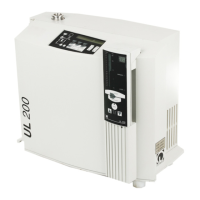
Except for the mains switch, all controls and displays are
located on the control panel (Fig. 4) and on the hand unit
(Fig. 5)
The hand unit is detachable and linked to the instrument
via a connecting cable. Magnets have been built into the
hand unit, so that it may easily be attached to any
magnetizable surface. If required, the connection cable
of the hand unit leading to the UL 200 can be extended
(extension cable Cat. No. 140 22).
The controls and displays are shown in Fig. 5.
The control panel on the UL 200 (Fig. 4) also contains
the corresponding menu and function push-buttons.
These are described in Chapter 2.4.3.
2.4.2 The Mains Switch
Operation of the mains switch (3/7) switches the entire
instrument on or off.
2.4.3 Controls on the Control Panel
MANUAL push-button
Via the MANUAL push-button (4/11) it is possible to
switch the manual ranging feature on and off. Once this
function has been selected it is then possible to enter the
display range for the leak rates (exponent) through the
VALUE push-button (4/6).
When pressing the MANUAL push-button (4/11) the fol-
lowing happens:
The LED in the MANUAL push-button (4/11) and the
MANUAL LED (5/8) on the hand unit come on.
The exponent (5/9) on the hand unit is frozen. When the
leak rate changes it is only required to observe the bar-
graph display (5/4).
In case of a range overflow, the upper arrow (5/7) at the
bargraph on the hand unit comes on and in the case of
range underflow, the lower arrow (5/5) at the bargraph on
the hand unit comes on.
The range of the exponent displayed by the LCD display
(4/2) is also restricted. The same applies to the dynamic
range of the chart recorder signal at the RECORDER
output (3/11) (see description for menu item 13). The
analogue voltage at pin 4 is constant. Only the signal at
pin 1 may be used for logging of the change in the leak
rate.
Note
The trigger thresholds (menu item 1) should fall into the
range of the bargraph display. Trigger levels outside the
range of the bargraph display are not usable in the case
of manual range selection.
The LED in the MANUAL push-button is not on and the
MANUAL status indicator (5/10) is off:
The range is selected automatically. The full measu-
rement range is available.
SERVICE push-button
Pressing of the SERVICE push-button (4/12) activates or
deactivates the service menu (see Chapter 2.5). When
the service menu has been selected, the status indica-
tors (4/7) and (4/12) come on. If the automatic functions
have been switched off in the service menu (service
menu item 70) the UL 200 will be restarted after the ser-
vice menu has been exited, i.e. all monitoring and auto-
matic functions are switched on again. After this, the
UL 200 will be running in the Standby mode.
CAL push-button
Pressing the CAL push-button (4/9) starts a calibration
process which may be run either in connection with an
internal calibrated leak (optional) or an external calibra-
ted leak (see Chapter Calibration).The UL 200 will then
control everything else on its own and will inform the
operator via the LCD display (4/2). The UL 200 autono-
mously decides whether to use the internal calibrated
leak or external calibrated leak which is connected to the
test port (3/2), depending on the instrument mode at the
time of the key-press.
Pressing of the CAL push-button in the measurement
mode: external calibration.
Pressing the CAL push-button in the Standby/Vent
mode: runs an internal calibration, provided
an internal calibrated leak has been
built-in.
The process differs for the different operating modes. If
the calibration process is to be performed with an exter-
nal calibrated leak, then the calibrated leak must be
connected to the inlet or the test sample before operating
the push-button. Switchover between external and inter-
nal calibrated leak is possible by operating the START
(5/3) and STOP / VENT (5/2) push-buttons.
The calibration process may be cancelled by pressing
the CAL push-button (4/9) or the CLEAR push-button
(4/10).
LED in the push-button is on: calibration process is
active.
LED in the push-button is off: calibration process is inac-
tive.
12
TH 10.211/8.02 - 12/97