Manual mass alignment:
As a rule, a mass alignment is run automatically during
the calibration process. Through this menu item, the
mass may be aligned manually.
For this a suitable calibrated leak (for example for M4:
helium calibrated leak 10
-8
... 10
-6
mbar·l·s
-1
) must be
connected and the instrument must be running in the
measurement mode. The correct password must be
entered (service menu item 50) and the automatic func-
tion must be switched off (service menu item 70).
After the correct mass number has been selected, you
must press the ENTER push-button (4/8).
The anode voltage flashes and can be changed via the
VALUE push-buttons. At the same time the preamplifier
voltage is monitored in the right-hand part of the LCD
display (4/2) or on the bargraph display (5/4) of the hand
unit. The anode voltage has been optimized as soon as
the amplifier voltage has reached a maximum. The
anode potential is stored in the EEPROM only when
pressing the ENTER push-button once more and will
thus be permanently available.
75: Amp Emi 500G 10.000V Display preamplifier
voltage
Shown in this menu item is the preamplifier voltage. At
the same time the current emission status as well as the
selected preamplifier resistor is indicated.
The emission status can be changed and also the pre-
amplifier range. The correct password must be entered
(service menu item 50) and the automatic function must
be switched off (service menu item 70).The status of the
parameter has been changed only after pressing the
Value push-button (4/6) and the Enter push-button (4/8)
once.
Emi: Emission has been switched on.
off: Emission in Standby. No ionization takes place.
13M: Preamplifier resistor 13 MΩ
470M: Preamplifier resistor 470 M Ω
15G: Preamplifier resistor 15 GΩ
500G: Most sensitive preamplifier resistor 500 GΩ
76: Gain A 16 2.5000V Display A/D converter voltage
Shown in this menu is the current post amplification gain
factor 0.25, 1, 4, 16 and the corresponding voltage of the
analogue/digital converter. The voltage from the pream-
plifier is amplified by this factor and applied to the A/D
converter. The A/D voltage lies in the range between
0 ... 2.5 V. The UL 200 selects the most favourable gain
factor automatically. The four post amplification gain fac-
tors can be tested.
If, in the case of servicing, the post amplification factor is
to be changed manually, the following conditions must be
met first: enter the correct second password (service
menu item 50), switch off the automatic function (service
menu item 70). When running the service menu enter
„76: Gain M“ via the Value push-buttons and acknowled-
ge by pressing the ENTER push-button. Then enter the
required post amplification factor with the aid of the value
push-buttons and the ENTER push-button. The corre-
sponding A/D converter voltage can be read off in the
right-hand part of the LCD display (4/2).
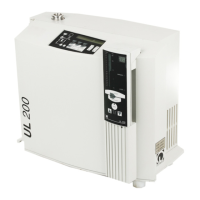
77: Cathode 1 Select cathode
The ion source built into the UL 200 is equipped with 2
independent cathodes. Cathode 1 is used by default.The
diode L4 (4/13) is green. When cathode 2 has been sel-
ected it is orange.
In the case of a failure the other cathode is selected
automatically. A warning (W45 or W46) is issued when
switching on the instrument. If a new ion source has
been built in, the warning can only be erased after the
corresponding cathode has been successfully switched
on manually.
78: Unit mbar·l·s
-1
Select unit of measurement
Switching between units.
When having selected mbar·l·s
-1
as the unit for the leak
rates, the total pressure will be indicated in mbar.
When having selected Pa m
3
s
-1
as the unit for the leak
rates, the total pressure will be indicated in Pa (Pascal).
Different hand units will be required depending on which
unit has been selected.
79: Default Reset <enter> Reset parameters to
default
All parameters of menu items 1, 2, 3, 9, 10 to 25, 27, 49
are reset to default.
The error log in service menu item 52 is deleted.
82: CAL Leak Factor 3.39
Gives the calculation factor between internal and exter-
nal calibrated leak.
90: Amp-Test <enter> Preamplifier test (amplifier test)
When running the amplifier test it is possible to qualitati-
vely check the operation of the measurement chain (sup-
pressor signal, preamplifier, post amplifier and A/D con-
verter). When switching on this test, a test signal is
applied to the preamplifier so that at the output a square
wave is produced which is symmetrical about 0 V or the
offset voltage. The positive signal amplitude (about
0.6 V) can be read off on the LCD display.
The frequency is about 2 Hz. In this mode the emission
is set to Standby and the preamplifier is switched to the
most sensitive range (500 GΩ ).
Before, the correct second password must have been
entered (service menu item 50).
The AMP test is started by pressing the ENTER push-
25
TH 10.211/8.02 - 12/97