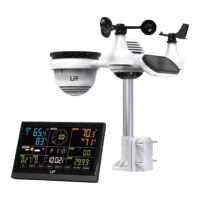
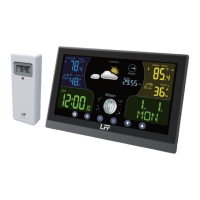
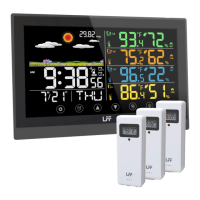
This document describes the LFF Wireless Color Weather Station, model LWS200, a device designed to provide comprehensive weather information and timekeeping functions. The system consists of a main weather station unit and an outdoor remote sensor.
Function Description
The LFF Wireless Color Weather Station serves as a personal weather monitoring system, displaying both indoor and outdoor temperature and humidity readings. It also features an atomic clock function for accurate timekeeping, an alarm with snooze, and a weather forecasting function. The device is designed for ease of use with a clear, colorful display and intuitive button controls.
Usage Features
Weather Station Unit:
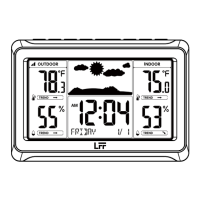
The main unit features a large, colorful display with super bright backlight, making it easy to read information at a glance. The display is divided into sections for outdoor temperature/humidity, atmosphere, indoor temperature/humidity, weekday/time zone, time, and calendar (month and date).
- Temperature and Humidity Readings: The station displays both indoor and outdoor temperature in either Celsius or Fahrenheit, along with humidity percentages. Trend indicators show whether temperature and humidity are rising, falling, or stable over the past hour.
- Atmosphere Display: This section provides a visual representation of the current atmospheric conditions, contributing to the weather forecast.
- Time Display: The time is shown in hour and minute format, with options for 12-hour or 24-hour display.
- Calendar Display: The calendar shows the month, date, and weekday, with weekdays written in full English letters.
- Weekday/Time Zone Display: The current weekday and selected time zone are displayed. The device supports 8 time zones: EST (Eastern), NST (Newfoundland), AST (Atlantic), HST (Hawaii), AKT (Alaska), PST (Pacific), MST (Mountain), and CST (Central).
- Weather Forecasting Function: The weather station provides a forecast for the next 6-12 hours based on barometric pressure fluctuations. Weather symbols displayed include Sunny, Partly Sunny, Cloudy, Light Rain, Heavy Rain, Light Snow, and Heavy Snow. It's important to note that this forecast is based on internal evaluation and may deviate from local weather services. Users are advised to consider local forecasts as authoritative in case of discrepancies.
- Atomic Clock Reception (RCC): The weather station automatically searches for the WWVB atomic clock signal to ensure accurate time. It attempts to update the time daily at 1:00 am, 2:00 am, 3:00 am, 4:00 am, and 5:00 am. The Atomic Time tower icon flashes during search and becomes solid when connected. Manual RCC reception is also possible by pressing and holding the WAVE button for 2 seconds.
- Alarm Function: The device includes a daily alarm with a snooze feature. Users can set the alarm hour and minute. When the alarm rings, pressing any button (except Snooze/Dimmer) stops the alarm for the day, while pressing Snooze/Dimmer pauses it for 5 minutes. The alarm icon indicates when the alarm is active.
- Backlight: When operating with the AC adaptor, the backlight has 3 levels of brightness. When running on batteries only, the backlight will come on for approximately 10 seconds when the SNOOZE/DIMMER button is pressed.
- Low Battery Indication: The weather station provides low battery indications for both the main unit and the wireless sensor, prompting users to replace batteries for optimal performance.
Outdoor Sensor:
The outdoor sensor is a compact unit designed to measure outdoor temperature and humidity.
- Temperature and Humidity Measurement: It accurately measures and transmits outdoor temperature and humidity data to the main weather station.
- LED Indicator: An LED flashes when the unit transmits a reading, confirming its operation.
- Wall Mount: The sensor can be easily mounted on a wall.
- Low Battery Indication: Similar to the main unit, the sensor also indicates when its batteries are low.
First Time Use and Pairing:
To set up the system, the outdoor sensor needs to be paired with the weather station.
- Plug in the AC-AC adaptor to the weather station (optional, 3 AAA batteries can be inserted for backup). The screen will turn on and begin searching for the sensor. The signal strength icon will animate during this process.
- Insert 2 new AAA alkaline batteries into the outdoor sensor. The sensor will transmit a signal, and its LED will flash.
- Keep the sensor 5-10 feet from the weather station during pairing.
- Once the RF connection is established, temperature and humidity readings will appear on the station.
- After successful RF connection or 3 minutes of pairing time, the weather station will automatically attempt to receive the atomic clock signal, indicated by a flashing RCC receiving dot icon.
- For optimal connection, allow the sensor and station to sit together for 15 minutes to establish a strong link.
- Place the sensor in a shaded outdoor location after setup.
Setting the Time and Alarm:
- Time Setting: In normal time display, press and hold the TIME SET button to enter setting mode. Users can adjust RCC On/Off, DST On/Off, Year, Month, Date, 12/24 Hour Format, Hour, and Minute using the ▲ and ▼ buttons. Press TIME SET to confirm each selection and move to the next item. If no operation occurs for 20 seconds, the device will automatically return to normal display.
- Alarm Setting: In alarm time display, press and hold the ALARM button to enter alarm setting mode. The hour of the alarm will flash, allowing adjustment with the ▲ and ▼ buttons. Press ALARM to confirm and move to set the minute.
Time Zone Selection:
In normal time display, pressing the TIME ZONE button allows users to cycle through the 8 available time zones. The selected time zone will flash for 5 seconds before returning to normal display.
Temperature Unit Switch:
The temperature unit can be switched between Celsius and Fahrenheit by pressing the °C/°F/CH button.
Search for Outdoor Sensor:
If no sensor is paired or if the connection is lost, users can manually initiate a search by pressing and holding the °C/°F/CH button for over 2 seconds. The signal strength icon will animate during the search.
Important Placement Guidelines:
- Mount the remote sensor on the North side to prevent direct sunlight from causing inaccurate readings.
- Ensure the outdoor sensor is mounted vertically to allow moisture to drain.
- Mount the sensor at least 6 feet in the air for a strong RF signal.
- To prevent wireless interference, place units at least 3 feet (0.9 m) away from electronic devices like TVs, computers, microwaves, and radios.
- For optimal atomic signal reception, keep the weather station away from large metallic items, thick walls, metal surfaces, or other objects that might limit radio communication.
- The maximum wireless transmission range is 300 feet (100m) in open air, not including walls and floors.
Maintenance Features
Battery Management:
- Always use new alkaline batteries for both the sensor and the weather station.
- Do not mix old and new batteries.
- Do not mix alkaline, standard, lithium, or rechargeable batteries.
- Always purchase the correct size and grade of battery for the intended use.
- Replace all batteries of a set at the same time.
- Clean battery contacts on both the device and the batteries prior to installation.
- Ensure batteries are installed with correct polarity (+ and -).
- Remove batteries from equipment that will not be used for an extended period.
- Promptly remove expired batteries.
- Note: Temperatures below -4°F may require Lithium batteries in the outdoor sensor for optimal performance.
General Care:
- Do not expose the unit to rain or moist environments to avoid fire or electric shock.
- The machine should not receive water drops or splashes, and no liquid-filled objects (like vases) should be placed on it.
- The AC adaptor must remain easily accessible to allow disconnection in case of emergency.
Factory Restart:
In case of malfunction, a factory restart can restore the station to its original "out of the box" condition.
- Remove all power (batteries and AC-AC adaptor) from both the outdoor sensor and the weather station.
- Leave both units without power for 10 minutes (this is very important).
- Follow the first-time use procedure to re-pair the sensor.