- 5 -
LGE Internal Use OnlyCopyright © LG Electronics. Inc. All rights reserved.
Only for training and service purposes
ADJUSTMENT INSTRUCTION
1. Application Object
This instruction is for the application to the DLP Projector
(Chassis: FM21B).
2. Notes
(1) The power source insulation of this DLP Projector is not
charging type and you may not use the transformer for
insulation. It is advised to use an insulation transform
between the power supply cable and power input of the set
to protect the test equipment.
(2) The adjustment must be performed under the correct
sequence. But, it can be changed within the error
boundary of performance, considering the mass
productivity.
(3) The adjustment must be performed in the circumstance of
25 °C ± 5 °C of temperature and 65 % ± 10 % of relative
humidity.
(4) For the adjustment, the receptor's input voltage shall be
maintained at 220 V, 60 Hz.
(5) The set must be on for 5 minutes prior to any adjustment.
After receiving possible 100 % White Pattern, it is ready for
adjustment. If it is inevitable, it can be regardless of the
signal.
3. Composition of Adjustment Mode
(1) Adjustment mode can be entered by pressing ADJ key of
the adjustment remote controller, and may exit by pressing
EXIT key after the adjustment.
(2) Preparation for adjustment.
1) Connect power to the Set, and make it Power On state.
2) Heat Run for at least 5 min. before the adjustment.
(3) Adjustment specification
1) Composition of adjustment mode
A. Turn on the power of the set with Power on key.
B. Select Default mode for input source.
C. Adjustment mode can be entered by pressing ADJ
key of the adjustment remote controller, and may exit
by pressing EXIT key after the adjustment.
D. Preparation for adjustment.
E. Connect power to the Set, and make it Power On
state.
F. Heat Run for at least 5 min. before the adjustment.
4. Folding Mirror Adjustment
4.1. Lighting System Adjustment Procedure
(1) Settle down optical engine in the standard position of Jig.
(2) Press Engine Clamp button to fix the engine, and press
Lens Clamp button to lock the lighting adjustment lens.
(3) Adjust screen size with 40 inch as standard, and after
bringing up Full White screen, adjust Focus.
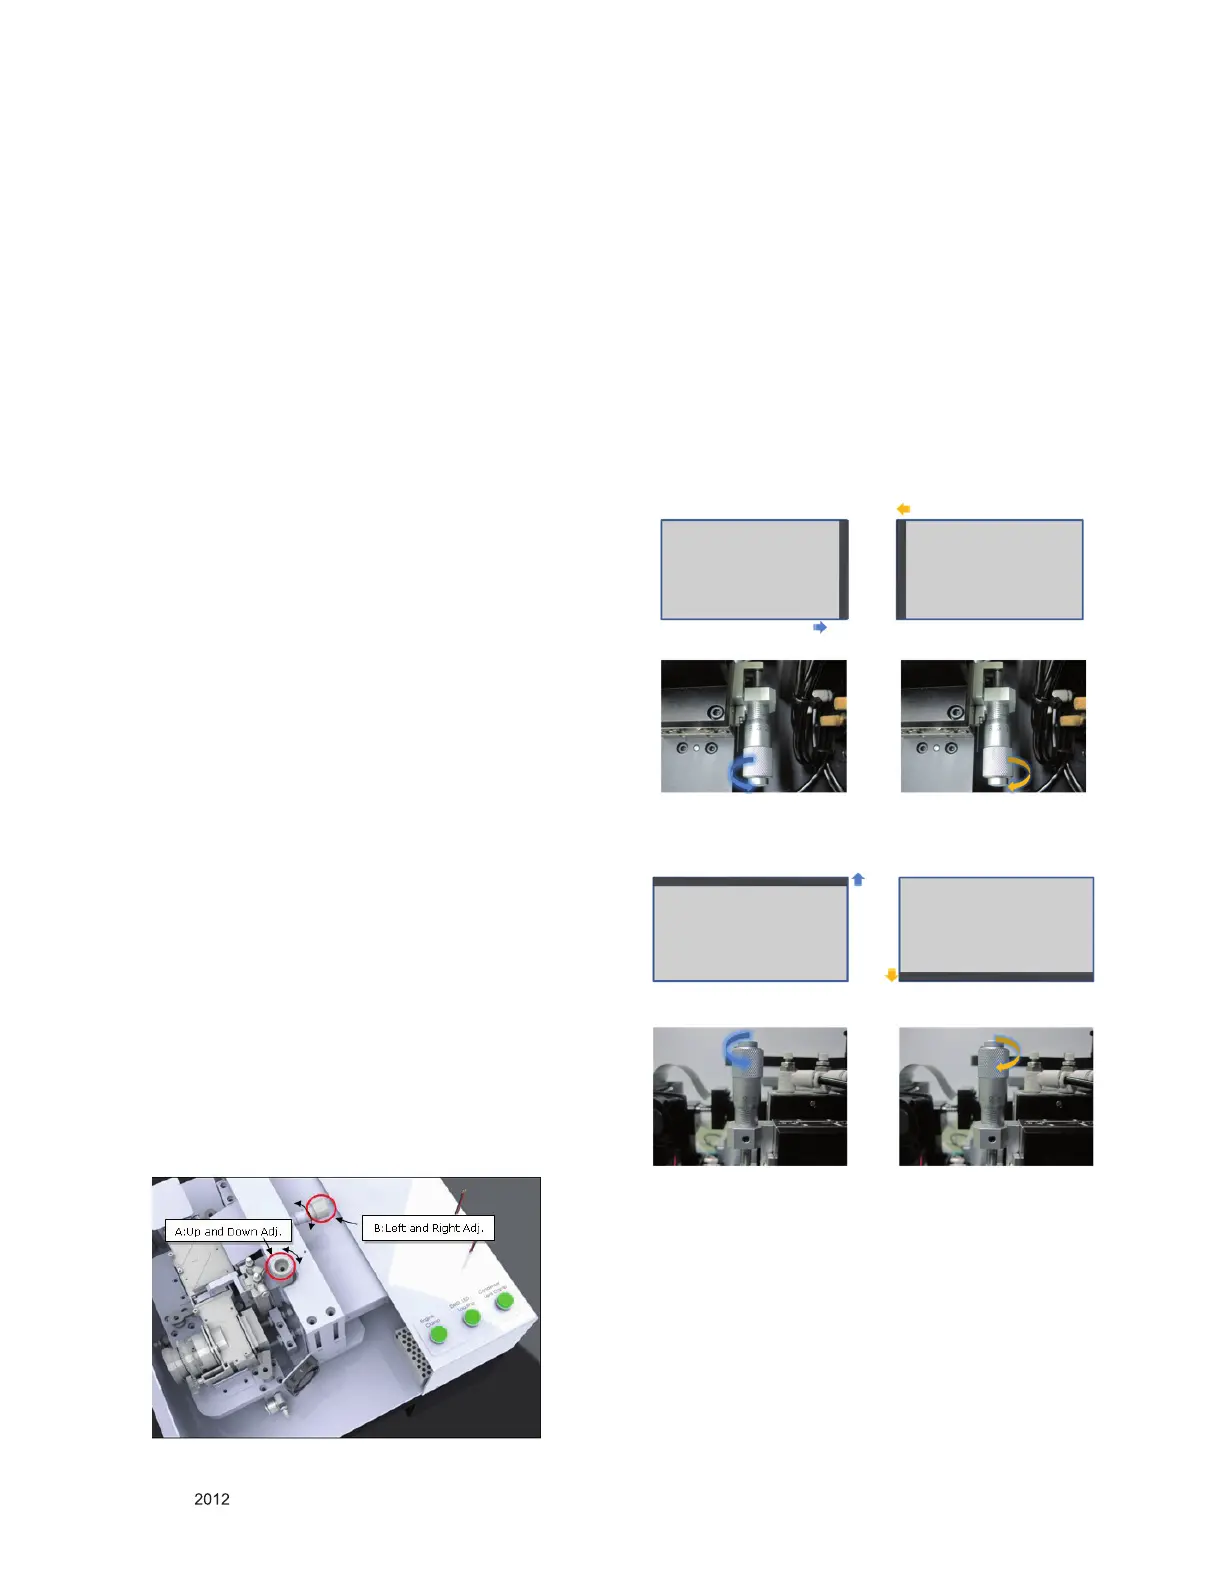
(4) In a case where a lightening is installed to a horizontal
direction as shown (a), an adjustment micro-meter is
rotated to counter-clockwise whereas it is rotated to
clockwise in a case of the left side installation to adjust a
lightening margin; after a width of a lightening margin is
confirmed by rotating 0.2 mm more to the rotation
direction, it is rotated back by 0.1 mm to the opposite
direction.
(5) In a case where a lightening is installed to a vertical
direction, confirm with a method like the above (4).
4.2.
Final Adjustment
Repeat the adjustments of 5) and 6) 2 times to check again
whether the lighting margin of the left screen is at the end,
and also check whether end of the right lighting margin went
over. Afte r fore i gn ob j ect i n spec t ion, f ocus l ine
width(measurement category: refer to the figure), and Focus
Stopper location inspection, fix the lighting system adjustment
lens.
In a case where installed to the right side(right)
In a case where installed to the left side(left)
(Fig. 4-1-1) In a case where installed to a horizontal direction
(Fig. 4-1-2) In a case where installed to a vertical direction
In a case where installed to the upper part(right)
In a case where installed to the lower part(left)
 Loading...