EasyManua.ls Logo

Lifetime 60075 User Manual

Lifetime 60075
76 pages
To Next Page IconTo Next Page
Page #1 background imageLoading...
Page #1 background image
ITM./ART. 123373
TOOLS REQUIRED TABLE OF CONTENTS
7/16" (≈11 mm) (x2)
3/8" (≈10 mm)
5/16" (≈8 mm) Wood Drill Bit
5/16" (≈8 mm) Masonry Drill Bit
Icon legend....................................4
Warnings & notices........................5
Platform construction....................6
Truss assembly...........................11
Gable assembly...........................16
Door assembly.............................21
Floor assembly............................30
Wall assembly..............................34
Parts identifi er.............................37
Shelving installation....................44
Door installation..........................48
Roof assembly.............................52
Window installation.....................62
Door alignment............................65
Shed anchoring...........................68
Cleaning & care...........................71
Registration........................72
Warranty.............................73
Pour le français, voir la page 3. Para el español, ver la página 2.
ASSEMBLY INSTRUCTIONS
BEFORE ASSEMBLY:
Assemble on a level surface
• At least 3 people recommended for setup
OUTDOOR
STORAGE SHED
MODEL 60075
FOR DOMESTIC USE ONLY!
IMPORTANT, RETAIN FOR FUTURE REFERENCE: READ CAREFULLY.
QUESTIONS?
For Customer Service in mainland
Europe and the United Kingdom:
E-mail: csinternational@lifetime.com
CONTACT LIFETIME CUSTOMER SERVICE:
Call: 1-800-225-3865
(English, French, Spanish)
Live Chat:
www.lifetime.com/customerservice/home
(click on "LIVE CHAT" tab)
Model Number: 60075
Product ID:
3/8" (≈10 mm)
(Not included—unless otherwise indicated*)
Question and Answer IconNeed help?

Do you have a question about the Lifetime 60075 and is the answer not in the manual?

Lifetime 60075 Specifications

General IconGeneral
BrandLifetime
Model60075
CategoryOutdoor Storage
LanguageEnglish

Summary

Warnings and Notices

Safety Guidelines and Warnings

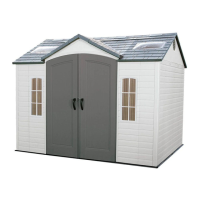
Important safety guidelines and warnings for assembly and use of the storage shed.

Platform Construction

Concrete Platform Construction

Details on constructing a concrete platform for the shed, including dimensions.

Wood Platform Construction

Guidelines for building a wooden platform for the shed, including lumber requirements.

Truss Assembly

Assembling Truss Components

Step-by-step instructions for connecting truss components using specified hardware.

Repeating Truss Assembly

Instructions for repeating the truss assembly process multiple times.

Gable Assembly

Assembling Gable Halves

Instructions for joining the left and right rear gable halves.

Installing Gable Vents and Entry Gables

Steps for installing vent screens and connecting entry gable halves.

Connecting Header and Gable

Attaching the header to the gable and securing it with screws.

Left Door Assembly

Installing Door Channels and Deadbolts

Attaching hinge tubes, door channels, deadbolts, and strike plate to the left door.

Attaching Door Latch and Handle

Securing the door latch and handle using the provided hardware.

Right Door Assembly

Installing Right Door Components

Installing hinge tubes, door channels, thumb lever, and handles on the right door.

Attaching Locking Hardware

Securing locking hardware, latch arm, and bracket with spring for the right door.

Floor Assembly

Assembling Floor Panels

Step-by-step guide for connecting and securing the shed floor panels together.

Wall Assembly

Securing Wall Support Channels

Attaching wall support channels to corner and window wall panels using screws.

Installing Wall Panels

Inserting and securing various wall panels, including corner and window panels.

Shelving Installation

Installing Shelving Components

Attaching shelf brackets to wall panels and securing shelves to the brackets.

Door & Entry Gable Installation

Installing Hinge Tubes and Entry Gable

Inserting hinge tubes into doors and securing the entry gable to the shed.

Attaching Gap Flaps

Installing gap flaps on the doors to block out light.

Roof Assembly

Setting Roof Panels and Skylights

Positioning roof panels, skylights, and securing them with hardware.

Window Pane Installation

Installing Window Panes and Latches

Peeling protective backing, sliding panes into place, and securing with screws and latches.

Door Alignment

Adjusting Door Levelness

Steps to adjust door height using shims to ensure they are level.

Shed Anchoring

Anchoring for Concrete Platform

Instructions and hardware for anchoring the shed to a concrete platform.

Anchoring for Wood Platform

Instructions and hardware for anchoring the shed to a wood platform.

Cleaning and Care

Product Care and Maintenance

Guidelines for cleaning and maintaining the Lifetime shed to ensure longevity.

Register Your Product Online

Online Product Registration

Instructions and benefits of registering the product online at Lifetime's website.

Warranty Information

10-Year Limited Factory Warranty

Details of the 10-year limited factory warranty, including coverage and claim procedures.

Related product manuals