6
Optional Chime Module Installation
The DMC1 supports the 3-note Model MC3 and 8-note
Model MC8 chime modules. The chime module installs
inside the wall housing and is activated by the Door Station
pushbutton.
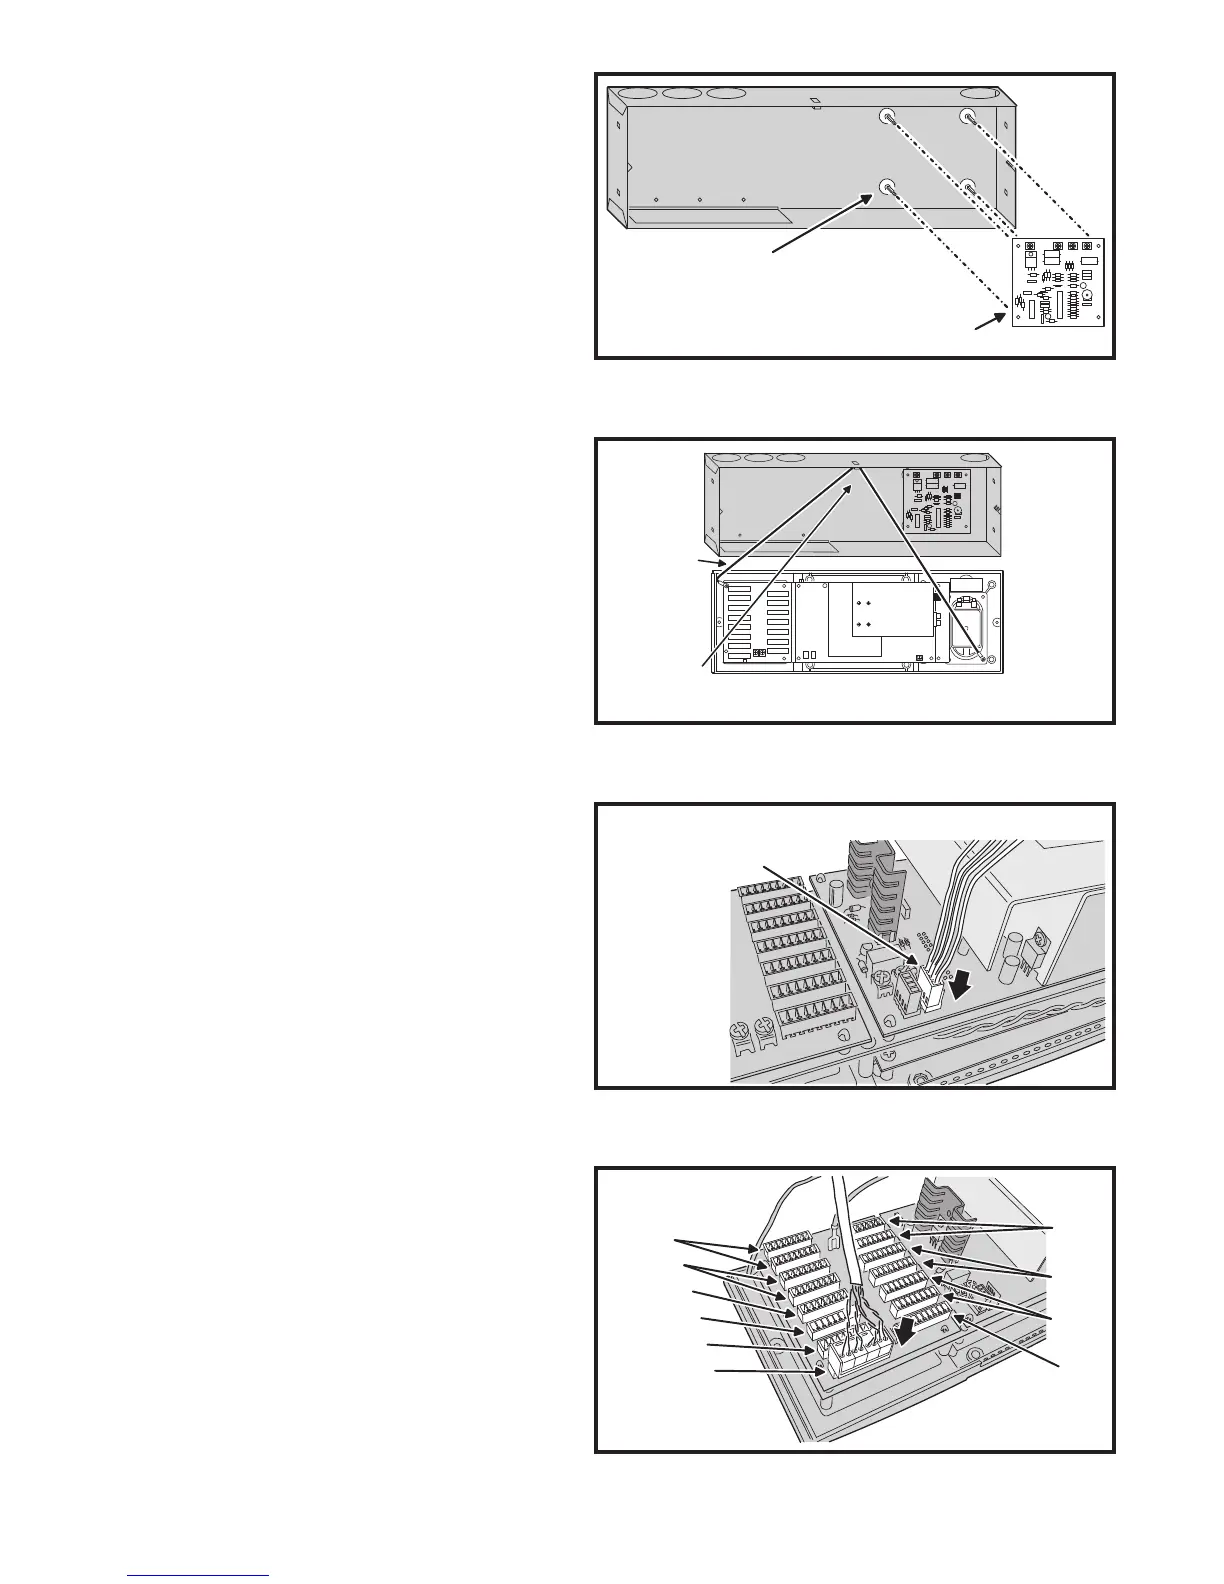
1. Install the chime module circuit board by snapping it onto the four
plastic mounting standoffs in the wall housing. See Figure 13.
Master Station Pre-installation
To aid wiring of the Master Station unit to the cables from
the wall housing, the Master Station unit contains a wire to
hang the Master Station from the wall housing.
1. Suspend the Master Station unit from the wall housing by looping the
third hand wire (the thick green wire) into the hook at the top of the
wall housing (see Figure 14).
2. If a chime module was installed, plug the chime module’s connector
into the CHIME connector on the DMC1 circuit board (see Figure 15).
Room Station and Music Speaker
Connection to Master Station
The DMC1 Master Station has 15 sockets for the Cat-5
quick connectors. If the system has more than nine Room
Stations, some Room Station pairs will share the same
station selector switch. Music speaker volume controls also
connect to the quick connector sockets. A MAXIMUM OF 15
SPEAKERS IN ANY COMBINATION (ROOM STATIONS,
PATIO STATIONS, OR 45-OHM MUSIC SPEAKERS) CAN
BE CONNECTED TO THE SYSTEM.
1. Refer to the room number identifi cation printed next to each connector
socket on the circuit board (see Figure 16). The connector room
number 1-9 identifi cation matches the station selector switches 1-9.
Stations 5, 6, 7, 8, and 9 each have two sockets for connection for
two Room Stations that will share the same station selector switch.
2. Insert each Cat-5 Room Station and music speaker quick connector
into the appropriate connector socket.
3. Write or label the names of the station locations in the numbered
areas provided inside the DMC1 front access door.
Patio Station Connection to Master Station
One connector socket on the DMC1 Master Station is
labeled for the Patio Station connection.
1. Plug the Patio Station quick connector into the PATIO socket. -OR- If
two Patio Stations are required for the installation, use the screw-
type terminal connector provided with the DMC1RW Patio Station
and wire both Patio Stations to the same connector and plug that
connector into the PATIO socket.
CHIME MODULE
MOUNTS ON FOUR
STANDOFFS INSIDE
THE DMC1H OR DMC1HC
WALL HOUSING
MC3 OR MC8
CHIME MODULE
Figure 13. Optional Chime Module Installation
DMC1H OR
DMC1HC
WALL HOUSING
DMC1
MASTER
USE GREEN
WIRE TO HANG
MASTER DURING
HOOKUP
"THIRD HAND"
WIRE
Figure 14. “Third Hand” Hanging Wire
PLUG CONNECTOR
FROM CHIME MODULE
INTO THE CHIME
CONNECTOR ON
THE MASTER
Figure 15. Chime Module Connection to Master Station
PLUG EACH STATION
CONNECTOR INTO
CORRECT SOCKET
ROOM 1
ROOM 2
ROOM 3
ROOM 4
ROOM 5
ROOM 6
PATIO
ROOM 9
ROOM 8
ROOM 7
ROOMS 5, 6, 7, 8, & 9
CAN BE SHARED BY
TWO ROOM STATIONS
Figure 16. Station Connections on Master Station