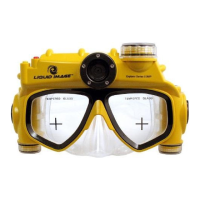
4.2 Video Mode -BLUE LIGHT
1. Press the POWER/MODE button for at least 1 second. The camera turns on.
2. Press the POWER/MODE button again for less than a second to change to
VIDEO Mode.
Note: the BLUE MODE LIGHT INDICATOR is on and the CAMERA MASK is now in
the VIDEO READY mode and set to take videos. The LCD screen displays the
movie camera icon.
3. Press the SHUTTER/SELECT button once. Recording begins.
Note: the BLUE MODE LIGHT INDICATOR is blinking. The light will continue to
blink until the camera stops recording.
4. To stop recording, press the SHUTTER/SELECT button again.
4.3 Power Off
1. Press the POWER/MODE button for more than 1 second to turn the camera off.
NOTE: If either the POWER/MODE or the SHUTTER/SELECT button has not been
used in 180 seconds, the CAMERA MASK will turn off automatically.
5.0 TRANSFERRING STILL IMAGES AND VIDEO TO A
COMPUTER
CAUTION: ALWAYS FOLLOW THE CARE AND MAINTENANCE INSTRUCTIONS
FOR RINSING IN FRESH WATER AND DRYING THE CAMERA MASK PRIOR TO
OPENING THE MEMORY COMPARTMENT.
The CAMERA MASK has two ways to transfer your image and video files to a
computer.The CAMERA MASK comes with a USB cable to connect your CAMERA
MASK directly to a computer. You may also choose to purchase and use a
commercially sold Micro SD Card to store and transfer images and videos that were
taken with the CAMERA MASK.
The computer does not require software to access the files stored on the CAMERA
MASK. The CAMERA MASK will act as an external hard drive when the USB cable
connects the camera to a computer.
ENG-11