6.4 Part Four - Testing the CAMERA MASK in shallow water
It is important to test the CAMERA MASK in a shallow area where you can stand
with your head above water.
1. Make sure the water is calm and free of obstacles, including people.
2. Wet hair, and then place the CAMERA MASK over the head. Make sure hair is
pulled back so that the seal around the mask is water tight.
3. Test the fit and water tightness around the eyes.Tighten or loosen the head
strap if needed.
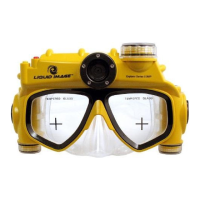
4. Feel the buttons on the top right side of the mask. Become familiar with the
finger placement.
5. Test all the camera modes and notice the MODE LIGHT INDICATOR colors
above your right eye.
6. Press and hold the power button until you see the MODE LIGHT INDICATOR
disappear.This indicates that the power to the CAMERA MASK is OFF.
7. Remain in shallow water and practice using the buttons on the CAMERA MASK
to record images and video until you are comfortable wearing and using the
CAMERA MASK while swimming.
CAUTION: For use while snorkeling or scuba diving, be sure you are comfortable
with the fit and use of the mask and camera functions prior to use during an
excursion. Perform the Camera Test prior to every excursion to check that all parts
are functioning.
CAUTION: The CAMERA MASK compartments should only be opened in a safe
indoor environment (away from sand and water) to perform necessary operations.
NEVER open any compartment that is sealed with screws.
ENG-16
7.0 CARE AND MAINTENANCE
When you are finished using the CAMERA MASK, always clean and wipe away any
water, sand, salt, or other debris before opening or storing. Always clean with FRESH
WATER.
To Clean:
1. Check all three caps for water tight closure before exposing to water.
2. Always rinse the CAMERA MASK in FRESH WATER to remove any sand, salt
or other debris. Do not use hot water or high pressure which may damage camera.