EasyManua.ls Logo

Loadrite LP930 - User Manual

Default Icon
12 pages
Print Icon
To Next Page IconTo Next Page
Loading...
1-1
LOADRITE LP930 | LP930-BT Printer User Manual
LOADRITE LP930 | LP930-BT Printer
User Manual
Document Number: 121529-95-ENG
Revision: B
Issued Date: June 2020
E: info@loadritescales.com
W: www.loadritescales.com
© 2020 Trimble Inc. All rights reserved. Trimble, the Globe & Triangle logo are trademarks and/or registered trademarks of Trimble Inc., registered in the United
States and in other countries. Loadrite is a trademark and/or registered trademark of Trimble Inc. All other trademarks and registrations are the property of their
respective owners.
The Bluetooth word mark and logos are registered trademarks owned by Bluetooth SIG, Inc. and any use of such marks by Trimble Inc. is under license.
The software contains proprietary information of Trimble Inc.; it is provided under a license agreement containing restrictions on use and disclosure and is also
protected by copyright law. Reverse engineering of the software is prohibited.
This document is copyrighted with all rights reserved. Under copyright laws, this document may not be copied in whole or in part, reproduced in any other media,
stored in a retrieval system, or transmitted in any form or by any means, electronic, mechanical, photocopying, recording or otherwise, without the express written
permission of Trimble Inc. Permitted copies must carry the same proprietary and copyright notices as were affixed to the original. Under the law, copying includes
translation into another language.
Published in New Zealand.
Disclaimer
Trimble Inc. operates a policy of on-going development. Please note that while every effort has been made to ensure that the data given in this document is
accurate, due to continued product development, the information, figures, illustrations, tables, specifications, and schematics contained herein are subject to change
without notice. Trimble Inc. does not warrant that this document is error-free. The screenshots and other presentations shown in this manual may differ from the
actual screens and presentations generated by the actual product. All such differences are minor and the actual product will deliver the described functionality as
presented in this document in all material respects. If you find any errors in the document, please report them to us in writing.
Trimble Inc. assumes no liability in connection with the use of any LOADRITE branded product.
The LP930 | LP930-BT is fully EMC (Electro-Magnetic Compatibility) compliant and is CE marked accordingly. A Declaration of Conformity, in accordance with the
EMC Directive 89/336/EEC (and as amended) is available from Trimble Inc. on request. The LP930 | LP930-BT also carries an automotive e-mark that applies,
provided the printer is installed in-line with the directive.
Question and Answer IconNeed help?

Do you have a question about the Loadrite LP930 and is the answer not in the manual?

Summary

Introduction

Installation

Installation Requirements

Guidelines for optimal mounting angle, orientation, and location to reduce dust/moisture entry and ensure accessibility.

Mounting Bracket

Details on attaching the printer using the included mounting bracket and adhesive for various surfaces.

Cable Connection

Instructions for connecting the LP930 (Serial) and LP930-BT (CAN/Bluetooth) printer cables to the indicator.

Configuration

Required settings for C-Series, L-Series, LM520, and X-Series indicators to connect the printer.

Printer Operation

Printer Modes

Explains Normal Mode (ready to print) and Spool Mode (storing data when paper is out or error occurs).

Printer Features

Details the Paper Feed button functionality and the status indications of the LED light.

Paper Roll Replacement

Step-by-step guide on how to replace the thermal paper roll in the printer.

Specifications

LP930 Cable Specification

Details the pinout for the LP930 serial cable, including GND, power, and data connections.

LP930-BT Cable Specifications

Details the pinout for the LP930-BT cable, including power and GND connections.

Overview

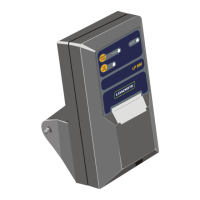
The LOADRITE™ LP930 | LP930-BT is an accessory to the LOADRITE weighing system, designed to provide a permanent record of weighing operations. This printer is supplied complete with a mounting bracket and two rolls of thermal printer paper.

Function Description:

The primary function of the LOADRITE LP930 | LP930-BT is to print a permanent record of weighing operations performed by a LOADRITE weighing system. The LP930 connects to the PRINTER/DATA LOGGER socket at the rear of the LOADRITE Indicator, while the LP930-BT connects to an available CAN socket on the power harness for power and communicates via Bluetooth® to the Indicator.

Important Technical Specifications:

  • Environmental:
    • Operating temperature: 0°C to +50°C.
  • Weight:
    • Approx. 340g (including roll of paper), excluding the mounting bracket.
  • Print Method:
    • Fixed head thermal mechanism.
  • Paper:
    • Width: 57.5mm
    • Maximum Roll Diameter: 55mm (approximate length: 33 meters)
    • Accepts paper rolls with or without a core.
  • Print Format:
    • Number of Columns: 24
    • Print Width: 48mm
    • Font (dots): 10 x 24
    • Dots Per Line (graphics): 384
    • Dot Spacing: 8 dots/mm (vertical and horizontal).
  • Character Set:
    • IBM® 224 character set, CP437.
  • Print Speed:
    • 50 mm/s.
  • Test Print:
    • Firmware version, encoded calibration data, supported character set.
  • Control Buttons:
    • Paper Feed
    • Lid Release.
  • Sensors:
    • Paper out (opto reflective)
    • Head Up (mechanical).
  • Data Input:
    • LP930: RS-232 Serial.
    • LP930-BT: Bluetooth®.
  • Baud Rate:
    • 9600 baud rate.
  • Data Buffer:
    • 20kb.
  • Power Requirements:
    • Input voltage range: 12V to 24V DC.
    • Average Current when printing: 2A @ 12V DC input.
    • Peak Current when printing: 7A @ 12V DC input.
    • Standby Current: 100mA @ 12V DC input.

Usage Features:

  • Installation Requirements: The printer should be installed at an appropriate mounting angle, orientation, and location to optimize use. To reduce dust/moisture entry, it should be mounted with the paper exit slot facing downward. Care must be taken to prevent external contaminants from entering when the lid is opened. The printer should not obstruct machine controls or operator visibility, and the lid must open freely for paper replacement. Easy operator access to controls is essential. Avoid direct sunlight or hot engine compartments; provide a screen if necessary.
  • Mounting Bracket: The printer comes with a mounting bracket that slots into the rear. To mount, push the lugs on the Belt Clip (MNT-BELTCLIP/BRKT-1) into the slots on the rear of the printer and slide up until it locks. Use the supplied double-sided adhesive to attach the mount to a suitable surface (e.g., vehicle window or ROPS). To remove, press the tab at the top of the Belt Clip.
  • Cable Connection (LP930): All power and signal connections are within the cable and connector assembly. Connect the printer cable to the PRINTER/DATA LOGGER socket on the LOADRITE Indicator. Ensure secure fastening and proper cable routing to prevent damage. Power is switched On/Off with the main power to the Indicator.
  • Cable Connection (LP930-BT): The LP930-BT has two connections: power and Bluetooth®. For power, locate an available CAN socket on the device's power harness and connect the LP930-BT Printer cable. The LED will light green when powered. Ensure secure fastening and proper cable routing. For Bluetooth®, navigate to Settings > Bluetooth on the Indicator. If Bluetooth is off, tap Off to enable it. Locate and tap the printer name (LOADRITE LP930-BT SN:XXXXXXXX) in the list of devices.
  • Configuration: Ensure the following settings are applied to the LOADRITE Weighing System Indicator or Integrator:
    • C-Series Integrator:
      • User Menu > Setup > Configure > Comms > Prt Port: LP930
      • User Menu > Setup > Configure > Comms > Prt Menu > Baud: 9600
    • L-Series Indicator:
      • Install Menu > Setup > Configure > Print > Printer: LP950
      • Install Menu > Setup > Configure > Print > Baud: 9600
    • Payload Management for Earthworks (LM520): All settings are automatically configured via Bluetooth® and require no changes.
    • X-Series Indicator:
      • Install Menu > Setup > Configure > Print > Printer: LP950
      • Install Menu > Setup > Configure > Print > Baud: 9600
  • Printer Modes:
    • Normal Mode: Ready to receive and print data. LED lights green when printing.
    • Spool Mode: Automatically enters this mode if paper runs out, the lid is open, or an error occurs. LED flashes, and data is stored but not printed. To exit, press the Paper Feed button twice.
  • Paper Feed Button: Used to fast-feed paper. In Idle Mode, pressing it twice prints a demonstration message (firmware version, calibration data, character set). In Spool Mode, pressing it prints stored data and then returns to Idle Mode.
  • LED Light: Indicates printer status with various color patterns:
    • Constant Green: Normal power, Normal buffer.
    • Fast-Flashing Green: Normal power, Spool buffer.
    • Long Green - Short Red: Low voltage power, Normal buffer.
    • Short Green - Short Red: Low voltage power, Spool buffer.
    • Fast-Flashing Red: Error, Spool buffer (printing prohibited).
    • No light: Off.

Maintenance Features:

  • Paper Roll Replacement: The printer uses standard 57mm wide thermal paper with a maximum roll diameter of 55mm.
    1. Slide the Lid Release button until the lid springs open.
    2. Unroll a small amount of paper and insert the roll into the printer with the unrolled portion close to the serrated metal edge.
    3. Close the lid, ensuring the paper protrudes through the slot. The lid will click into place.
    4. Press the Paper Feed button to check paper alignment.
    5. Tear off excess paper by pulling sharply towards the serrated metal edge.

Loadrite LP930 Specifications

General IconGeneral
BrandLoadrite
ModelLP930
CategoryPrinter
LanguageEnglish

Related product manuals