EasyManuals Logo

LS GIPAM 2000 User Manual

LS GIPAM 2000
6 pages
To Next Page IconTo Next Page
Page #1 background imageLoading...
Page #1 background image
Status LED
Function key
Relay operation
status indication
lamp
Direction key
Remote /
Local
CB
CLOSE/OPEN
MMI structure
How to operate CB Close/Open
Go to SYSTEM CONFIG menu on the initial screen.
Then go to RELAY CONFIG menu in the SYSTEM CONFIG.
Generate a cursor, and put the value to where you want to input.
The confirmation for the setting values can be done by following
~
process.
(After confirm, press to go back to the initial screen.)
* When it is not operated for 15
minutes while the password has
been released, the lamp on the LCD
screen will be off and it will be locked
again (But checking correction
value/measurement value is still
available regardless of the password)
* When approving the DC power again
after turn it off, it requires the
password input.
X 1 times
X 3 times
(Switch to Local(In site operation) status
and confirm)
(Indicated approximately for 3~4 sec)
Close Open Close Open
Operation
1) It works by pressing the Close / Open
button of the relay twice.
2)
operation should be conducted while
the
is indicated on the indication screen.
3) When the password is released,
②,
processes will be skipped and Close /
Open operation will be conducted through
①,
and
processes.
4) The password is required only when
inputting correction values, conducting
controls, and rebooting.
Checking status and measurement value monitoring
will be still available without password.
Function key
Direction key
Status LED
Operation Power
status indication
: Lights up when
operation power is
approved.
Indicates communication
status with
monitoring department
:
Flickering when
sending/receiving data
Indicates abnormal
status by internal
selfdiagnosis
: Lights up when an
error occurs
Indicates operation
status of the relay
: Flickering in Pick-up
status Lights up in
Trip status
CT/PT input
When input is over, save the changed
value by pressing , and then press
to go back to the preveious screen
( ).
(Initial monitor)
X 4 times
Press
to generate
a cursor.
Change the
value by using
and move
the cursor with
,
.
Put in the [ ]
by using
and move
the cursor with
,
.
5-1
: Display simple single line
diagram and measurement value
: Confirmation button, back to
the detail settings
: Cancel button, back to the
previous screen
: Cursor movement button
: Change the correction
values or relay elements. ( )
: Set the relay operation status
indication lamp
: Relay Reset button
: Save settings
: Delete accumulation
value (Wh, Vo, Io,
Event/Fault History)

Questions and Answers:

Question and Answer IconNeed help?

Do you have a question about the LS GIPAM 2000 and is the answer not in the manual?
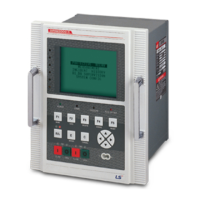
LS GIPAM 2000 Specifications

General IconGeneral
BrandLS
ModelGIPAM 2000
CategoryControl Unit
LanguageEnglish

Related product manuals