EasyManua.ls Logo

Lutron Electronics Serena - User Manual

Lutron Electronics Serena
8 pages
To Next Page IconTo Next Page
Loading...
Motorized shade with wireless radio frequency (RF) control.
Installation Guide—Please Read Before Installing
Serena® Remote-Controlled Shades
Insulating Honeycomb Shades
English
1
Lutron Electronics Co., Inc., 7200 Suter Road, Coopersburg, PA 18036-1299, U.S.A.
Printed in the U.S.A. 8/13 P/N 368-3194 Rev. B
Important Notes
Please Read Before Installing
!
WARNING: SHOCK HAZARD. Can cause serious injury or death. Read and follow all instructions.
!
CAUTION: RISK OF FALLING OBJECTS. Securely install the shade system per the mounting instructions.
Failure to do so could result in minor or moderate injury.
1. Read, follow, and save these instructions.
2. When mounting the brackets, make sure you are screwing into wood studs if possible. If not, you must use
appropriate fasteners (not included) for the mounting surface.
3. Make sure the brackets are aligned with each other. If not, the shade may not properly snap into the brackets.
4. Install the shade on its brackets and ensure a clear path for its travel before installing batteries.
5. Keep all LTE devices (routers, mobile phones, etc.) at least 3 ft (1 m) away from shade.
Included Components
Shade
Mounting brackets
Mounting screws
Spacers, if applicable
Required Tools
Pencil
Tape measure
Drill with 3/32" drill bit
#2 Phillips screwdriver
CE Information
(For model numbers CS-EDU-YK-
BULK and CS-EDU-YQ-BULK)
Lutron Electronics hereby declares
that CS-EDU-YK-BULK and
CS-EDU-YQ-BULK are in compliance
with the essential requirements and
other relevant provisions of Directive
1999/5/EC. A copy of the DoC can
be obtained by writing to:
Lutron Electronics Co., Inc.
7200 Suter Road
Coopersburg, PA 18036 U.S.A.
TRA
Registered No: ER0096954/12
Dealer No: 0016561/08
TRA Compliance Information
(For model number CS-EDU-YK-BULK)
Power Source Options (sold separately)
Batteries (type and quantity vary with shade width):
Eight (8) AA, lithium
or
Four (4) D, alkaline
Six (6) D, alkaline
Eight (8) D, alkaline
Rechargeable
batteries
Individual Power Supply:
CSPS-P1-1-6-WH
10 Output Power Supply Panel:
CSPS-P1-10-6
1 Prepare to Install
Question and Answer IconNeed help?

Do you have a question about the Lutron Electronics Serena and is the answer not in the manual?

Lutron Electronics Serena Specifications

General IconGeneral
BrandLutron Electronics
ModelSerena
CategoryIndoor Furnishing
LanguageEnglish

Summary

Prepare to Install

Important Notes

Key safety and installation guidelines before proceeding with the shade setup.

Power Source Options

Details on battery and wired power supply options available for the shade.

Mount Shade

2.1 Verify Correct Shade Size

How to confirm the shade fits the window opening before proceeding with installation.

2.2 Attach Brackets to Mounting Surface

Steps for positioning and securing mounting brackets to the wall or trim.

Bracket Placement

Diagrams and specifications for positioning brackets based on shade width.

2.3 Mount Shade in Brackets

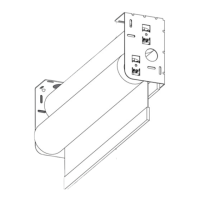
Instructions for attaching the shade headrail to the installed mounting brackets.

Install Power Source

3.1 Expose Top of Headrail

How to access the shade's internal components by releasing battery release tabs.

3.2 Connect Power Source

Guide for connecting battery or wired power supplies to the shade.

Assign Control & Program Shade

4.1 Assign Control

Steps to pair a wireless control with the shade for operation.

4.2 Adjust Upper Limit

Optional procedure to set the maximum raised position for the shade.

4.3 Adjust Lower Limit

Optional procedure to set the minimum lowered position for the shade.

4.4 Set Preset Levels

How to program a specific shade position as a user-defined preset.

4.5 Set Preset on Multiple Shades

Guide for setting individual presets for multiple shades simultaneously.

Restoring Factory Default

Removing the Shade from the Brackets

Cleaning the Fabric

Troubleshooting

A Shade Does Not Respond

Solutions for when the shade fails to operate or respond to its control.

B Shade Is Not Level

Advice for correcting uneven shade movement or positioning issues.

C Shade Does Not Reach Window sill

Steps to ensure the shade lowers correctly to the window sill position.

Shade Button Blink Codes

Explanation of LED indicator lights on the shade button and their diagnostic meanings.

Related product manuals