Do you have a question about the Lutron Electronics Sivoia QS and is the answer not in the manual?
Verify shade dimensions against window specifications for proper fit.
Mark and position dual mounting brackets centered over the window for secure installation.
Select and drill access points for power and communication cables in the brackets.
Mount the first and second dual brackets securely to the structure.
Strip and wire the 4-pin terminal block to the EDU connector cables.
Route wires through designated slots, ensuring buttons are accessible.
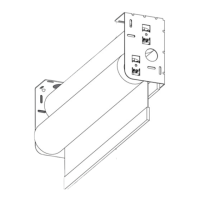
Install the idler and EDU sides of the shade into their respective brackets.
Fine-tune shade level and centering by adjusting mounting brackets and screws.
Plug the 4-pin terminal block into the EDU terminal block and secure wiring.
Tighten retaining screws in each bracket to finalize shade installation.
Verify shade fabric tracking and use shimming to correct telescoping issues.
Configure the shade's open and close travel limits directly from the EDU.
Confirm programmed open and close limits by testing shade movement.
Install the lower shade by repeating the setup steps from 6 through 13.
Ensure all connected devices are communicating properly within the system.
Reset the EDU to its factory default settings without affecting programmed limits.
Identify and resolve common symptoms like shade movement, fabric leveling, and EDU errors.
Understand the warranty coverage period, scope, exclusions, and limitations.
Find contact information for technical support, customer service, and warranty claims.
| Brand | Lutron Electronics |
|---|---|
| Model | Sivoia QS |
| Category | Indoor Furnishing |
| Language | English |