ENGLISH
4
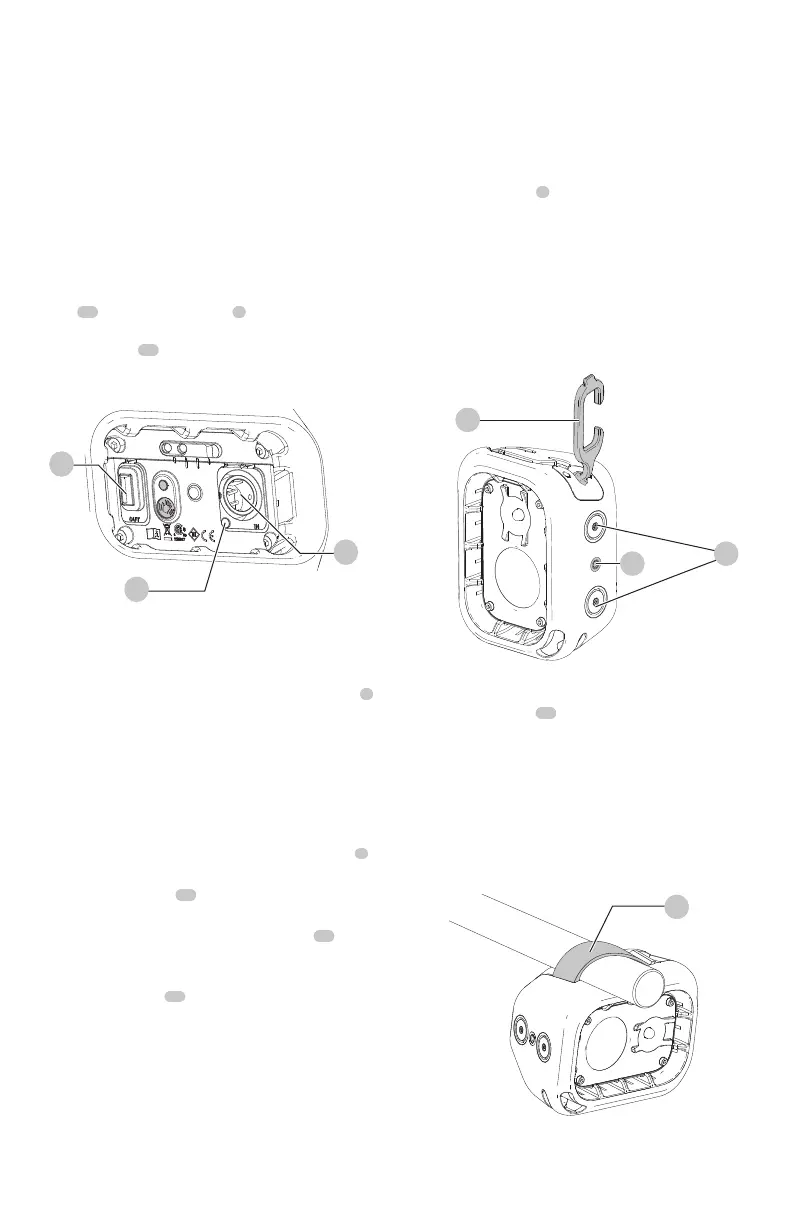
Hang Hook (Fig.C)
CAUTION: When the area light hangs by the hang
hook, do not shake the area light or the object from
which it hangs. Do not hang the area light from any
electrical wires or anything that is not secure. Personal
injury or property damage mayoccur.
Light Placement (Fig. A, C, D)
The area light can be used one of five ways.
• On a levelsurface.
• Hung from a joist or saw horse using the hang hook
6
.
Refer to Hang Hook for furtherinstruction.
• Using the hang strap
14
to attach the area light to an
object. Refer to Hang Strap for furtherinstruction.
• Mounted to a tripod using the screw threads
12
located on the bottom and side of the area light. Refer
to Screw Threads for furtherinstruction.
• Using the magnets
11
located on the bottom
and sides of the area light. Refer to Magnets for
furtherinstruction.
Power Bank (Fig. B)
The power bank can be used when the lamp is in use and
when it is being charged.
1. Plug your device charging cable into the output port
4
2. Your device will begin to charge automatically.
NOTE: If the lamp battery fully discharges, your device
will no longer charge and the lamp must be recharged.
Fig. D
14
Hang Strap (Fig. D)
The built in hang strap
14
can be used to attach the area
light to objects in the space you are workingin.
1. To access the hang strap, pull the strap upwards, away
from the area lighthousing.
2. Wrap the strap around the object you want to attach
the light to and fix the end of the strap to one of the
rods as shown in Fig. D.
NOTE: Ensure the hang strap is fully secured and will
not unattach from the rods beforeproceeding.
Fig. C
6
12
11
Fig. B
3
10
4
Getting Started (Fig. A, B)
NOTE: For best results, make sure your area light is
fullycharged. Always charge the battery after long period
of storage (such as 6 months) to prevent permanent
capacityloss.
To charge the area light, insert the power supply
adaptor
13
into the DC input port
3
and plug the unit into
any 120V AC power source, such as a wall receptacle. The
charging indicator
10
will illuminate green when the area
light is fully charged.
OPERATION
WARNING: To reduce the risk of serious personal
injury, turn unit off and disconnect it from
power source before making any adjustments or
removing/installing attachments or accessories.
An accidental start‑up can causeinjury.
CAUTION: Only use the hang hook for hanging
the LED area light. The hang hook is not intended
to support additional weight. Do not attach or
hang anything additional to the area light or risk of
breakage mayoccur.
CAUTION: Do not use the hang hook to reach with or
to support your weight in anysituation.
The built in hang hook
6
can be be attached to anchored
objects in the space you are workingin.
1. To access the hang hook, pull the hook upwards, away
from the area light housing until the hook opening
isexposed.
2. Secure the hang hook onto an anchored object in your
workspace.
NOTE: Ensure the hang hook is fully secured and will
not slide off the anchored object beforeproceeding.