EasyManua.ls Logo

Magic Chef 9522WUA - User Manual

Magic Chef 9522WUA
16 pages
Print Icon
To Next Page IconTo Next Page
Loading...
8112P322-60
(02-99-00)
TABLE OF CONTENTS
IMPORTANT SAFETY INSTRUCTIONS 2-3.........
CLOCK AND TIMER 4............................
USING YOUR OVEN 5-10.........................
Oven characteristics 5...........................
Fan 5.........................................
Oven indicator light 5............................
Use of aluminum foil 5...........................
Preheating 5...................................
Oven controls 5................................
How to set oven controls 6.......................
Double wall oven - lower oven 6..................
Oven racks 7...................................
Baking tips 8...................................
Roasting tips 8.................................
Common baking problems chart 9.................
Broil tips and broil chart 10.......................
CONTINUOUS CLEANING OVEN 11................
CARE AND CLEANING CHART 12.................
MAINTENANCE 13...............................
Oven door 13..................................
Oven light 13...................................
Oven vent 13...................................
Oven window 13................................
SERVICE 14-15..................................
Troubleshooting chart 14-15......................
WARRANTY 16..................................
24-inch Electric Wall Oven
with
Time-Of-Day Clock and Timer
Owners Guide
Model Number:
Serial Number:
Date of Purchase:
INSTALLER Please leave
this manual with this appliance.
CONSUMER To save you
time, energy and money, read
and keep this manual for future
reference.
Model and serial numbers are on the rating plate located on the front oven
frame for single wall ovens. For double wall ovens, the rating plate is
located on the front oven frame of the lower oven. Open the oven door to
see the rating plate.
- - -
FOR CUSTOMER ASSISTANCE CALL 1-800-688-9900 USA
1-800-688-2002 Canada
8112P322-60
A/01/06
Question and Answer IconNeed help?

Do you have a question about the Magic Chef 9522WUA and is the answer not in the manual?

Overview

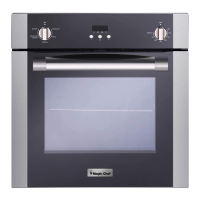
This document is an owner's guide for a 24-inch electric wall oven, featuring a time-of-day clock and timer. It provides comprehensive information on the appliance's function, technical specifications, usage, and maintenance.

Function Description:

The electric wall oven is designed for baking, roasting, and broiling food. It includes a time-of-day clock and a separate timer function. The oven operates with two control knobs: an Oven Temperature knob and a Selector knob. For single wall ovens, the Oven Temperature knob is marked "OVEN & BROILER," while for double wall ovens, the upper oven knob is marked "UPPER OVEN." The Selector knob determines the type of oven operation, with settings for BAKE and BROIL. The lower oven of double wall oven models only has a bake element and does not use a Selector knob. A fan automatically turns on during cooking operations and turns off when the oven is switched off. An oven indicator light illuminates when the oven is on and cycles on and off as the heating elements maintain the preset temperature.

Important Technical Specifications:

  • Oven Type: 24-inch Electric Wall Oven.
  • Controls: Two knobs (Oven Temperature and Selector) for single wall ovens; two knobs for the upper oven and one for the lower oven in double wall ovens.
  • Timer Range: 1 minute (0:01) up to 12 hours (12:00). The timer does not control the oven's operation.
  • Oven Racks: Two oven racks with a lock-stop position to prevent them from coming completely out.
  • Oven Light: Uses a 40-watt appliance bulb.
  • Continuous Cleaning Oven: Features a dark gray, white stipple, and rough, porous textured finish designed to absorb and oxidize spatters during normal oven use. The oven door liner is porcelain enamel.
  • Power Supply: Designed for operation on a 208-volt circuit, which may affect broil times.

Usage Features:

  • Setting the Clock: Press the CLOCK pad, then use the up/down arrow pads to adjust the time in 1-minute or 10-minute increments. The display flashes when power is interrupted until the clock is set.
  • Setting the Timer: Press the TIMER pad, then use the up/down arrow pads to set the desired time. The timer starts automatically after a few seconds, indicated by a flashing colon. A beep sounds at 1 minute, and three beeps sound at the end of the timer operation.
  • Baking/Roasting: Requires setting both the Oven Temperature and Selector knobs (or just the temperature knob for the lower oven of a double wall oven). Preheating for 10-15 minutes is recommended for proper baking results. Food should be placed in the center of the oven, allowing at least two inches between the utensil and oven walls.
  • Broiling: Only the upper oven can be used for broiling in double wall oven models. Both Oven Temperature and Selector knobs must be set to BROIL. For lower temperature broiling, the Oven Temperature knob can be set to 350°F while the Selector knob remains at BROIL. Preheat the broil element for 3 minutes for optimum results. The oven door should be opened to the broil stop position (about 6 inches) during broiling.
  • Oven Racks: Designed to be placed in desired positions when the oven is cool. Rack positions are numbered 1 (bottom) to 4 (top). Specific rack positions are recommended for different types of cooking (e.g., Rack 4 for two-rack cooking, Rack 3 for most broiling, Rack 2 for one-rack baking, Rack 1 for roasting turkey).
  • Aluminum Foil Use: Not recommended to cover entire racks or place directly under cookware. A small piece of foil can be placed on the rack below a pan to catch spills.
  • Bakeware: Different bakeware materials (shiny metal, dark metal, oven-proof glassware, insulated bakeware) can affect baking results and may require adjustments to oven temperature or cooking time.

Maintenance Features:

  • Broiler Pan & Insert: Remove from oven after use, cool, pour off grease, then wash with soapy water. Stubborn soil can be removed with a soap-filled scouring pad. Dishwasher safe.
  • Baked Enamel (Oven Door): Wipe up spills immediately with a dry paper towel or cloth. Wash with soap and water when cool. Avoid abrasive or harsh cleaning liquids/powders.
  • Control Knobs: Gently pull forward to remove. Wash in mild detergent and water. Avoid abrasive cleaning agents. Rinse, dry, and replace, ensuring correct placement.
  • Glass (Oven Window): Wash with soap and water. Stubborn soil can be removed with a paste of baking soda and water. Avoid abrasive materials. Rinse with clear water and dry.
  • Metal Finishes (Trim Parts): Wash with soap and water. Stubborn soil can be removed with a paste of baking soda and water. Avoid oven cleaner, abrasive, or caustic agents.
  • Oven Elements: Self-cleaning; soil burns off as elements are used. Do not spray oven cleaner on elements.
  • Oven Racks: Clean with soapy water. Remove stubborn soil with cleansing powder or soap-filled scouring pad. Rinse and dry.
  • Plastic Finishes (Door Handle, Trim): Wipe up fat, grease, or acid spills immediately with a dry paper towel or cloth. When cool, clean with soap and water. Avoid oven cleaner, powder, or liquid cleansers, abrasive, or caustic cleaning agents.
  • Porcelain Enamel (Oven, Door Liner): Wipe up all spills, especially acidic or sugar spills, immediately with a dry cloth. Avoid wiping warm/hot surfaces with a damp cloth. Oven cleaner can be used on porcelain enamel oven surfaces, but not on the continuous cleaning oven.
  • Silicone Rubber Door Gaskets: Wash with soap and rinse thoroughly. Do not remove.
  • Continuous Cleaning Oven: The special finish cleans most spatters during normal oven use. Heavy spillovers may require manual cleaning with a nylon brush or plastic pad and clear water. Avoid paper towels, cloths, sponges, oven cleaners, powdered cleansers, soap, detergent, paste, abrasive materials, steel wool, sharp instruments, or scrapers on continuous cleaning surfaces.
  • Oven Light Bulb Replacement: Disconnect power to the oven. Ensure the bulb is cool. Unscrew the old bulb carefully with a dry potholder and replace it with a 40-watt appliance bulb. Reconnect power and reset the clock.
  • Oven Door Removal/Replacement: To remove, open the door to the broil stop position (about 4 inches), grasp both sides, and lift evenly until it clears the hinge arms. To replace, align slots in the door with hinge arms, slide down until seated, then push down on top corners. Do not operate the oven until the door is properly replaced.

Magic Chef 9522WUA Specifications

General IconGeneral
BrandMagic Chef
Model9522WUA
CategoryOven
LanguageEnglish

Related product manuals