ENG
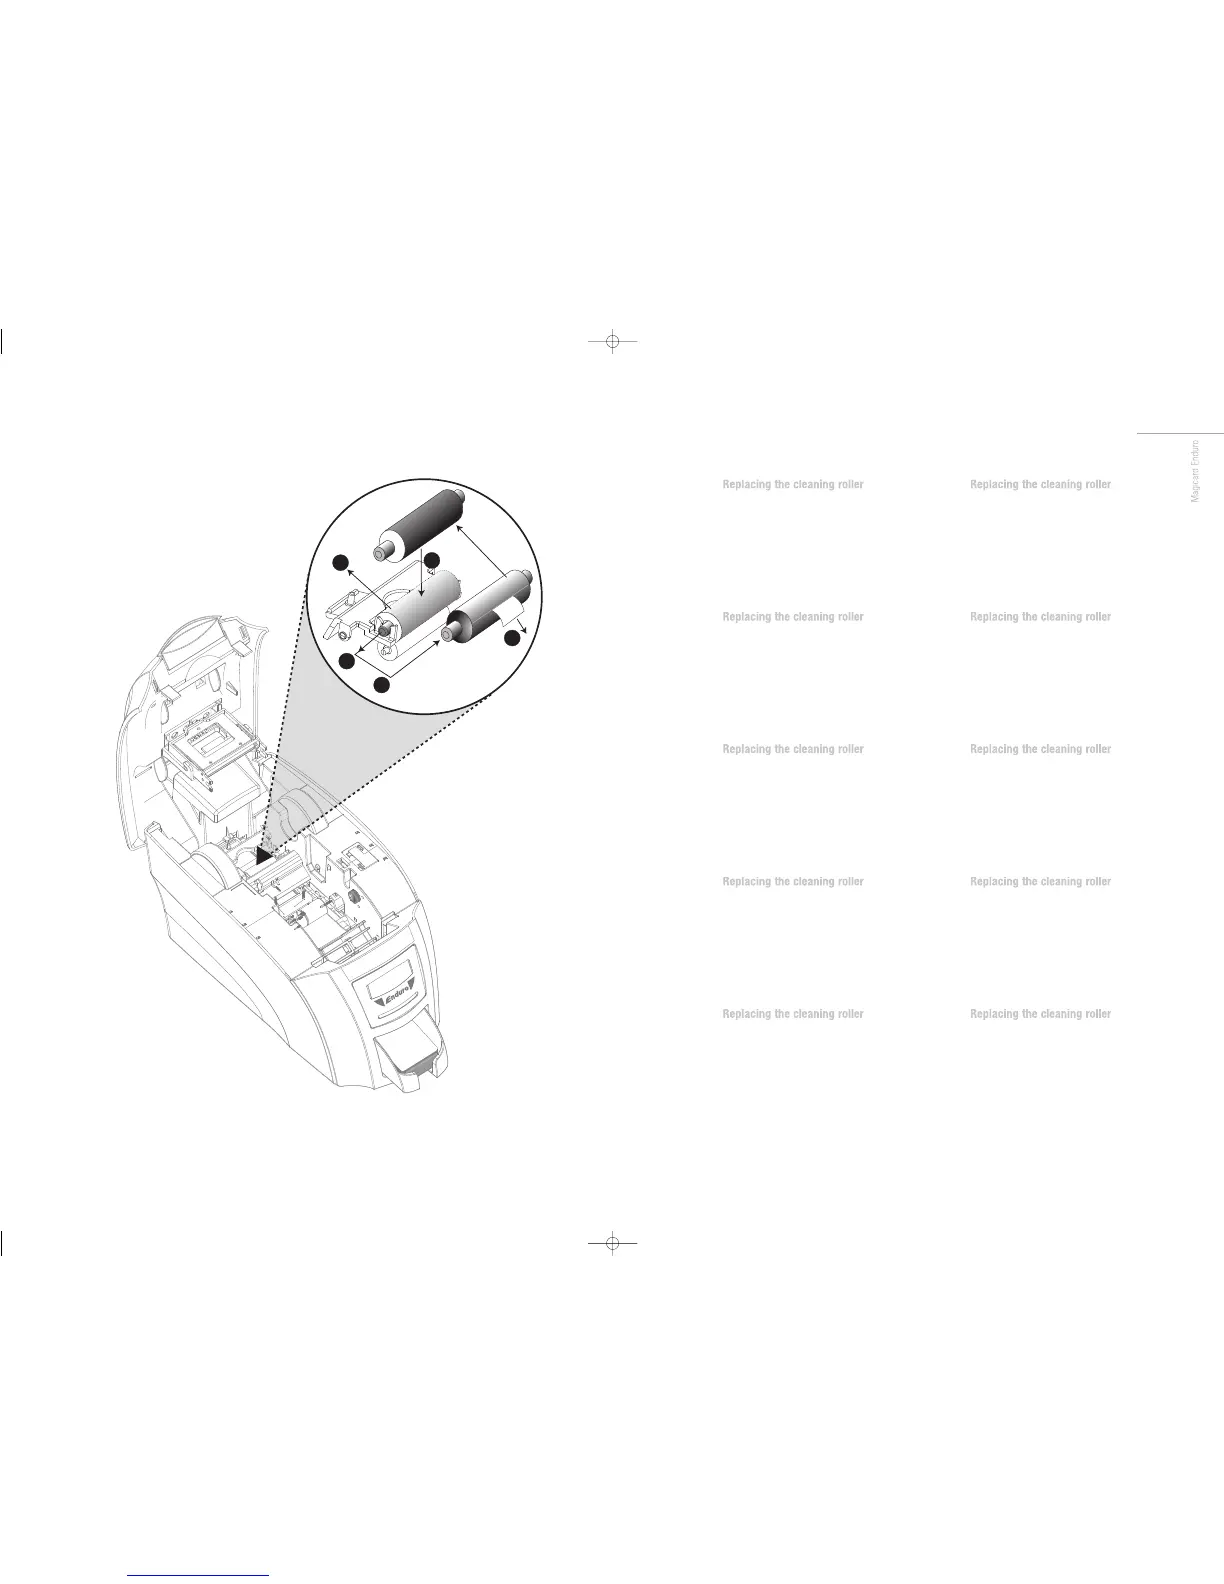
A new cleaning roller is supplied with
each dye film roll.
– Open printer and remove used dye film.
A Pull out the used cleaning roller.
B Remove metal bar.
C Slide the metal bar into the new cleaning roller.
D Peel off white protective layer carefully
to reveal tacky surface.
E Place new cleaning roller into printer.
FR
A new cleaning roller is supplied with
each dye film roll.
– Open printer and remove used dye film.
A Pull out the used cleaning roller.
B Remove metal bar.
C Slide the metal bar into the new cleaning roller.
D Peel off white protective layer carefully
to reveal tacky surface.
E Place new cleaning roller into printer.
ES
A new cleaning roller is supplied with
each dye film roll.
– Open printer and remove used dye film.
A Pull out the used cleaning roller.
B Remove metal bar.
C Slide the metal bar into the new cleaning roller.
D Peel off white protective layer carefully
to reveal tacky surface.
E Place new cleaning roller into printer.
PT
A new cleaning roller is supplied with
each dye film roll.
– Open printer and remove used dye film.
A Pull out the used cleaning roller.
B Remove metal bar.
C Slide the metal bar into the new cleaning roller.
D Peel off white protective layer carefully
to reveal tacky surface.
E Place new cleaning roller into printer.
IT
A new cleaning roller is supplied with
each dye film roll.
– Open printer and remove used dye film.
A Pull out the used cleaning roller.
B Remove metal bar.
C Slide the metal bar into the new cleaning roller.
D Peel off white protective layer carefully
to reveal tacky surface.
E Place new cleaning roller into printer.
DE
A new cleaning roller is supplied with
each dye film roll.
– Open printer and remove used dye film.
A Pull out the used cleaning roller.
B Remove metal bar.
C Slide the metal bar into the new cleaning roller.
D Peel off white protective layer carefully
to reveal tacky surface.
E Place new cleaning roller into printer.
CN
A new cleaning roller is supplied with
each dye film roll.
– Open printer and remove used dye film.
A Pull out the used cleaning roller.
B Remove metal bar.
C Slide the metal bar into the new cleaning roller.
D Peel off white protective layer carefully
to reveal tacky surface.
E Place new cleaning roller into printer.
RU
A new cleaning roller is supplied with
each dye film roll.
– Open printer and remove used dye film.
A Pull out the used cleaning roller.
B Remove metal bar.
C Slide the metal bar into the new cleaning roller.
D Peel off white protective layer carefully
to reveal tacky surface.
E Place new cleaning roller into printer.
PL
A new cleaning roller is supplied with
each dye film roll.
– Open printer and remove used dye film.
A Pull out the used cleaning roller.
B Remove metal bar.
C Slide the metal bar into the new cleaning roller.
D Peel off white protective layer carefully
to reveal tacky surface.
E Place new cleaning roller into printer.
NL
A new cleaning roller is supplied with
each dye film roll.
– Open printer and remove used dye film.
A Pull out the used cleaning roller.
B Remove metal bar.
C Slide the metal bar into the new cleaning roller.
D Peel off white protective layer carefully
to reveal tacky surface.
E Place new cleaning roller into printer.
Enduro QSG multi language V3 - 07:Enduro QSG multi language V2- 07 29/1/08 14:10 Page 41
 Loading...