BAZ72501-en
Pos: 32 /Techn ische Dokument ation/Alle Ger äte/Übersc hriften/ Überschrifte n 1/I/Überschr ift 1: Instandha ltung @ 28\mod _133 2159 81253 6_75.d ocx @ 156 5908 @ 1 @ 1
Pos: 33 / Techn ische Dokument ation/ Alle Ger äte/Übersc hriften/ Überschrifte n 1.1/R/Über schrift 1.1: Rein igung @ 6\mod_1178617677265_75.docx @ 91586 @ 2 @ 1
Pos: 3 4 /Tec hn ische Dokum ent ation/ Leist ungs prüfs tänd e, Diagnos e-/ Abgas ger ät e/Z7 Zub eh ör a llgem ei n/2 501 M AHA P TI T ool/ BA/ Inh alt: Z72 5 Rein igung @ 3 1\mod_1364373962760_75.docx @ 1732581 @ @ 1
Make sure that the contacts of the female USB connector and the male OBD
connector are not dirty or damaged.
Clean the housing, the female USB connector and the male OBD connector as
required using mild detergent.
Pos: 35 /Techn ische Dokument ation/Alle Ger äte/Übersc hriften/ Überschrifte n 1.1/F/Über schrift 1.1: Fehl erbehebung @ 8\mod_1206714646748_75.docx @ 179620 @ 2 @ 1
Pos: 3 6 /Tec hn ische Dokum ent ation/ Leist ungs prüfs tänd e, Diagnos e-/Ab gas gerä te/ Z7 Z ube hör all gem ein/ 250 1 MAH A PTI To ol/B A/In hal t: Z 725 Fe hlerb ehe bu ng @ 31\mod_1364373354106_75.docx @ 1732537 @ @ 1
• Pay attention to the display elements and sensor, see "Initial Operation >
Display".
• Make sure that the MAHA PTI Tool has been correctly commissioned.
• Make sure that the EUROSYSTEM software has been started up correctly.
• Check that there is a proper connection between the vehicle, the
MAHA PTI Tool and the PC.
• Please contact the service hotline.
Pos: 37 /Tec hnische Dokume ntat ion/Alle Geräte/ Übersc hriften/ Übers chrifte n 1.1/E /Übersc hrift 1 .1: Er satztei le @ 1 8\mod _125 55968 47002 _75.d ocx @ 474 414 @ 2 @ 1
Pos: 38 / Techn ische Dokument ation/ Alle Ger äte/I nhalte/I nhalt: Er satzte ile - Al le Ger äte_12pt @ 26\mod_1324468768120_75.docx @ 1141219 @ @ 1
To ensure safe and reliable operation, only use original spare parts supplied by the
equipment manufacturer.
Pos: 39 /Techn ische Dokument ation/Alle Ger äte/Übersc hriften/ Überschrifte n 1.1/B/Über schrift 1.1: Batt erie wechseln @ 11\m od_ 12295 88856 866_7 5.docx @ 28525 0 @ 2 @ 1
Pos: 4 0 /Tec hn ische Dokum ent ation/ Leist ungs prüfs tänd e, Diagnos e-/A bgasgerä te/Z7 Zubeh ör all gemein/ 2501 MAH A P TI Tool/ BA/Inh alt: Z 725 Ba tterie w echsel n (Tex t) @ 31\m od_ 136 437 414 402 3_75.d ocx @ 173 262 5 @ @ 1
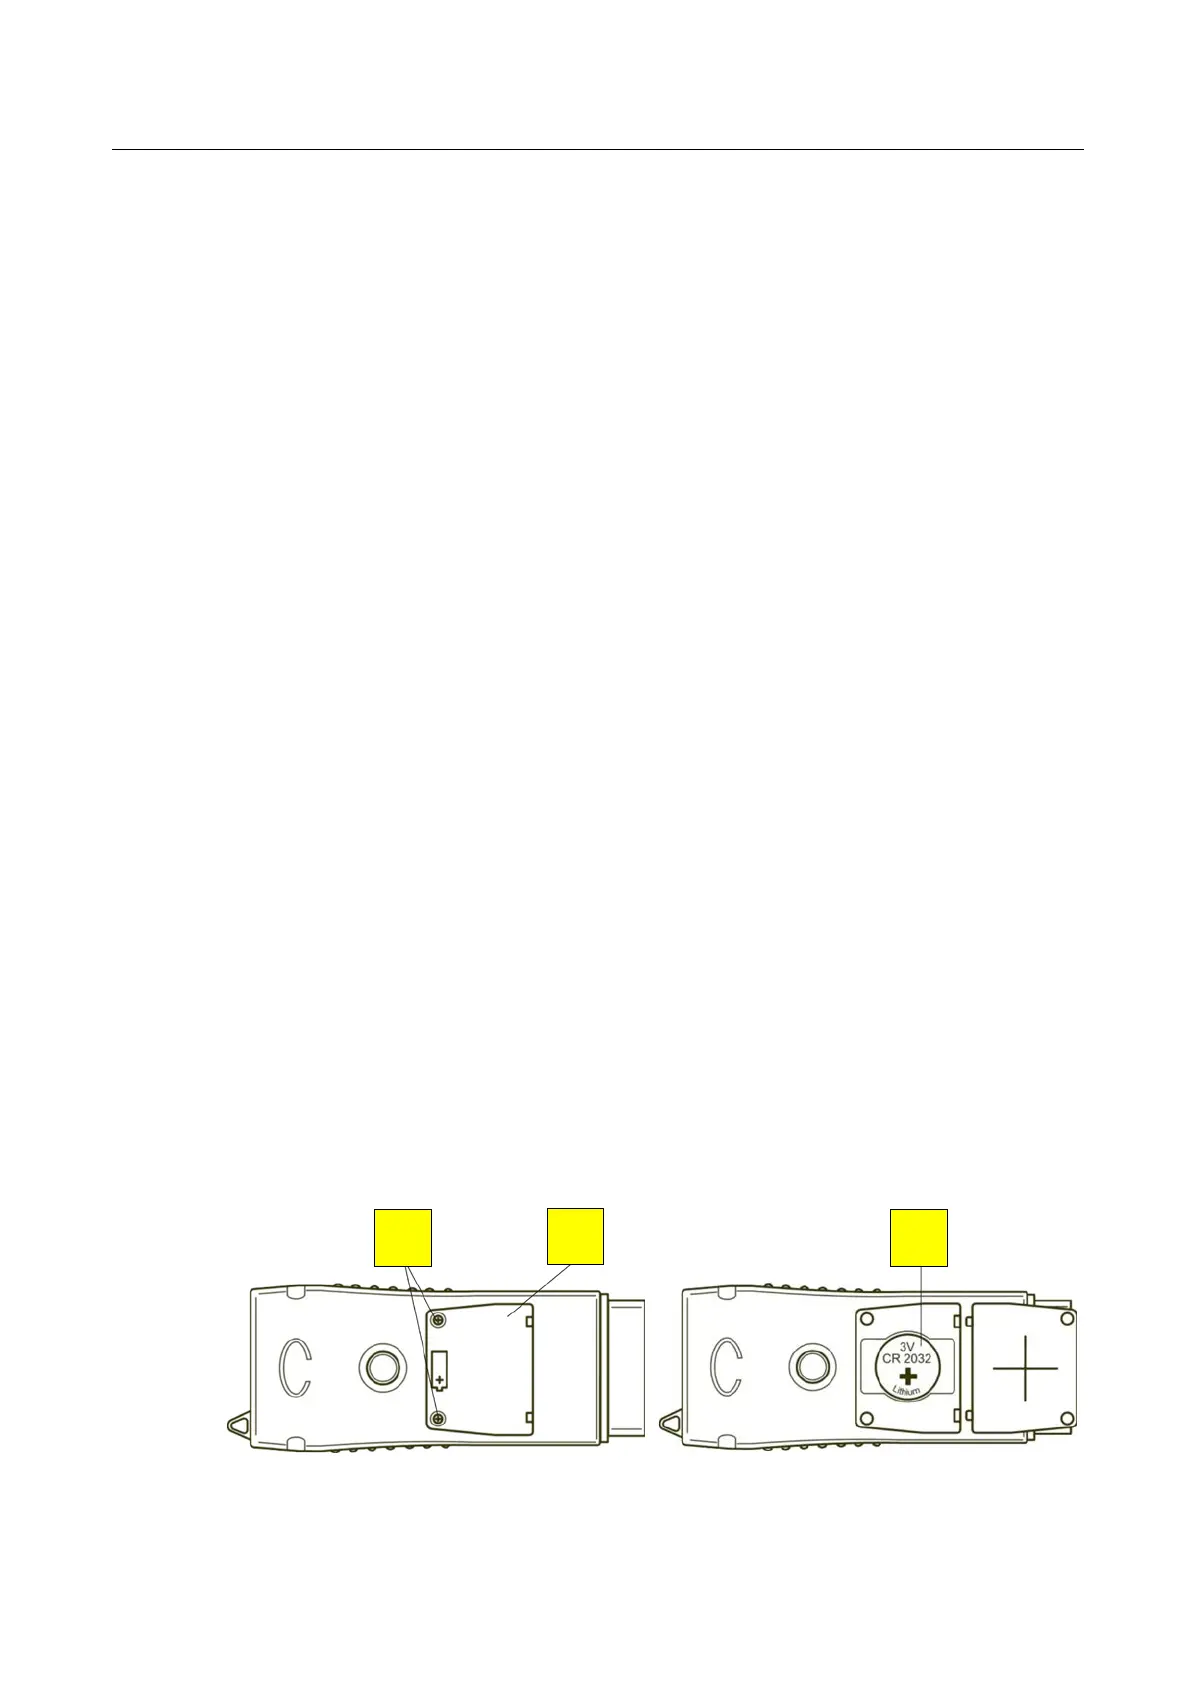
1 Loosen the screws (N) and remove the cover (E).
2 Replace the battery (O). Note the polarity! The positive pole must be pointing
outwards/upwards as depicted.
3 Replace the cover and tighten the screws.
Pos: 4 1 /Tec hn ische Dokum ent ation/ Leist ungs prüfs tänd e, Diagnos e-/A bgasgerä te/Z7 Zubeh ör all gemein/ 2501 MAH A P TI Tool/ BA/Inh alt: Z 725 Ba tterie w echsel n (Bilder ) @ 31\mod_1364377021994_0.docx @ 1732669 @ @ 1
Pos: 42 /----- Form at-----/ MAN UEL LE R UM BR UCH S ei ten umb ruch @ 0 \mod_1134403577687_0.docx @ 1277 @ @ 1
N
E
O