Do you have a question about the Makita 1100 and is the answer not in the manual?
Depth of cut is adjusted by turning the knob on the front of the tool.
Start by resting the tool on the workpiece surface without blades touching, then switch on.
Keep blades sharp for best performance using the sharpening holder to remove nicks.
Check carbon brushes regularly and replace when worn to the limit mark.
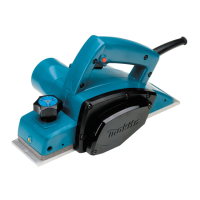
The Makita Power Planer Model 1100 is a robust electric tool designed for efficient and precise planing operations. This instruction manual provides comprehensive guidance on its safe and effective use, maintenance, and available accessories, ensuring optimal performance and longevity of the device.
The primary function of the Makita Power Planer is to smooth and shape wood surfaces by removing thin layers of material. It is equipped with an 82 mm (3-1/4") planing width, making it suitable for a variety of woodworking tasks, from rough cutting to achieving a fine finish. The tool operates with a high no-load speed, ensuring quick and clean cuts. Its design incorporates a double insulation system, enhancing user safety by providing an extra layer of protection against electric shock.
The planer features an adjustable depth of cut, controlled by a knob located on the front of the tool. This allows users to precisely set the amount of material to be removed, accommodating different project requirements. For continuous operation, the trigger switch can be locked in the "ON" position, reducing user fatigue during extended use. The tool is also capable of shiplapping, which involves making stepped cuts along the edge of a workpiece, and chamfering, creating a beveled edge. These functions are facilitated by an edge fence and a "V" groove in the front base, respectively, allowing for accurate and consistent results.
To ensure safe and effective operation, users must adhere to several key practices. Before connecting the tool to a power source, it is crucial to verify that the voltage matches the specifications on the nameplate. The work area should always be kept clean, well-lit, and free from flammable liquids or gases. Children and visitors must be kept away from the work area to prevent accidents.
When operating the planer, it is essential to hold the tool firmly with both hands and keep hands away from rotating parts. Before starting a cut on an actual workpiece, it is recommended to let the tool run for a while to check for any vibration or wobbling, which could indicate improper blade installation. The blade should attain full speed before making contact with the workpiece. For optimal planing, apply pressure on the front of the tool at the start of planing and at the back at the end. Inclining the workpiece can also facilitate smoother planing. The speed and depth of cut should be adjusted according to the desired finish; a shallower cut and slower advance are recommended for a finer finish, while a deeper cut can be used for rough cutting.
The planer's blades must be set correctly and securely to achieve a smooth and even planing surface. The cutting edge of the blade should be absolutely level and parallel to the surface of the rear base. The manual provides detailed instructions and illustrations for proper blade installation and adjustment, emphasizing the importance of checking for alignment and tightness of bolts to prevent uneven cutting or dangerous wobbling.
For shiplapping, the edge fence is inserted into a hole in the front of the tool and aligned with the cutting line on the workpiece. The fence is then adjusted to contact the side of the workpiece and secured with a screw. For chamfering, the "V" groove in the front base is aligned with the edge of the workpiece. These features allow for versatile applications and precise shaping of wood.
Regular maintenance is crucial for ensuring the safety, reliability, and extended lifespan of the Makita Power Planer. Before performing any inspection or maintenance, the tool must always be switched off and unplugged to prevent accidental startup.
One of the key maintenance tasks is the replacement of carbon brushes. Users should regularly remove and check the carbon brushes, replacing them when they wear down to the limit mark. It is important to keep the carbon brushes clean and free to slip in their holders. Both carbon brushes should be replaced simultaneously, and only genuine Makita carbon brushes should be used. The process involves removing the chip cover and brush holder caps with a screwdriver, taking out the worn brushes, inserting new ones, and securing the caps.
Maintaining sharp blades is essential for the best performance. The manual recommends using a sharpening holder to remove nicks and produce a fine edge. Before sharpening, the dressing stone should be immersed in water for 2-3 minutes. The sharpening holder is designed to hold two blades simultaneously, ensuring they contact the dressing stone at the same angle for uniform sharpening. Proper blade installation and adjustment are also critical maintenance aspects, as loose or improperly aligned blades can lead to poor planing action, vibration, and potential tool breakdown. The blade installation bolts must be tightened carefully and securely, and clearances between the blade ends and the tool body should be checked by hand-rotating the drum.
The tool's cords should be inspected periodically for damage and repaired by an authorized service facility if necessary. Handles should be kept dry, clean, and free from oil and grease. For any repairs or adjustments, it is recommended to use Makita Authorized or Factory Service Centers and always use Makita replacement parts to maintain product safety and reliability. Adhering to these maintenance guidelines will help ensure the planer continues to operate efficiently and safely for many years.
| Input power | - W |
|---|---|
| Power source | AC |
| Idle speed | 16000 RPM |
| Vibration level | 3 m/s² |
| Planning width (max) | 82 mm |
| Chip thickness (max) | 3 mm |
| Depth | 150 mm |
|---|---|
| Width | 415 mm |
| Height | 172 mm |
| Weight | 4900 g |