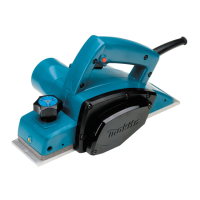
The Makita Power Planer, Model 1911B, is a robust and efficient tool designed for various woodworking applications, offering precision and ease of use for both professional and DIY enthusiasts. This instruction manual provides comprehensive guidelines for its safe operation, maintenance, and optimal performance.
Function Description
The power planer is primarily used for planing wood surfaces, allowing users to smooth rough timber, reduce the thickness of a workpiece, or create chamfers. Its core function involves a rotating drum equipped with sharp planer blades that shave off thin layers of wood as the tool is moved across the surface. The depth of cut is adjustable, providing versatility for different tasks, from aggressive material removal to fine finishing. The tool is designed with double insulation, enhancing user safety by eliminating the need for a grounded power cord and system.
Usage Features
Operating the Makita Power Planer involves several key features that contribute to its effectiveness and user comfort:
- Adjusting Depth of Cut: The depth of cut can be easily adjusted by turning a knob located on the front of the tool. This allows for precise control over the amount of material removed with each pass, enabling users to achieve desired thicknesses and finishes. For rough cutting, a deeper cut can be set, while for a finer finish, a shallower cut and slower advance speed are recommended.
- Switch Action: The tool is activated by pulling the switch trigger. For continuous operation, the switch trigger can be pulled and then the lock button pushed in. To stop the tool from the locked position, the trigger is pulled fully and then released. Before plugging in the tool, it's crucial to ensure the switch trigger actuates properly and returns to the "OFF" position when released, as a malfunctioning switch can be dangerous.
- Planing Operation: To begin planing, the front base of the tool should be rested flat upon the workpiece surface, ensuring the blades are not in contact. Once the blades attain full speed after switching on, the tool is moved gently forward. Pressure should be applied to the front of the tool at the start of planing and shifted to the back at the end. Inclining the workpiece can facilitate easier planing, especially when working downhill. The planer is designed to maintain a cutting speed that prevents jamming by chips, ensuring smooth operation.
- Chamfering: The planer is equipped with a "V" groove in the front base, which allows for chamfering. To create a chamfer, the "V" groove is aligned with the edge of the workpiece, and the tool is planed along this line. This feature adds versatility for decorative or functional edge treatments.
- Blade Setting for Correct Planing: Achieving a smooth and even planing surface depends heavily on the correct and secure setting of the planer blades. The blades must be mounted so that their cutting edge is absolutely level and parallel to the surface of the rear base. Incorrect blade settings can lead to rough surfaces, nicks, or gouging at the start or end of the cut. The manual provides visual examples of proper and improper blade settings to guide users.
Maintenance Features
Proper maintenance is essential for extending the life of the Makita Power Planer and ensuring its continued safe and efficient operation.
- Removing and Installing Planer Blades: Blades are removed by unscrewing the installation bolts with the provided socket wrench, allowing the drum cover and blades to come off together. When installing new blades, it's critical to clean out any chips or foreign matter from the drum and blades first. Only blades of the same dimensions and weight should be used to prevent drum oscillation, vibration, and eventual tool breakdown. The blades are placed on a gauge base, ensuring the blade edge is flush with the inside edge of the gauge plate. The adjust plate is then placed on the blade, pressed flush with the back side of the gauge base, and secured with two screws. Finally, the adjust plate's heel is slipped into the drum groove, the drum cover fitted, and the installation bolts tightened evenly and alternately with the socket wrench. It is paramount to tighten the blade installation bolts securely, as loose bolts can be dangerous.
- Sharpening Planer Blades: To maintain optimal performance, the planer blades should always be kept sharp. A sharpening holder is provided to assist in removing nicks and producing a fine edge. Before sharpening, the dressing stone should be immersed in water for 2-3 minutes. The holder is then used to ensure both blades contact the dressing stone simultaneously at the same angle, ensuring consistent sharpness.
- General Tool Care: The manual emphasizes the importance of keeping cutting tools sharp and clean, as properly maintained tools are less likely to bind and are easier to control. Users should regularly check for misalignment or binding of moving parts, breakage, and any other condition that might affect the tool's operation. Any damaged parts should be serviced before further use.
- Service and Replacement Parts: For product safety and reliability, all repairs, carbon brush inspection and replacement, and any other maintenance or adjustment should be performed by Makita Authorized or Factory Service Centers, using only genuine Makita replacement parts. This ensures that the tool continues to meet its original specifications and safety standards.
- Accessory Use: Only accessories and attachments recommended by Makita for this specific model should be used. Using unauthorized accessories can pose a risk of injury and may not be suitable for the tool's intended purpose. The manual lists recommended accessories such as planer blades, sharpening holder assembly, blade gauge, guide rule, dressing stone, socket wrench, and a dust bag.
By adhering to these instructions, users can ensure the safe, effective, and long-lasting performance of their Makita Power Planer.