SO
Angle de coupe d'onglet
Desserrez la via tie serrage du guide et
faites tourner le socle rotatif sur la posi-
tion oil le repere indique l'angle desire sur
l'echelle. Serrez ensuite la via de serrage
afin d'assurer en place le soda rotatif.
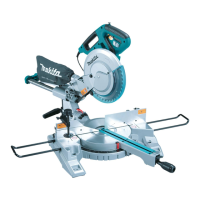
Positioning for adjusting the miter angle
Loosen the clamp screw on the guide
fence and turn the turn base to the posi-
tion where the pointer indicates the
desired angle on the miter scale. Then
tighten the clamp screw firmly to secure
the turn base.
(1)
Vis de serrage
(2)
Repere
(3)
EcheIle
ATTENTION:
Lorsque vous faites tourner le socle rotatif, veillez a bien lever le
bras a fond.
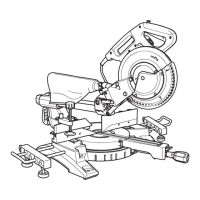
Angle de biseau
La lame s'incline jusqu'a 45
0
vers la gauche. Pour ajuster l'angle
de biseau, relachez le levier
a
l'arriere de l'outil. Inclinez la lame
vers la gauche de facon que le repere indique l'angle desire sur
rechelle de biseau. Serrez ensuite le levier a fond pour fixer le
support en place.
CAUTION:
When turning the turn base, be sure to raise the handle fully.
Positioning for adjusting the bevel angle
The saw blade tilts up to 45
°
to the left. To adjust the bevel
angle, loosen the lever at the rear of the tool. Tilt the blade to
the left so that the pointer indicates the desired angle on the
bevel scale. Then tighten the lever firmly to secure the arm.
CI I
Support
(2) Levier
13) Serrer
(4)
Desserrer
(5)
Levier
161 EcheIle de biseau
Ill
Repere
(1)
Arm
(2)
Lever
(3)
Tighten
(4)
Loosen
(51 Lever
(61
Bevel scale
Ill Pointer
ATTENTION:
CAUTION:
Lorsque vous inclinez la lame, veillez a bien lever le bras a fond.
When tilting the saw blade, be sure to raise the handle fully.
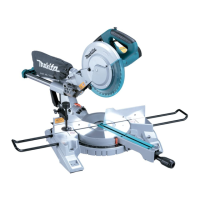
Serrage du materiau
ATTENTION:
II eat extremement important de bien fixer toujours en place le
materiau a scier, correctement et fermement a ('aide de l'etau.
Faute de cette precaution, vous risquez d'endommager votre scie
et le materiau. VOUS RISQUEZ AUSSI DE VOUS BLESSER.
Apres avoir /ermine votre sciage, NE RELEVEZ PAS LA LAME
avant qu'elle se soit completement arretee.
L'etau peut s'installer soit a gauche soit
droite du guide. Inserez la tige de l'etau
dans ('orifice du guide et serrez la via sur
le dos du guide pour la fixer. Positionnez
le bras de l'etau en fonction de l'epaisseur
et de la forme de votre materiau et as-
surez-le en position en serrant la vis de
serrage. Assurez-vous qu'aucune partie de
l'outil rte contacte l'etau quand vous
abaissez le bras a fond ou quand vous
tirez et poussez le chariot.
(1)
Tige de l'etau
(2)
Vis
(3) Vis
de serrage
(4)
Bras
de l'etau
(5)
Guide
Securing workpiece
WARNING:
It is extremely important to always secure the workpiece pro-
perly and tightly with the vise. Failure to do so can cause the
tool to be damaged and/or the workplace to be destroyed. PER-
SONAL INJURY MAY ALSO RESULT. Also, after a cutting
operation,
DO NOT raise the
blade until the blade has come to a
complete stop.
The vise can be installed on either the left
or right side of the guide fence. Insert the
vise rod into the hole in the guide fence
and tighten the screw on the back of the
guide fence to secure the vise rod. Posi-
tion the vise arm according to the thick-
ness and shape of the workpiece and
secure the vise arm by tightening the
clamp screw. Make sure that no part of
the tool contacts the vise when lowering
the handle fully or when pulling or push-
ing the carriage.
(11
Vise rod
(2) Screw
MI Clamp screw
(41
Vise arm
(S) Guide fence
ATTENTION:
Le materiau dolt etre assure fermement en place contre le socle
rotatif et le guide a l'aide de l'etau durant toute operation de
sciage.
CAUTION:
The workpiece must be secured firmly against the turn base
and guide fence with the vise during all operations.
17
 Loading...