This document provides a comprehensive instruction manual for the Makita M4301 Jig Saw, covering its intended use, safety warnings, operational procedures, and maintenance guidelines.
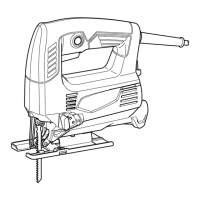
The Makita M4301 Jig Saw is designed for cutting wood, plastic, and metal materials. Its versatile design, coupled with an extensive range of compatible saw blades, makes it suitable for various applications, including curved and circular cuts. The tool operates on a single-phase AC power supply and is double-insulated, allowing for safe use with sockets without an earth wire.
Safety Warnings and Precautions
Before operating the jig saw, it is crucial to read and understand all safety warnings and instructions provided in the manual. Failure to comply with these warnings can result in electric shock, fire, or serious injury.
Work Area Safety:
- Keep the work area clean and well-lit to prevent accidents.
- Avoid operating power tools in explosive atmospheres where flammable liquids, gases, or dust may be present, as sparks can ignite them.
- Ensure children and bystanders are kept away from the operating area to prevent distractions and loss of control.
Electrical Safety:
- Always ensure power tool plugs match the outlet and never modify them. Do not use adapter plugs with earthed (grounded) power tools.
- Minimize body contact with earthed or grounded surfaces like pipes, radiators, and refrigerators to reduce the risk of electric shock.
- Do not expose power tools to rain or wet conditions.
- Handle the power cord with care; do not use it for carrying, pulling, or unplugging the tool. Keep the cord away from heat, oil, sharp edges, and moving parts.
- When operating outdoors, use an extension cord suitable for outdoor use.
- If operating in a damp location is unavoidable, use a residual current device (RCD) protected supply.
- Power tools can generate electromagnetic fields (EMF); users with pacemakers or similar medical devices should consult their doctor before operation.
- Never touch the power plug with wet hands.
- If the cord is damaged, have it replaced by the manufacturer or an authorized agent to avoid safety hazards.
Personal Safety:
- Remain alert and use common sense while operating the tool. Avoid using the power tool when tired, or under the influence of drugs, alcohol, or medication.
- Always wear personal protective equipment, including eye protection (safety glasses or goggles), a dust mask, non-skid safety shoes, a hard hat, and hearing protection. In Australia/New Zealand, a face shield is also legally required.
- Prevent unintentional starting by ensuring the switch is in the off-position before connecting to the power source, picking up, or carrying the tool.
- Remove any adjusting keys or wrenches before turning the power tool on.
- Maintain proper footing and balance at all times to ensure better control of the tool.
- Dress appropriately; avoid loose clothing or jewelry, and keep hair and clothing away from moving parts.
- If dust extraction and collection facilities are provided, ensure they are connected and properly used to reduce dust-related hazards.
- Do not become complacent with tool safety principles, even with frequent use.
- Always wear protective goggles to protect your eyes from injury.
Jig Saw Specific Safety Warnings:
- Hold the power tool by insulated gripping surfaces when performing operations where the cutting accessory may contact hidden wiring or its own cord.
- Use clamps or another practical method to secure and support the workpiece on a stable platform.
- Always use safety glasses or goggles.
- Avoid cutting nails; inspect the workpiece and remove any nails before operation.
- Do not cut oversize workpieces.
- Check for proper clearance beyond the workpiece to prevent the blade from striking the floor, workbench, etc.
- Hold the tool firmly.
- Ensure the blade is not contacting the workpiece before turning on the switch.
- Keep hands away from moving parts.
- Do not leave the tool running unattended; operate the tool only when hand-held.
- Always switch off the tool and wait for the blade to come to a complete stop before removing it from the workpiece.
- Avoid touching the blade or workpiece immediately after operation, as they may be extremely hot.
- Do not operate the tool at no-load unnecessarily.
- Be aware that some materials may contain toxic chemicals; take caution to prevent dust inhalation and skin contact. Follow material supplier safety data.
- Always use the correct dust mask/respirator for the material and application.
Functional Description
The jig saw offers different cutting actions and features for various tasks.
Switch Action:
- Before plugging in the tool, ensure the switch trigger actuates properly and returns to the "OFF" position when released.
- To start the tool, pull the switch trigger. Tool speed increases with pressure on the trigger. Release the trigger to stop.
- For continuous operation, pull the switch trigger, push in the lock button, and then release the switch trigger. To stop from the locked position, pull the switch trigger fully, then release it.
Selecting the Cutting Action:
The tool can operate with an orbital or a straight-line (up and down) cutting action. Orbital cutting thrusts the blade forward on the cutting stroke, significantly increasing cutting speed. To change the cutting action, turn the cutting action changing lever to the desired position.
- Position 0 (Straight line cutting action): Ideal for cutting mild steel, stainless steel, and plastics.
- Position I (Small orbit cutting action): Suitable for clean cuts in wood and plywood.
- Position II (Medium orbit cutting action): Recommended for cutting mild steel, aluminum, and hard wood. Also good for cutting wood and plywood.
- Position III (Large orbit cutting action): Best for fast cutting in aluminum, mild steel, wood, and plywood.
Assembly
Installing or Removing Jig Saw Blade:
- Always ensure the tool is switched off and unplugged before performing any work on the tool.
- Clean out any chips or foreign matter from the jig saw blade and/or blade holder to prevent insufficient tightening and potential injury.
- Avoid touching the jig saw blade or workpiece immediately after operation, as they may be extremely hot.
- Always secure the jig saw blade firmly to prevent breakage or serious personal injury.
- Use only B-type jig saw blades; other types may result in insufficient tightening and injury.
- To install, loosen the bolt counter-clockwise on the jig saw blade holder with the hex wrench. Insert the blade with teeth facing forward into the holder as far as it will go, ensuring the back edge fits into the roller. Tighten the bolt clockwise.
- To remove, follow the installation procedure in reverse.
- Occasionally lubricate the roller.
Hex Wrench Storage:
- Store the hex wrench in the designated hook on the tool when not in use to prevent loss.
Operation
Basic Cutting:
- Always hold the base flush with the workpiece to prevent blade breakage and injury.
- Advance the tool very slowly when cutting curves or scrolling to avoid slanted cutting surfaces and blade breakage.
- Turn the tool on without the blade contacting the workpiece and wait until it reaches full speed. Rest the base flat on the workpiece and gently move the tool forward along the marked cutting line.
Bevel Cutting:
- Always ensure the tool is switched off and unplugged before tilting the base.
- Raise the dust cover completely before making bevel cuts.
- Bevel cuts can be made at any angle between 0° and 45° (left or right).
- To tilt the base, loosen the bolt on the back of the base with the hex wrench. Move the base so the bolt is in the center of the cross-shaped slot. Tilt the base to the desired angle, indicated by graduations on the motor housing, and tighten the bolt.
Front Flush Cuts:
- Loosen the bolt on the back of the base with the hex wrench. Slide the base all the way back and tighten the bolt to secure it.
Cutouts (Boring a Starting Hole):
- For internal cutouts without a lead-in cut from an edge, pre-drill a starting hole of 12 mm or more in diameter. Insert the jig saw blade into this hole to begin the cut.
Cutouts (Plunge Cutting):
- Plunge cutting allows for internal cutouts without a pre-drilled hole or lead-in cut.
- Tilt the tool up on the front edge of the base with the blade point positioned just above the workpiece surface.
- Apply pressure to the tool to prevent the front edge of the base from moving when switching on. Gently lower the back end of the tool slowly.
- As the blade pierces the workpiece, slowly lower the base onto the surface.
- Complete the cut in the normal manner.
Finishing Edges:
- To trim edges or make dimensional adjustments, run the jig saw blade lightly along the cut edges.
- Always use a suitable coolant (cutting oil) when cutting metal to prevent significant blade wear. Greasing the underside of the workpiece can be an alternative to coolant.
- For clean cutting operations, connect the tool to a Makita vacuum cleaner by inserting the hose into the hole at the rear of the tool.
- Note that dust extraction cannot be performed when making bevel cuts.
Rip Fence (Optional Accessory):
- Always ensure the tool is switched off and unplugged before installing or removing accessories.
Straight Cuts:
- For repeatedly cutting widths of 160 mm or less, use the rip fence for fast, clean, straight cuts.
- To install, insert the rip fence into the rectangular hole on the side of the base with the fence guide facing down. Slide the rip fence to the desired cutting width and tighten the bolt.
Circular Cuts:
- For cutting circles or arcs of 170 mm or less in radius, install the rip fence with the fence guide facing up.
- Insert the circular guide pin through one of the two holes on the fence guide. Screw the threaded knob onto the pin to secure it.
- Slide the rip fence to the desired cutting radius and tighten the bolt. Then move the base all the way forward.
- Always use jig saw blades No. B-17, B-18, B-26, or B-27 when cutting circles or arcs.
Anti-Splintering Device for Steel Base (Optional Accessory):
- For splinter-free cuts, the anti-splintering device can be used.
- To install, move the base all the way forward and insert the device between the two protrusions of the base.
- Note that the anti-splintering device cannot be used when making bevel cuts.
Maintenance
- Always ensure the tool is switched off and unplugged before attempting any inspection or maintenance.
- Never use gasoline, benzine, thinner, alcohol, or similar substances, as they can cause discoloration, deformation, or cracks.
- To maintain product safety and reliability, all repairs, carbon brush inspection and replacement, and any other maintenance or adjustment should be performed by Makita Authorized or Factory Service Centers, using genuine Makita replacement parts.
- Follow instructions for lubricating and changing accessories.