INTENDED USE
• This device is suitable for mixing, chopping, blending, heating, boiling and steaming food.
• This device is not a fryer. Do not attempt to fry food using the device.
• The device is for personal use only and is not intended for commercial applications.
• The device should only be used as described in these instructions. Any other use is deemed to be
improper.
• The following are excluded from the warranty: all defects caused by improper handling, damage
or unauthorised attempts at repair. This also applies to normal wear and tear.
SAFETY INSTRUCTIONS
• This device must not be used by children. Children and animals must be kept away from the
device and the mains cable!
• This device may be used by people with reduced physical, sensory or mental abilities or a lack of
experience and / or knowledge if they are supervised or have received instruction on how to use
the device safely and have understood the dangers resulting from this.
• Children must not play with the device.
• Danger of injury due to sharp blades! Never hold the cross-blade attachment by the blades!
Hold it by the top end when inserting, removing and cleaning it.
• CAUTION: Hot surface! The device will become very hot during use.
Do not come into contact with heated parts while or after using the device! Only touch
the handles and control knobs while the device is in operation or immediately after it has
been switched off. Wait until the device has cooled down fully before it is transported or stored away.
Use suitable oven gloves when handling the device.
• The device must always be disconnected from the mains power when it is left unattended and
before assembling, disassembling and cleaning the device.
• Do not make any modifications to the device. Also do not replace the mains cable yourself. If the
device, the mains cable or the mains plug of the device are damaged, these parts must be replaced
by the manufacturer, customer service department or a similarly qualified person (e. g. specialist
workshop) in order to avoid any hazards.
• The device is not designed to be operated with an external timer or a separate remote control
system.
• Note the cleaning instructions in “Cleaning and Storage”!
Risk of Injuries
• Warning of suffocation! Keep children and animals away from the packaging material.
• Caution: Risk of scalding from hot steam! Be careful when opening the lid or taking
off the steaming unit.
• Caution: Risk of scalding from hot liquid! Be careful handling the device if the mixing bowl
contains hot liquid.
• Caution: Risk of scalding from hot liquid! Be careful when handling the steaming unit.Hot
water may accumulate in the intermediate base and steaming attachment! Be careful when
removing these parts!
• Caution: Risk of falling! Make sure that the connected mains cable does not present a trip
hazard. The mains cable must not hang down from the surface on which the device is placed in
order to prevent the device from being pulled down.
• The working area must always be well lit when the device is in use.
USING ACCESSORIES CORRECTLY
• Cross-Blade Attachment
CAUTION!! Risk of damage to the cross-blade attachment! Do not drop the
cross-blade attachment and do not leave it lying in water or other liquids for longer than
two hours to avoid damage.
• The cross-blade attachment is used to chop up, stir and mix together the ingredients in the
mixing bowl.
• The device cannot be operated without the cross-blade attachment.
Inserting:
1. Before inserting the cross-blade attachment, ensure that the sealing ring is fitted
correctly on the shank of the attachment. Otherwise there is the risk that liquid will escape from
the mixing bowl into the motor unit and the device will be damaged.
If the sealing ring is not fitted correctly, slide it all the way onto the shank until it is firmly fixed behind
the two latches on the shank.
2. Hold the cross-blade attachment at the top end and place it in
the mixing bowl. Make sure that the cross-blade attachment rests
fully on the bottom of the mixing bowl. The two locking lugs on the
shank must be pushed through the recesses in the mixing bowl.
3. Hold the cross-blade attachment firmly, turn the mixing bowl
upside down and place the wing nut on the end of the shank. It
must be fully recessed. If necessary, twist the wing nut slightly to do
this.
4. Twist the wing nut clockwise as far as it will go.
5. Check that the cross-blade attachment fits securely.
Removing:
Follow the steps for inserting in reverse order:
1. Insert the blade cover, hold the cross-blade attachment at the top end with one hand.
2. Turn the mixing bowl upside down, loosen the wing nut anticlockwise and remove it.
3. Take the cross-blade attachment out of the mixing bowl.
• Blade Cover
The blade cover is intended to protect your hands when detaching the cross-blade attachment or
cleaning the inside of the mixing jug.
Inserting:
• The blade cover is placed onto the cross-blade attachment of the mixing bowl. To do this, hold
the blade cover on the end of the shank of the cross-blade attachment, then press two handles of
the blade cover onto the blade until a click sound heard.
Removing:
• To remove the blade cover,hold two handles and pull it up and off at the same time.
• Stirring Attachment (Butterfly whisk)
CAUTION!! Risk of damage to the cross-blade attachment!
Do not add any food which could damage or block the stirring attachment while the
device is operating.
• The stirring attachment is suitable for whipping cream or beating egg white and for stirring soups,
puddings, sauces, rice pudding etc.
Inserting:
• The stirring attachment is plugged onto the cross-blade attachment with the wings pointing
downwards. It must engage!
Removing:
• To remove it, twist it back and forth slightly and pull it up and off at the same time.
Danger of Electric Shock from Water
• Use and store the device only in closed rooms. Do not operate the device in rooms with
high humidity.
• Never immerse the motor unit, mains cable or mains plug in water or other liquids and ensure
that they cannot fall into water or become wet.
• Should the motor unit fall into water, switch off the power supply immediately. Do not attempt to
pull the device out of the water while it is still connected to the mains power! Have the device
checked in a specialist workshop before using it again.
• Never touch the device, mains cable or mains plug with wet hands when these components are
connected to the mains power.
Warning of Electric Shock from Damage and Inappropriate Use
• The device should only be connected to a properly installed socket with safety contacts.
The socket must also be readily accessible after connection so that the connection to the
mains can quickly be isolated. The mains voltage must match the technical data of the device. Only
use suitable extension cables whose technical data is the same as that of the device.
• The device must be switched off when inserting or removing the mains plug.
• Remove the mains plug if a fault occurs during operation or before a thunderstorm.
Warning of Fire
• Do not use the device in rooms containing easily ignitable or explosive substances.
• Do not operate the device in the vicinity of combustible material. Do not place any
combustible materials (e. g. cardboard, paper or plastic) on or in the device.
• Do not connect the device along with other consumers (with a high wattage) to a multiple socket
in order to prevent overloading and a possible short circuit (fire).
• Do not cover the device during operation in order to prevent it from catching fire. Do not insert
anything into the ventilation openings of the device and make sure that these do not become
clogged.
• In the event of a fire: Do not extinguish with water! Smother the flames with a fire blanket or a
suitable fire extinguisher.
Risk of Damage to Material and Property
• Always check the device for damage before putting it into operation. The device should
only be used when it is fully assembled, undamaged, and in working order!
• Always place the device on a dry, even, firm and heat-resistant surface. Do not place it below
kitchen wall units or similar cupboards. The rising steam could cause damage to them!
• Do not place the device on or next to heat sources such as hobs or ovens. Keep naked flames,
e.g. burning candles, away from the device, the cable and the plug.
• The device may not be heated up when it is empty. Do not allow the motor to run when the
device is empty.
• Make sure that the maximum fill level (MAX marking in the mixing bowl) is not exceeded!
• Make sure that the mains cable is not squashed, bent or laid over sharp edges and does not
come into contact with hot surfaces (this also applies to the hot surfaces of the device!).
• Do not move the device during use.
• When the mains plug is removed from the plug socket, always pull on the mains plug and never
the cable.
• Do not pull or carry the device by the mains cable.
• Use only original spare parts from the manufacturer.
• Never place heavy objects on the device.
• Do not expose the device to extreme temperatures, strong temperature fluctuations, moisture,
direct sunlight or impacts.
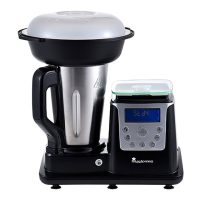
ITEMS SUPPLIED AND DEVICE OVERVIEW
Unpack all parts and check the items supplied for completeness and any transport damage. If you
find any damage to the components, do not (!) use the device, but contact our customer service
department.
BEFORE INITIAL USE
1. Remove any protective films and stickers that may be present from the device.
2. The accessories may still have some production residues on them. To avoid harmful effects to
your health, clean the device thoroughly before you first use it (see “Cleaning and Storage”).
3. Familiarize yourself with the accessories. Do this by reading the following chapter.
• Mixing Bowl
The mixing bowl is where the items to be mixed or cooked are processed and heated. The
Markings in the mixing bowl show the minimum and maximum fill levels.
The minimum fill level of the mixing bowl is 0.5 litres.
The maximum fill level of the mixing bowl is 1.5 litres. Do not exceed this!
There is a danger of scalding from hot items that are being mixed splashing out.
Moreover, the mixing bowl could overflow during operation.
Inserting mixing bowl into the motor unit:
• Place the mixing bowl into the mixing bowl mount on the motor unit.
• Apply gentle pressure to push down the mixing bowl until you hear it engage in place.
Removing mixing bowl from the motor unit:
Press the release button, at the same time tilt the mixing bowl slightly towards you by pulling on the
handle, and pull the mixing bowl upwards out of the motor unit.
• Mixing Bowl Lid
The mixing bowl lid closes the mixing bowl. To ensure that the items being mixed or cooked do
not splash out, the device can only be operated if the lid has been attached and locked in place
properly.
Attaching:
CAUTION!! Risk of scalding from hot items that are being mixed splashing out!
Before inserting the mixing bowl lid, ensure that the sealing ring has been fitted correctly,
is clean and undamaged so that the lid is tight and neither liquids nor ingredients can
splash out between the mixing bowl and mixing bowl lid. If the sealing ring is damaged, replace it
immediately and always do so after no more than 2 years in each case.
• The sealing ring must be fitted in the groove at the edge of the lid. If this is not the case, insert
the sealing ring and make sure it’s fitted correctly before use.
How to know if the sealing ring is fitted correctly?
Please check it as below after the sealing ring fitted:
Inserting:
1. Insert the mixing bowl lid on top of the mixing bowl with the locking tab placed near to the slot in
the handle of the mixing bowl.
2. Gently twist the mixing bowl lid clockwise until the tab locks into the slot until a click sound heard.
Removing:
CAUTION!! Risk of injuries caused by food splashing out!
Only remove the mixing bowl lid once the cross-blade attachment has come to a
standstill.
CAUTION!! Risk of scalding from hot steam!
Be careful when opening the lid after cooking.
• To remove the mixing bowl lid, follow the steps for attaching it in reverse order:
1. Twist the mixing bowl lid anticlockwise until the tab is released.
2. Lift the mixing bowl lid off the mixing bowl.
• Measuring Cup
The measuring cup is used to measure out ingredients.
Moreover, the measuring cup can be used to seal shut the opening in the lid. This prevents any
loss of heat and prevents the ingredients being mixed and cooked from splashing out.
Inserting:
• For this purpose, place the measuring cup with its opening facing downwards into the opening
in the lid and turn it clockwise to fix it in place.
When boiling cream, milk or pasta, do not insert the measuring cup into the opening in
the lid to prevent boiling over. Insert the measuring cup when chopping up food to
prevent it from splashing out.
Removing:
The measuring cup can be removed during operation to allow further ingredients or liquid to be
added.
• Twist the measuring cup anticlockwise and pull it out of the opening in the lid.
• Steaming Attachment
CAUTION!! Risk of scalding from hot steam and hot condensation!
Never use the steaming attachment without its lid.
CAUTION!! Risk of scalding from hot items that are being mixed splashing out!
Before inserting the steaming attachment, ensure that the sealing ring has been fitted correctly, is
clean and undamaged so that the steaming attachment sits tightly on the mixing bowl. If the
sealing ring is damaged, replace it immediately but always do so after no more than 2 years in
each case.
• The sealing ring must be fitted in the groove at the edge of the lid. If this is not the case, insert
the sealing ring and make sure it’s fitted correctly before use.
How to know if the sealing ring is fitted correctly?
Please check it as below after the sealing ring fitted:
• Only ever use the steaming unit with this device. It must not be used in the microwave, the oven
or with other devices.
• The steaming attachment consists of a steaming bowl, a steaming rack and a lid. It is suitable for
the gentle cooking of food using hot steam that rises from the mixing bowl.
• Use the steaming bowl without the steaming rack to steam a greater quantity of the same food.
• Insert the steaming rack into the steaming bowl to cook a greater quantity of the same
foodstuffs which should not rest on top of one another (e. g. yeast dumplings) or to cook different
foodstuffs simultaneously (e. g. vegetables and meat).
• Make sure that food with a longer cooking time is at the bottom and food with a shorter cooking
time is at the top.
• The steaming bowl is attached to the open mixing bowl instead of the mixing bowl lid.
Inserting:
1. Insert the steaming bowl on top of the mixing bowl with the locking tab placed near to the slot in
the handle of the mixing bowl.
2. Gently twist the mixing bowl lid clockwise until the tab locks into the slot until a click sound heard.
Removing:
CAUTION!! Risk of scalding from hot steam!
Be careful when opening the steaming bowl after steam-cooking.
• To remove the mixing bowl lid, follow the steps for attaching it in reverse order:
1. Twist the steaming bowl anticlockwise until the tab is released.
2. Lift the steaming bowl off the mixing bowl.
• Digital Scale (Fixed in the Motor Unit)
On the scale you can weigh food up to 5 kg. It also has a Tare Function (Tare). Use the WEIGHING
FUNCTION button to switch on the scale, change the unit of measurement and activate the tare
function.
WORKING WITH THE DEVICE
• Control Panel and Display
7. : POWER button, for activating the device; switching the heating function and the blend
function.
8. : BLEND SPEED button, for activating the blend function and setting the speed level.
Note: Disabled at a temperature setting of 120 °C.
9. : WEIGHING FUNCTION button, for activating the scale.
10. : PULSE FUNCTION button, for activating the cross-blade attachment at maximum
speed.
NOTE: Disabled during the heating process at the temperature setting of 80 °C, 100 °C and 120 °C
for safety reasons.
11. : TEMPERATURE SET button, for setting the temperature (40 °C,60 °C ,100 °C,120 °C).
12. : TIMER SET button, for setting the preparation time (max. 60 minutes).
13. : INCREASE(+) button, for increasing the speed level, temperature and preparation time
once the corresponding button has been pressed.
14. : DECREASE(-) button, for reducing the speed level, temperature and preparation time
once the corresponding button has been pressed.
• Basic Use of the Device
• CAUTION!! Risk of burns! The metal surface of the mixing bowl also becomes hot from the
heated contents. Only ever touch the mixing bowl by the handle or use kitchen gloves.
• CAUTION!! Risk of scalding from hot steam and hot condensation! Be aware that hot
steam will emerge from the mixing bowl lid during cooking. Particular care should be taken when
removing the lid and when using the steaming unit.
• Risk of damage to the device from overheating! Never place the motor unit on a soft surface.
The ventilation slots on the bottom of the device must not be covered. Otherwise, the device could
be damaged.
• Risk of damage to the device from falling! Note that when chopping up food the imbalance
which is created in the mixing bowl may cause the whole device to move in some circumstances.
The device should therefore be set up so that it cannot fall off the work surface.
• Do not overload the device! Only chop up hard foodstuffs (e. g. ice cubes) by pressing the
PULSE button with brief pauses.
• Overheating of the device! Do not allow the device to operate on speed level 2 for longer than
2 minutes without stopping. Then let the device cool down for a short while before it is used again.
• Risk of damage to the stirring attachment! When the stirring attachment is placed on the
device, only use speed level 1.
• For safety reasons, the device can only be switched on if the mixing bowl is fitted in the
motor unit correctly and the mixing bowl lid or steaming bowl are locked on.
• To save power, the display switches to standby mode when the device is not used for
approx. 4 minutes, “stdy” appears on the display. To switch the display back on again,
press the POWER button.
How to use this device? Please follow the below steps:
1. Place the motor unit on a dry, clean, flat and non-heatable work surface.
2. Make sure that the suction feet stick properly to the work surface.
3. Insert the mains plug into a properly installed plug socket that is easily accessible.
4. Ensure that the cross-blade attachment is correctly fixed in place in the mixing bowl. When
using additional accessories, e.g. for stirring or steaming, follow the instructions provided in “Using
Accessories Correctly”.
5. Pour any ingredients you want into the mixing bowl. Do not exceed the MAX marking in the
mixing bowl!
6. Secure the mixing bowl lid on the mixing bowl and place the mixing bowl into the motor unit. If
you do not intend to boil milk, cream or pasta or steam food, close the opening in the lid with the
measuring cup that is supplied.
7. Switch on the motor unit by flipping the On / Off switch on the back of
the motor unit to the I position. A beep is heard and the device goes into
standby mode. “stdy” appears on the display.
8. Press the POWER button to activate the device.
9. Set the preparation time (max. 60 minutes): Press the TIMER SET button to activate the time
setting. Using this button to switch the unit of time between the minutes and seconds.
• Pressing at first time, the unit of time “Min” in the display will flash, then set the time in
minute by using the “+” and “–” buttons.
• Pressing at second time, the unit of time “Sec” in the display will flash, then set the
time in second by using the “+” and “–” buttons.
NOTE: This step can be skipped if the ingredients are only to be briefly chopped up or mixed
together and not heated, using the PULSE FUNCTION button or ingredients are to be weighed.
10. To heat or cook the ingredients, press the TEMPERATURE SET button and use the “+” and “–”
buttons to set a temperature of between 40 °C, 60 °C , 80 °C , 100 °C and 120 °C.
11. To switch the
BLEND FUNCTION, press the BLEND SPEED button and use the “+” and “–”
buttons to choose between speed level 1 and speed level 2.
NOTE: The cross-blade attachment is disabled at a temperature setting of 120 °C.
12. Press the POWER button.The device starts to operate.
• The preselected preparation time, temperature and speed level can be changed at any
time during operation. To do this, press the corresponding button and alter the setting
using the “+” and “–” buttons. The preparation time is paused, but the device continues
to operate.
• Ingredients can be added through the opening in the lid during preparation.
• If the preparation process is to be paused, just gently twist the mixing bowl lid
anticlockwise and release the tab from the slot in the handle, the device will stop
Immediately. “E2” will appear on the display and a beep is heard every second until the
Lid has been secured again.
To secure the lid, twist the lid clockwise and lock the tab into the slot again, the device
will continue to work from the last working time.
• If the preparation process is to be aborted prematurely, press the POWER button. The
device goes into standby mode. “stdy” appears on the display.
13. Five beeps are heard roughly five seconds before the end of the preparation time. The device
stops automatically after the set preparation time has elapsed. “End” appears on the display and
two beeps are heard every three seconds. Press the POWER button to deactivate the device and
switch it to standby mode. “stdy” appears on the display. All settings are set to 0. If the ingredients
are to be processed further, repeat steps 8 to 11.
14. To switch off the device, move the On / Off switch to position 0 and pull the mains plug out of
the plug socket.
15. Take the mixing bowl off the motor unit, open it and remove the mixed or cooked food.
• Chopping, Mixing or Blending in the Mixing Bowl
1. For chopping, mixing or blending without HEATING FUNCTION, just use the BLENDE
FUNCTION without any additional accessories and (follow the instructions provided in “Basic Use
of the Device”(except the step 10)).
NOTE: Only use the cross-blade attachment for blending, mixing or chopping.
2. Close the opening in the lid with the measuring cup so that no food can splash out.
3. For a brief pulse of maximum speed (speed level 2), e. g. for chopping up ice cubes, press the
PULSE FUNCTION button. Larger food (quantities) are chopped up evenly if the PULSE FUNCTION
button is pressed a few times in succession.
• Cooking (Heating) in the Mixing Bowl
For cooking/heating without blending in the mixing bowl, just use the HEATING FUNCTION
without pressing the BLEND SPEED button and follow the instructions provide in “Basic Use of the
Device (except the step 11)”.
• When boiling cream, milk or pasta, do not insert the measuring cup into the opening in the lid to
prevent boiling over. Also do not cover the opening in the lid with other objects!
• If need a further blending during cooking, just switch the BLEND SPEED button and follow the
instructions provide in “Basic Use of the Device (see the step 11)”.
NOTE: The cross-blade attachment is disabled at a temperature setting of 120 °C.
• If need a briefly blending during cooking, just use the PULSE FUNCTION button.
NOTE: Disabled at the temperature setting of 80 °C, 100 °C and 120 °C.
• Whipping Cream and Beating Egg White in the Mixing Bowl
To whip cream and beat egg white, plug the stirring attachment(Butterfly whisk) onto the
cross-blade attachment (see “Using Accessories Correctly” | “Stirring Attachment (Butterfly whisk)”)
and follow the instructions provided in “Basic Use of the Device”.
• Steam-Cooking
• The mixing bowl lid must not be inserted when using the steaming unit.
• CAUTION!! Risk of scalding from hot steam and hot condensation! Note that hot
steam will escape from the side and top of the lid of the steaming unit during operation.
• Only hold the steaming attachment using the two handles on the side.
• When you open the lid, always hold it so that you do not come into contact with the rising steam
or the dripping hot liquid.
• Note that when you remove the steaming attachment, hot steam will continue to rise up through
the opening in the lid of the mixing bowl.
• After the steaming attachment is removed, it is essential that it is placed down on a
moisture-resistant and heat-resistant surface.
How to use this function? Please follow the below steps:
1. Connect the motor unit in the manner described in “Basic Use of the Device” and make sure
that the cross-blade attachment is correctly fixed in place in the mixing bowl.
2. Pour at least 0.5 litres of water into the mixing bowl for a cooking time of 30 minutes. For a
longer cooking time, the amount of water required increases by 250 ml for every 15 minutes.
Attention! Do not exceed the MAX marking!
To add flavour to the food, stock or a water/wine mixture for example may also be used
instead of water.
3. Insert the mixing bowl into the motor unit.
4. Place the steaming bowl on top of the mixing bowl. Follow the instructions provided in “Using
Accessories Correctly” | “Steaming Attachment” and make sure that the steaming attachment fits
correctly.
5. Insert the steaming rack into the steaming bowl and loosely add the food to be cooked on it.
Make sure that some slots remain clear so that steam can rise up. If steaming a lot of food, place
food directly into the steaming bowl without using the steaming rack.
6. Place the lid on the steaming attachment. Make sure that it fits correctly as otherwise more
steam than you want may escape and the food will not be cooked properly.
7. Switch on the motor unit by flipping the On / Off switch on the back of the motor unit to the I
position. A beep is heard and the device goes into standby mode. “stdy” appears on the display.
8. Press the POWER button to activate the device.
9. Set the desired preparation time (follow the instructions provided in “Basic Use of the Device”).
10. Set the temperature to 120 °C (follow the instructions provided in “Basic Use of the Device”).
NOTE: All steam-cooking should be carried out at 120 °C, without blending.
11. Press the POWER button again, the device starts to operate.
12. The device stops automatically after the set preparation time has elapsed. Press the POWER
button to abort the preparation process prematurely or to deactivate the device after the
preparation time has elapsed.
ENEN
13. To switch off the device, move the On / Off switch to position 0 and pull the mains plug out of
the plug socket.
14. Carefully remove the lid.
15. Twist the steaming attachment anticlockwise until the tab is released and carefully lift it off
(follow the instructions provided in “Using Accessories Correctly” | “Steaming Attachment”).
16. Carefully remove the mixing bowl from the motor unit and pour away the hot liquid.
• Using the Weighing Function
Make sure that the device is positioned stably on a flat work surface and the suction feet
stick to it properly so that the scale can display the most accurate measurement results
possible.
How to use this function? Please follow the below steps:
1. Switch on the motor unit by flipping the On / Off switch on the back of the motor unit to the I
position.
2. Press the POWER button to activate the device.
3. Press the WEIGHING FUNCTION button to activate the weighing function.
The preset unit of measurement is grams. You can change the unit of measurement by
repeatedly pressing the WEIGHING FUNCTION button (grams / kilograms (g / kg) –
pounds (lb) – ounces (oz)).
4. Place the ingredient to be weighed onto the scale. The weight is displayed.
5. If the WEIGHING FUNCTION button is pressed and held for approx. 3 seconds, the Tare
Function (Tare) is activated and the weight displayed is reset to 0, further ingredients can be
weighed.
CLEANING AND STORAGE
• CAUTION!! Risk of burns! Allow the device to cool down completely before cleaning it.
• CAUTION!! Danger of electric shock from water! Remove the mains plug from the
plug socket before cleaning the device.
• CAUTION!! Risk of damage to the device! Do not immerse the motor unit and mixing
bowl in water or any other liquids.No liquid must get into the bottom section of the mixing
bowl as this is where heating elements and other electronic components are fitted. The
mixing bowl must not be cleaned in the dishwasher.
• The device and all its accessories are not dishwasher-safe!
• Clean the mixing bowl and the accessories immediately after each use to prevent germ formation.
Do not allow food residues to dry on.
• Do not use any corrosive or abrasive cleaning agents or scouring sponges to clean the device.
These can damage the surface.
Please follow the below steps for cleaning and storage:
1. Rinse out the inside of mixing bowl briefly under running water.
• If the mixing bowl and cross-blade attachment are only slightly dirty, it is sufficient to
clean them briefly using water:
1) pour 1 litre of water and a few drops of washing-up liquid into the mixing bowl,
2) close the mixing bowl with the mixing bowl lid including the measuring cup,
3) press the PULSE FUNCTION button a few times,
4) rinse out the mixing bowl thoroughly with clear water.
• If the mixing bowl inside need to be cleaned with cloth by hands, don’t forget to use the blade cover
to protect your hands from hurts (follow the instructions provided in “Using Accessories Correctly” |
“Blade Cover”).
2. Wash all of the accessories in warm, soapy water. If necessary, remove the cross-blade
attachment from the mixing bowl for cleaning (follow the instructions provided in “Using
Accessories Correctly” | “Cross-Blade Attachment”).
WARNING: Handle the cross-blade attachment with care as the blades are extremely sharp.
3. If necessary, remove the sealing rings for cleaning.
4. Wipe down the motor unit with a slightly damp cloth if necessary and then dry it with a soft
cloth.
5. Allow all parts to dry completely before the device is reassembled.
6. Reattach all sealing rings (follow the instructions provided in “Using Accessories Correctly” |
“Mixing Bowl Lid” and “Steaming Attachment”).
7. Store the device in a dry, clean place that is not accessible to children and animals.
The plastic parts may suffer discolouration over time. However, this does not have any
negative effect on either health or the way that the device parts work.
14 15
 Loading...