Do you have a question about the MasterTop Bimini Top Plus and is the answer not in the manual?
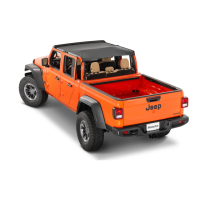
Identifies the Bimini Top Plus & Wind Stopper Combo for Jeep Gladiator vehicles.
Lists the necessary tools and components for installation.
Highlights crucial safety advice, including seatbelt use and securing the top.
Emphasizes the need for safety glasses to prevent eye injury during installation.
Explains the meaning of WARNING, CAUTION, and NOTICE signal words.
Advises on optimal temperature and fabric relaxation for easier installation.
Details the correct method for threading straps through buckles.
Describes the windshield seal's role in water and debris prevention.
Covers draping the top and loosely attaching initial side straps.
Guides on how to thread straps through the windshield gap.
Explains how to attach and secure the front corner straps to buckles.
Details threading the four center straps through the windshield gap.
Explains attaching center straps to locator brackets and tightening all front straps.
Guides on securing straps to the B-pillar behind the front doors.
Details attaching and tightening the two center rear straps to the roll bar.
Explains how to attach rear corner straps using Torx screws and buckles.
Describes mounting D-rings using Torx screws and attaching hook/loop straps.
Details attaching the Wind Stopper to the Bimini Top's hook and loop strip.
Explains securing corner straps using Torx screws to the roll bar.
Guides on attaching and tightening the side straps for proper centering.
Details inserting the plastic strip into the truck bed's belt rail.
Provides tips for reducing 'slapping sound' using included foam.
Offers guidance on cleaning and maintaining the soft top for longevity.
Details what is covered under the MasterTop limited warranty.
Lists conditions and damages not covered by the warranty.
Outlines the exclusive remedy and limitations on damages.
This document provides installation instructions and product information for the MasterTop Bimini Top Plus & Wind Stopper Combo, designed for 2020-Current Jeep® Gladiator Vehicles (Items #143007XX, 148507XX).
The MasterTop Bimini Top Plus and Wind Stopper Combo is designed to enhance the fair-weather driving experience of off-road capable vehicles by providing shade and weather protection. The Bimini Top Plus offers overhead shade, while the optional Wind Stopper works in tandem to provide additional protection, particularly from wind. The product is intended for weather protection only and should not be relied upon to contain occupants in the event of an accident or to protect from ground contact or falling objects. It is crucial to always wear seatbelts and keep body parts within the vehicle when using this product. The top must be fully secured or stowed before driving and should not be latched or folded while driving. It also needs to be removed when installing a soft or hard top back on the vehicle.
The product includes:
Required tools for installation are:
The Bimini Top Plus features a reinforced rubber seal sewn into the front edge to help block water and debris from entering the cab. This seal is designed to be tucked into the gap between the windshield and the roll bar. While made of waterproof materials, the top itself is not entirely waterproof, and some leakage may occur between doors, the roll bar, and around the front rubber seal.
The Wind Stopper is designed to attach to the rear of the Bimini Top Plus via a strip of hook and loop fastener. It also features a plastic strip sewn into its bottom edge, which is inserted into the "belt rail" located on the back of the truck bed.
Installation Process: The installation involves several steps, starting with draping the fabric and installing the front side straps. These straps are loosely wrapped around the side horizontal tubes and threaded through buckles. Next, the front corner straps are threaded between the windshield and the front roll bar, then secured to front buckles. The four front center straps are similarly threaded between the windshield and roll bar, then behind and through the front trim piece, and finally looped around Freedom panel locator brackets on the windshield. All front straps must be tightened securely to ensure the top is taut across and forward before attaching rear straps.
The two front B-Pillar straps are attached by wrapping them around the inside of the B-Pillar and securing them to buckles. The two center rear straps are wrapped around the roll bar and attached to buckles. The back two rear corner straps are secured to factory mounting points on the lower portion of the roll bar using a T25 Torx Driver to remove and re-install screws through the buckle strap. Finally, three D-Ring attachments are secured to the B-pillar using existing Torx screws, and the Bimini top's Hook and Loop straps are attached to these D-rings.
For the optional Wind Stopper, it is first attached to the center of the Bimini Plus hook and loop strip. Side straps are then attached around the roll bar, and corner straps are secured to factory mounting points on the lower roll bar using T25 Torx screws. The plastic strip on the Wind Stopper's bottom is inserted into the truck bed's belt rail. All straps are then tightened to center the Wind Stopper.
Optimal Installation Conditions: For a smooth fit and ease of installation, the top should be installed at temperatures above 72 degrees Fahrenheit. Below this temperature, the fabric may contract, making installation difficult. It is recommended to take the top out of its package and let it sit in a warm place or direct sunlight for 1-2 hours before installation.
Adjustments for "Slapping Sound": If a "slapping sound" occurs due to wind currents, ensure the top is tight. Adhesive-backed foam, included with the product, can be applied to susceptible spots to eliminate flapping. For hard top owners, these spots are on the flat Freedom panel mounts located behind the front seats on the Sound bar (FIG 43). For hard and soft top owners, they are on the top edge of the Sound bar (FIG 44).
Cleaning: Regular cleaning is recommended to prolong the life of the top. The fabric should be washed often using a mild soap, warm water, and a soft bristle brush. Special soft top cleaners available on distributors' websites can also be used. After cleaning, rinse thoroughly with clear water to remove all soap residue. Hang the top to dry; do not use a clothes dryer.
Warranty: The MasterTop accessory comes with a Limited 3 Year Warranty, covering defects in material and workmanship for a period of 3 years from the date of initial retail sale. The warranty is disclaimed for installation damage, alteration, normal wear and tear, cosmetic damage, water immersion, acts of God, accidents, misuse, negligence, inadequate mounting, theft, vandalism, intentional damage, fleet/rental/commercial use, or use in competition/racing. The exclusive remedy is repair or replacement of product or parts upon MasterTop inspection. Customers must contact MasterTop to obtain an RGA number for warranty consideration. Labor, removal, shipping, and installation costs are the customer's responsibility.
Further product updates and information are available on www.mastertop.com.
| Brand | MasterTop |
|---|---|
| Model | Bimini Top Plus |
| Category | Automobile Accessories |
| Language | English |