Do you have a question about the Max Re-Bar-Tier RB397 and is the answer not in the manual?
Proper eye protection must be worn, conforming to ANSI Z87.1 for frontal and side protection.
Use hearing protection in high noise environments to prevent hearing damage.
Keep bystanders, especially children, away from the tool during operation.
Do not use the tool in rain or wet places to prevent electric shock, malfunction, or overheating.
Check screws for tightness and inspect parts for wear or damage before mounting the battery.
Always set the main switch to OFF, lock the trigger, and detach the battery pack when not in use.
Keep hands and body parts away from the feeder arm and curl guide to prevent serious injury.
Keep fingers and body parts away from the tie-wire reel during operation to avoid serious injury.
Never point the tool at anyone, as it can cause personal injury if it activates unexpectedly.
Keep fingers off the trigger when the tool is not in operation to prevent accidental tying and injury.
Do not operate the tool if it is not working properly or if any abnormal condition is noticed; seek repair.
Discontinue operation immediately if the tool operates without the trigger or exhibits unusual heat, smell, or sound.
Never modify the tool as it impairs performance, safety, and voids the warranty, potentially causing injury.
Keep the tool clean and in good condition for optimal performance and safety, especially the grip.
Use only MAX JPL914 battery packs to prevent damage, malfunction, or fire.
Fully charge the battery pack before use to ensure maximum performance and battery life.
Use only specified MAX charger JC928 and battery pack JPL914 to prevent overheating or fire.
Avoid touching the power cord or plug with wet hands or gloves to prevent electric shock.
Do not cover the battery charger during charging to prevent overheating, damage, or fire.
Store battery packs and chargers away from heat and flames to prevent fire or damage.
Never charge the battery pack near flammable materials to avoid fire hazards.
Charge the battery pack in a well-ventilated area, away from direct sunlight.
Charge the battery pack within the recommended temperature range of 41°F to 104°F (5°C to 40°C).
Rest the charger for 15 minutes between charges to prevent functional trouble.
Ensure ventilation holes are clear of obstructions to prevent electric shock or functional issues.
Handle power cords carefully, avoid carrying by the cord, and protect them from sharp edges or heat.
Do not use this charger for non-rechargeable batteries.
The charger should only be used by children or disabled persons under supervision.
Ensure children are supervised and do not play with the charger.
Use a pack cap on the battery terminal when not in use to prevent short circuits.
Prevent battery terminals from short-circuiting to avoid overheating and damage.
Avoid storing the tool in vehicles or direct sunlight in summer to prevent battery pack deterioration.
Recharge discharged battery packs immediately to prevent damage.
Wear safety gloves to avoid injuries from the sharp edges of the tie finish.
The trigger can be locked for safety. Always keep it locked when not in use.
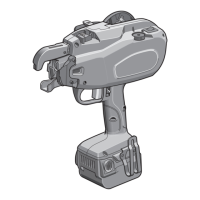
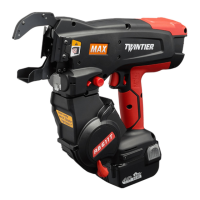
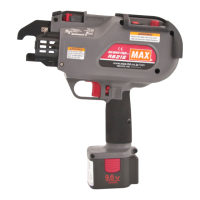
Identifies and illustrates the various parts of the re-bar tying tool.
Details technical specifications of the RB397 tool, including weight, dimensions, and battery type.
Provides specifications for the MAX tie-wire (TW897A), including diameter and length.
Presents technical data for noise and vibration levels of the tool.
Lists typical applications for the re-bar tying tool, such as precast plants and commercial buildings.
Specifies the minimum and maximum re-bar sizes that can be used with the RB397 tool.
Explains how to determine the production year from the product's serial number.
Details the process of charging the battery pack using the MAX JC928 charger.
Step-by-step guide on how to load the tie-wire spool into the tool correctly.
Instructions on how to safely remove the tie-wire from the tool.
Explains the auto power-off feature that saves battery consumption by turning off the tool after 30 minutes of inactivity.
Details how to adjust the wire tension using the torque dial on the tool.
Guides on how to achieve proper tie tightness by angling and positioning the tool.
Regular inspection of the tool is recommended to maintain performance and identify issues.
Do not lubricate the equipment as it can cause functional problems.
Periodically clean the feeding mechanism, especially the feed gear, to maintain tool performance.
Instructions for disassembling the cutter section of the machine for cleaning purposes.
Loosen specific bolts to begin the disassembly process for cleaning.
Remove arm B and its associated bolts as part of the cleaning disassembly.
Remove and clean the cutter, fixed cutter, wire guide, and cutter plate unit.
Assemble the cutter plate unit and fixed cutter using the designated holes.
Fit the cutter and assemble the wire guide A onto the tool.
Align wire guide B with arm B and the pipe, then assemble arm B.
Ensure arm B is securely assembled by tightening bolts to the specified torque.
Troubleshooting for when the tool initializes but no operation occurs after the tip axis is set.
Troubleshooting for when the LED is lit but the tool does not operate after 30 minutes or trigger pull.
Troubleshooting for when the wire stops sending halfway during operation or no wire is sent.
Troubleshooting for when the binding wire draws a circle or comes out of the curl guide.
Troubleshooting for when no wire cutting occurs.
Troubleshooting for wire entanglement or weak binding power.
| Model | RB397 |
|---|---|
| Type | Rebar Tier |
| Power Source | Battery |
| Max Tie Capacity | Up to #5 x #5 rebar |
| Voltage | 14.4V |
| Battery Type | Lithium-ion |
| Rebar Size | #3 to #6 (10mm to 19mm) |
| Wire Used | TW897A, TW897-PC, TW897-EG |
| Ties per Coil | Up to 120 ties |
| Tie Wire Gauge | 21 gauge |