NOTE: This table saw is designed to cut wood and wood composition
products only. Depending on the shape of the panel, use the rip fence
or mitre gauge.
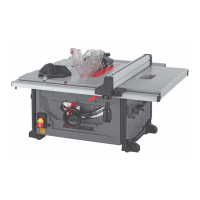
KNOW YOUR TABLE SAW
KNOW YOUR TABLE SAW
RIP FENCE
The rip fence is a sturdy metal fence that can be locked to the work table to guide the
workpiece securely.
SCALE
Located on the front rail, the easy-to-read scale provides precise measurements for rip
cuts.
RIVING KNIFE
The riving knife is a metal piece, slightly thinner than the saw blade, used to keep the kerf
open to prevent kickback.
SWITCH ASSEMBLY
This saw has an easy-access power switch. The switch located on the front of the cabinet
allows the operator to turn the table saw On/Off easily. To lock the switch in the Off
position, remove the safety key from the switch. Place the key in a location that is
inaccessible to children and others not qualified to use the tool.
ARBOUR
The arbour is a shaft on which a blade is mounted.
WORK TABLE
The surface to which the workpiece is attached while cutting.
OVERLOAD PROTECTION
The machine is equipped with a overload reset switch that will restart the motor after it
shuts off due to overloading or low voltage. If the motor stops during operation, move
the ON/OFF switch to the “OFF ” position. Remove any workpiece from the table. Wait
about 5 minutes for the motor to cool down, and then push the reset button and move
the switch to the “ON” position.
WOODEN SPACER
The wooden spacer is attached on one side of the rip fence to prevent the material from
being caught between the bottom of the rip fence and the work table, when ripping
material such as thin panelling.
OUTFEED SUPPORT
This outfeed support at the back of the tool gives the operator additional support when
cutting long workpieces.
SLIDING EXTENSION TABLE
Located on right side of the saw table, this extension table givers the operator additional
support when cutting wide workpieces.
OPERATING COMPONENTS
The upper portion of the blade projects up through the table and is surrounded by an
insert called the table insert. The height of the blade is set with a handwheel on the front
of the cabinet.
Detailed instructions are provided in the “Operating Instructions” section of this manual
for the basic cuts: cross cuts, mitre cuts, bevel cuts and compound cuts.
The rip fence is used to position work for lengthwise cuts. A scale on the front rail shows
the distance between the rip fence and the blade.
It is very important to use the blade guard assembly for all through-sawing operations.
The blade guard assembly includes: riving knife, anti-kickback pawls, and plastic blade
guard.
APPLICATIONS
You can use this tool for the purposes listed below:
• Straight-line cutting operations such as crosscutting, ripping, mitring 0-45° mitre
angle, bevel crosscutting 0-45° blade bevel and 90° mitre angle and 0-45° blade bevel
and 0-45° mitre angle.
• Cabinet making and woodworking.
CAUSES OF KICKBACK
Kickback can occur when the blade stalls or binds, causing the workpiece to be kicked
back toward the operator with great force and speed. If your hands are near the saw
blade, they may be jerked loose from the workpiece and come into contact with the
blade. Obviously, kickback can cause serious injury, and it is well worth using precautions
to avoid the risks.
Kickback can be caused by any action that pinches the blade in the wood, such as the
following:
• Making a cut with incorrect blade depth.
• Sawing into knots or nails in the workpiece.
• Twisting the wood while making a cut.
• Failing to support the workpiece.
• Forcing a cut.
• Cutting warped or wet lumber.
• Using the wrong blade for the type of cut.
• Not following correct operating procedures.
• Misusing the saw.
• Failing to use the anti-kickback pawls.
• Cutting with a dull, gummed-up, or improperly set blade.
AVOIDING KICKBACK
• Always use the correct blade depth setting. The top of the blade teeth should clear the
workpiece by 1/8 to 1/4" (3.2 to 6.4 mm).
17
model no. 055-6766-2 | contact us 1-888-670-6682model no. 055-6766-2 | contact us 1-888-670-6682
16
 Loading...