Page 9 of 10 M-KIT100/101/102 Assembly Instrucons 181-03001
These instrucons must be followed exactly. Failure to follow these instrucons could damage the product or result in injury to persons using or
assembling the product. Maxon Furniture Inc. shall not be liable for any costs, loss, damage, expenses or injuries resulng from failure to properly
assemble the product in accordance with these instrucons.
Maxon Furniture Inc. Customer Service: 1-800-876-4274
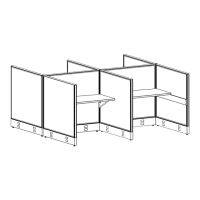
Adjust and align LCCT123636TM Countertops 7.
to PLNR4236 Panels.
Connect LCCT123636TM Countertops 8.
together using two Aaching Brackets (1 on
each side of the PLNR4236 Panels) and four
#10 x 3/4” Pan Head Screws per Bracket
(Figure 11).
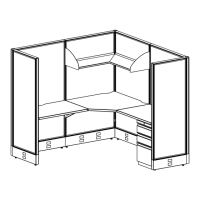
Aach one pair of LH and RH Countertop 9.
Brackets to each Countertop on the outside
corner of the workstaon with two #10 x 3/4”
Pan Head Screws per Bracket (Figure 12).
Aach one LH and RH Bracket to the inside 10.
corners of the workstaon with two #10 x
3/4” Pan Head Screws per Bracket (Figure
13).
Fully ghten all screws when LCCT123636TM 11.
Countertops are aligned with each other and
the PLNR4236 Panels.
Figure 13Figure 12
BACK VIEW
Attach the inside screw
first to help ensure Bracket
teeth are fully engaged
in the panel slots.
Attaching
Bracket
(use 2 Brackets,
1 on each side
of the panels)
#10 x 3/4"
Phillips
Pan Head
Screw
Figure 11
LH & RH Countertop
Brackets
LH & RH
Countertop
Brackets
RH Countertop
Bracket
LH Countertop
Bracket (hidden)