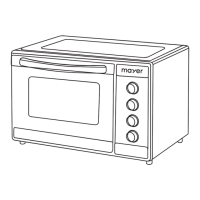
This document describes the Mayer Electric Oven MM040D, a versatile kitchen appliance designed for various cooking tasks.
Function Description
The Mayer Electric Oven MM040D is an electric oven with a range of functions for baking, roasting, and defrosting. It features separate temperature controls for the upper and bottom heating elements, allowing for precise cooking. The oven also includes a timer function, preheating capability, and various specialized cooking modes.
Important Technical Specifications
- Model: MM040D
- Rated Voltage: 220-240V~50-60Hz
- Rated Power: 1800-2100W
- Gross Capacity: 40L
- Temperature Range: 60°C - 230°C (for top/bottom heat adjustment)
- Timer: Up to 180 minutes
Usage Features
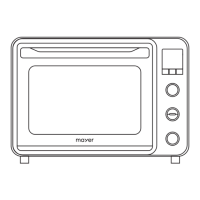
The oven is equipped with a user-friendly control panel featuring several knobs and a digital display.
Control Panel Components:
- Upper Temperature / Real-Time Temperature Display: Shows the current temperature of the upper heating element.
- Upper Temperature / Real-Time Temperature Selector Knob: Used to adjust the desired temperature for the upper heating element.
- Function / Preheat Selector Knob: Allows selection of various cooking functions and initiates the preheating process.
- Bottom Temperature / Real-Time Temperature Display: Shows the current temperature of the bottom heating element.
- Bottom Temperature / Real-Time Temperature Selector Knob: Used to adjust the desired temperature for the bottom heating element.
- Timer Display: Shows the remaining cooking time.
- Timer (min) / Start / Pause / Stop Selector Knob: Used to set the cooking duration, start, pause, or stop the operation.
- Indicator Light: Illuminates to indicate oven operation.
Operating Procedures:
- Initial Setup: Before first use, ensure the appliance is unplugged. Wash all accessories with mild dish detergent, rinse thoroughly, and dry completely. Reassemble them in the oven. It is recommended to run the oven empty at the highest temperature on the toast function for about 10 minutes to burn off any manufacturing residues, which may produce a slight smell and smoke initially. Operate in a well-ventilated area.
- Powering On: Plug in the power cord. Press the lowest knob (Timer / Start / Pause / Stop) to "On / Pause / Off". The oven will begin a self-test, and the function menu LED will light up clockwise, followed by the cavity lamp. The display panel will show "00:00" and enter standby mode. The oven will switch off after 1 minute of no operation.
- Function Selection: Rotate the Function / Preheat Selector Knob to cycle through the available cooking functions. The display will show the default time and temperature for the selected function.
- Temperature Adjustment:
- After selecting a function, press the middle knob (Function / Preheat Selector Knob) once. The highest layer number will blink, allowing adjustment of the top heating temperature using the Upper Temperature Selector Knob (60°C - 230°C).
- Press the middle knob again to set the bottom heating temperature using the Bottom Temperature Selector Knob (60°C - 230°C).
- Press the respective selector knob to confirm the heat setting.
- Timer Setting: After setting temperatures, turn the Timer Selector Knob to adjust the baking time, up to 180 minutes.
- Preheating:
- Select a function using the Function / Preheat Selector Knob.
- Press the top knob (Upper Temperature Selector Knob). The bottom of the display will show "PREH," and preheating will start. Press the top knob again to stop preheating.
- Once preheating is complete, a beep sound will indicate readiness. The oven will switch off after 2 minutes if no operation follows.
- Place food into the oven and start baking.
- Start/Pause/Stop:
- After setting functions and temperatures, press the lowest knob (Timer / Start / Pause / Stop Selector Knob) once to switch on the oven.
- Press it again to pause baking.
- Press and hold it to stop baking or set the appliance to standby mode.
- During Operation Notes:
- The timer knob can be rotated to adjust baking time while the oven is operating.
- The cavity lamp lights up for 1 minute when any knob is pressed or turned.
- The oven updates the temperature every 5°C until it reaches the target temperature, then every 1°C when cooling down.
- To check the current temperature setting during baking, press the middle knob. The display will show the setting for 5 seconds before returning to the oven's real-time temperature.
- For even browning, adjust temperature and baking time, or turn the pan/adjust rack position.
Available Cooking Functions:
The oven offers a variety of functions, each with a specific icon:
- Top Heating: For fish fillet baking and seafood.
- Top Heating + Rotisserie: For whole larger poultry baking and large meat.
- Bottom Heating: For bit/thick cake and meat baking.
- Top / Bottom Heating: For cakes, pork, steak, meatballs, risotto.
- Top / Bottom Heating + Convection: For cakes, pork, steak, meatballs, risotto.
- Top Heating + Convection + Rotisserie: For nuts.
- Top Heating + Convection: For skewer and chicken wings.
- Top Heating Full Power: For skewer chicken wings.
- Bottom Heating + Convection: For cooking risotto.
- Bottom Low Temperature Heating: For dough, yogurt, and ferment products.
- Convection + Heating: For defrost.
- Cooling Convection: For cavity cooling.
Cooling Convection Note: After baking, the cavity is hot. You can open the front door and set the oven to the cooling convection function until the cavity has cooled down sufficiently to safely retrieve your food.
Maintenance Features
Regular cleaning and maintenance are crucial for the oven's longevity and performance.
- Cool Down: After use, set the timer knob anti-clockwise to "O" position. Allow the hot oven to cool completely to room temperature before cleaning.
- Unplug: Always unplug the power cord from the socket before cleaning.
- Regular Cleaning: Clean the oven after each use to prevent grease accumulation and unpleasant odors.
- Accessory Cleaning: Remove all accessories from the oven. The baking tray can be washed like other kitchenware, either by hand or in a dishwasher.
- Surface Cleaning: Clean the oven's exterior surface and interior with a damp cloth or sponge. Ensure water or soap does not get into the appliance's vents.
- Tray Cleaning: Take out the baking tray and crumb tray for washing.
- Avoid Abrasives: Do not use abrasive products that could damage the appliance.
- Interior Cleaning Precautions: Do not use aluminum-corrosive products (e.g., spray detergents) to clean the inside aluminum walls. Never scrape the walls with sharp or pointed objects.
Important Safety Instructions
- This appliance is not intended for use by persons with reduced physical, sensory, or mental capabilities, or lack of experience and knowledge, unless supervised or instructed by a responsible person.
- Children should be supervised to ensure they do not play with the appliance.
- Do not operate the appliance with a damaged cord or plug, or if it malfunctions, has been dropped, or damaged. A damaged power cord must be replaced by the Service Centre.
- Always follow basic safety precautions when using electrical appliances to reduce the risk of fire, electric shock, and injury.
- Do not immerse the appliance, cord, or plug in water or other liquids.
- Unplug the appliance from the outlet when not in use and before cleaning. Do not unplug by pulling on the cord.
- Use only accessories provided with the appliance.
- Do not operate the oven in the presence of explosive or flammable fumes (e.g., petrol, kerosene).
- Do not leave the oven operating without supervision. Ensure it is placed on a flat, stable, dry, heat-resistant surface during operation.
- Do not place the oven on or near a heater, cooker, or hot gas.
- Do not disassemble the oven or replace parts with non-intended components.
- Do not touch hot surfaces; use handles and knobs only. The oven and glass door are hot during use.
- Do not sprinkle water on the hot glass window, as this could cause it to crack.
- Maintain at least a 10 cm distance between the oven and the wall.
- Allow the appliance to cool before cleaning.
- Oversized food or metal utensils must not be inserted into the oven, as they may create fire or electric shock.
- A fire may occur if the oven is covered or touches inflammable material (draperies, walls, etc.) during operation.
- Do not store any items on the oven during operation.
- Exercise extreme caution when using containers made of materials other than metal or glass.
- Do not store any materials, other than recommended accessories, in the hot oven.
- Always wear protective, insulated oven gloves when inserting or removing items from the hot oven.
- For indoor use only.