Do you have a question about the Melnor AquaTimer 4 76280 and is the answer not in the manual?
Attaching the timer to an outside faucet and turning on water for operation.
Troubleshooting water flow issues during timer installation.
Instructions on periodic cleaning to remove debris and sediments.
Guidance on storing the timer indoors away from freezing temperatures.
Recommendations for battery usage and lifespan.
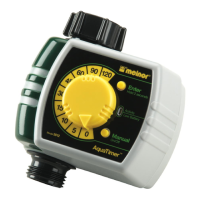
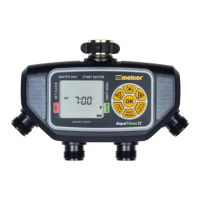
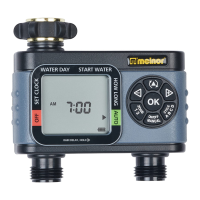
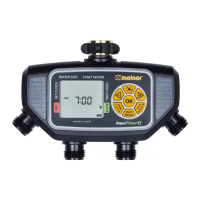
The Melnor AquaTimer 4-Zone Electronic Water Timer, model 76280, is an advanced device designed to automate and manage watering schedules across up to four distinct zones from a single faucet. This timer allows for precise control over when, where, and how long your plants are watered, offering flexibility and efficiency for various gardening needs.
The primary function of the AquaTimer is to automate the watering process for multiple areas, eliminating the need for manual intervention. It supports up to four independent zones, each capable of being programmed with up to four different start times. This multi-zone capability is ideal for gardens with diverse watering requirements, such as different plant types, soil conditions, or sun exposures. The timer operates in a 12-hour (AM/PM) or 24-hour (military time) mode, which can be toggled by holding the OK button for 5 seconds. However, changing the time mode will erase all existing programs, so it's important to set this preference early.
The timer allows users to specify watering days, offering options for selecting individual days of the week or setting watering intervals (e.g., every 1 to 7 days). This flexibility ensures that plants receive water according to their specific needs and local weather conditions. Users can set the duration of each watering cycle, ranging from 1 to 360 minutes (6 hours), ensuring adequate hydration without overwatering. The timer also includes a "Rain Delay" feature, which temporarily suspends the watering program for up to 7 days if rain is in the forecast, conserving water and preventing overwatering. During a rain delay, all other functions, including manual watering and the OFF mode, are put on hold. The display will alternate between the current time and the remaining delay time.
For extended periods when watering is not desired, the "OFF Mode" can be activated, stopping all watering until the timer is manually switched back to "AUTO Mode." This is useful during colder months or when away from home for an extended period. The "Manual Watering" feature provides immediate control, allowing users to open a specific zone for a set duration to fill a bucket, clean equipment, or perform other tasks that require temporary water access. The timer remembers the last manual time set, which can be reset to "0" if needed.
The AquaTimer is designed for outdoor use and should not be used when ambient air temperature is below 40°F (4.5°C) or with water temperatures exceeding 115°F (46°C). Proper storage in a dry, frost-protected area is crucial during colder months to prevent damage from freezing water.
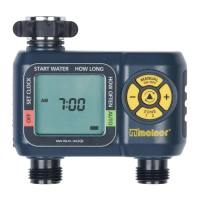
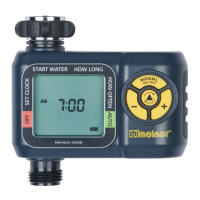
Setting up the AquaTimer involves a straightforward process guided by the device's interface. After battery installation, the first step is to set the current time and day of the week. The arrow on the screen points to "CLOCK" initially, and users navigate with the +/- buttons to select the correct day and time, confirming each selection with the OK button.
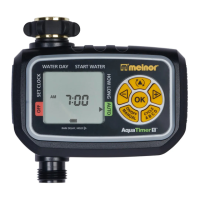
Once the clock is set, users proceed to "WATER DAY" to define the watering schedule. Here, individual days of the week can be selected, or an interval period (e.g., every 2 days) can be chosen. The interface highlights selected days with a square. After setting the watering days, the arrow moves to "START WATER," where users can program up to four independent start times (Cycle A, B, C, D) for each zone. This allows for multiple watering events throughout the day if needed.
Following the start times, users move to "HOW LONG" to specify the duration for each watering cycle. The +/- buttons adjust the minutes, and the OK button confirms the setting. It's important to note that watering cycles can only be selected if a start time has been set for that cycle.
After configuring Zone 1, users can then proceed to set up additional zones (Zone 2, 3, and 4) by pressing the Zone button to switch between them and repeating the "WATER DAY," "START WATER," and "HOW LONG" steps for each. Once all desired zones are programmed, pressing the Zone button again will transition the timer into "AUTO Mode," where it will execute the programmed schedule. In AUTO Mode, the display alternates between showing the current time and the next watering cycle for each zone.
The "Rain Delay" feature is activated by holding the Manual button until "DELAY" appears, then using the +/- buttons to set the delay duration (up to 7 days). To cancel a rain delay, the duration is set back to "0." The "OFF Mode" is engaged by pressing the Manual button until the arrow points to "OFF," and similarly, returning to "AUTO" mode reactivates the schedule.
For immediate, unscheduled watering, the "Manual Watering" button allows users to select a zone and set a specific duration. The valve will open for the selected time and then automatically close.
The timer can be completely reset to factory settings by holding the OK button for 7 seconds until "RESET" appears. This action erases all programming, requiring users to reconfigure the clock and watering schedules.
Regular maintenance is essential to ensure the longevity and optimal performance of the Melnor AquaTimer.
Battery Installation and Replacement: The timer requires two AA alkaline batteries. Rechargeable batteries are not recommended. Users should replace batteries when the indicator reaches a low level. It's also advised to remove batteries at the end of the watering season before storing the timer to prevent corrosion and extend battery life. Batteries typically last about one season, though more frequent watering times can drain them faster.
Cleaning: Periodically, the timer should be cleaned to prevent debris or sediments from accumulating. This involves turning off the water, removing the timer from the faucet, and checking the filter washer. If debris is present, the filter washer should be removed and cleaned. Additionally, activating the "MANUAL" mode and opening all valves while spraying water through them and the faucet connection helps flush out any built-up sediments.
Open Valves During Installation: If water continuously flows through one or more valves during installation, it may be due to the valves being open from transportation. To resolve this, users should turn off the water, remove the batteries, wait for the screen to go blank, and then reinsert the batteries. This action will not erase existing watering schedules. If the problem persists, the "Manual" feature can be used to open and close each valve three times to clear any obstructions.
Seasonal Storage: To protect the timer from freezing temperatures, which can cause water inside to freeze and expand, damaging the unit, it should be removed from the faucet, drained, and stored indoors in a dry, frost-protected location at the end of the watering season or when frost is anticipated. The batteries should also be removed during storage.
Compatibility with Soil Moisture Sensor: The AquaTimer is compatible with the Melnor HydroLogic Soil Moisture Sensor (sold separately). Connecting this sensor allows the timer to prevent overwatering by suspending watering cycles when the soil is already wet or when it's raining. This feature helps conserve water and ensures plants receive the optimal amount of moisture. The sensor monitors soil moisture and can be adjusted to maintain the desired level for healthy lawns and gardens.
| Model | 76280 |
|---|---|
| Number of Zones | 4 |
| Power Source | 2 AA batteries (not included) |
| LCD Display | Yes |
| Material | Plastic |
| Watering Duration | 1 minute to 4 hours |
| Watering Frequency | Every 6, 12, 24, 48, or 72 hours |
| Rain Delay | Yes |
| Valve Connection | Standard garden hose thread |