EasyManua.ls Logo

Merik LiftMaster 7511LMK - User Manual

Merik LiftMaster 7511LMK
80 pages
Print Icon
To Next Page IconTo Next Page
Loading...
CONTENTS
Preparation. . . . . . . . . . . . . . . .1-2
Assembly . . . . . . . . . . . . . . . . .3-4
Installation . . . . . . . . . . . . . . .5-12
Install the Door Control. . . . . . 13-14
Install the Protector System
®
. . 15-18
Power. . . . . . . . . . . . . . . . . . 19-20
Adjustments . . . . . . . . . . . . . 21-23
Battery Backup*. . . . . . . . . . . 24-25
Operation . . . . . . . . . . . . . . . . . 26
Features . . . . . . . . . . . . . . . . . . 27
Door Control . . . . . . . . . . . . . 28-29
Remote Control . . . . . . . . . . . . . 30
To Erase the Memory . . . . . . . . . 31
To Open the Door Manually . . . . . 32
Maintenance . . . . . . . . . . . . . . . 33
Troubleshooting. . . . . . . . . . . 34-35
Accessories. . . . . . . . . . . . . . . . 36
Warranty. . . . . . . . . . . . . . . . . . 37
Repair Parts . . . . . . . . . . . . . 38-39
* If applicable
Chain Drive Garage
Door Opener
Please read this manual and the enclosed safety materials carefully!
Fasten the manual near the garage door after installation.
The door WILL NOT CLOSE unless the Protector System
®
is connected and properly
aligned.
Periodic checks of the garage door opener are required to ensure safe operation.
The model number label is located on the front panel of your garage door opener.
This garage door opener is ONLY compatible with MyQ
®
and Security+ 2.0
®
accessories.
DO NOT enable the Timer-to-Close feature if you are installing the garage door
opener on a one-piece door. The Timer-to-Close is to be used ONLY with sectional
doors.
www.merik-internacional.com/mx/
Serial Number:
Date of Purchase:
Model 7511LMK
FOR RESIDENTIAL USE ONLY
Write down the following information for
future reference:
.
Question and Answer IconNeed help?

Do you have a question about the Merik LiftMaster 7511LMK and is the answer not in the manual?

Summary

Preparation

Safety Symbol and Signal Word Guide

Explains safety symbols and their meaning.

Door Balance and Operation Check

How to check the garage door for balance and smooth operation.

Installation Tools Required

Lists the necessary tools for installation.

Preparation

Carton Contents Inventory

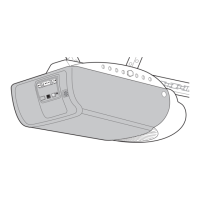
Lists all components included in the product packaging.

Installation Hardware List

Details the hardware required for assembly and installation.

Assembly

Attach Rail to Opener Unit

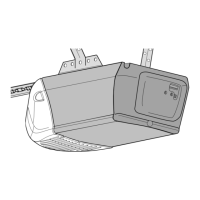
Instructions for connecting the rail to the main unit.

Assembly

Adjust Drive Chain Tension

Steps to adjust the tension of the drive chain.

Installation

Critical Installation Safety Guidelines

Critical safety and procedural guidelines before starting.

Installation

Header Bracket Mounting Location

Guidance on selecting the mounting spot for the header bracket.

Installation

Header Bracket Installation Procedure

Step-by-step instructions for mounting the header bracket.

Installation

Connect Rail to Header Bracket

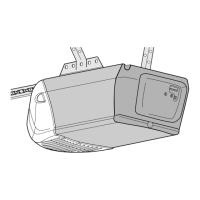
Connects the opener rail to the installed header bracket.

Position Opener Unit on Rail

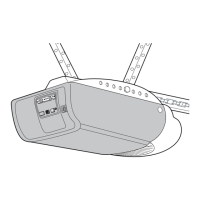
How to place the opener unit onto the rail.

Installation

Securely Hang Garage Door Opener

Securely mount the opener unit to the ceiling or wall.

Installation

Install Opener Light Bulbs

Steps for inserting the opener's light bulbs.

Attach Emergency Release Rope and Handle

Connects the manual release mechanism.

Installation

Mount Door Bracket on Garage Door

Instructions for attaching the bracket to the garage door.

Installation

Connect Door Arm to Trolley Mechanism

Links the door arm to the opener's moving trolley.

Install the Door Control

Mount Wall-Mounted Door Control

Steps for mounting the wall-mounted control.

Install the Door Control

Wire Door Control to Opener

Connecting the control unit's wiring to the opener.

Placement of Safety Warning Labels

Placement of critical safety labels.

Install the Protector System

Install Safety Reversing Sensors

Instructions for mounting the safety sensors.

Install the Protector System

Safety Sensor Mounting Options

Provides options for sensor mounting locations.

Install the Protector System

Wire Safety Reversing Sensors to Opener

Connects the safety sensors to the garage door opener.

Install the Protector System

Pre-wired Sensor Installation Steps

Specific wiring steps for systems with pre-installed wires.

Power

Connect to Electrical Power Supply

Instructions for connecting the opener to the electrical supply.

Power

Align and Check Safety Reversing Sensors

Checks and adjustments for proper sensor alignment.

Verify Door Control Wiring Connection

Confirms correct wiring of the wall-mounted control.

Adjustments

Adjustment Procedure Overview

Overview of adjustment procedures and safety.

Identify Programming Buttons

Identifies the buttons used for programming travel limits.

Adjustments

Program Door Travel Limits

Step-by-step guide to setting door open/close positions.

Adjustments

Test Safety Reversal System Function

Procedures to verify the safety reversal function.

Test Protector System Functionality

Verifies the functionality of the safety sensors.

Battery Backup

Install Backup Battery Unit

Instructions for inserting the backup battery into the unit.

Battery Backup

Battery Charging and Capacity

Information on how the battery charges and its capacity.

Interpret Battery Status LED Indicators

Explains the meaning of the LED lights on the unit.

Operation

Critical Safety Warnings for Operation

Critical safety warnings for operating the opener.

Features

MyQ and Security+ 2.0 Accessory Compatibility

Details compatibility with smart accessories.

Protector System (Safety Reversing Sensors) Function

Explains the function of the safety sensors.

How to Use Your Garage Door Opener

Guidance on the general operation of the opener.

Battery Backup System Overview

Information on the backup power system.

Door Control

Door Control Operation and Synchronization

General operation and synchronization of the control panel.

Basic Push Bar and Light Button Use

Basic functions of the control panel's buttons.

Advanced Door Control Feature Setup

Covers Learn, Lock, Auto Light, and MAS functions.

Door Control

Control Panel Feature Configuration

Configuration options for panel features like Lock and Lights.

Light Duration and Motion Sensor Settings

Adjusting light duration and motion sensor activation.

Maintenance Alert System (MAS) Activation

How to activate/deactivate maintenance notifications.

Remote Control

Program Remote Controls and Keyless Entry

Steps to add or reprogram access devices.

Remote Control

Erase All Remote Control Memory

Procedure to clear all programmed remote and keyless entry codes.

To Open the Door Manually

Manual Door Operation via Release Handle

Steps for manually operating the door via the release handle.

Maintenance

Routine Maintenance Schedule and Tasks

Routine checks and lubrication tasks for upkeep.

Replace Remote Control Battery

Guide for changing the battery in the remote.

Troubleshooting

Diagnostic Codes and Error Solutions

Lists error codes and their corresponding troubleshooting steps.

Troubleshooting

Troubleshooting Common Operational Issues

Addresses various operational problems and their fixes.

Accessories

List of Compatible Accessories

Lists available accessories and their descriptions.

Warranty

Product Limited Warranty Terms

Details the terms and conditions of the product warranty.

Repair Parts

Replacement Parts for Rail Assembly

Lists replacement parts for the opener's rail.

Spare Parts for Installation Process

Lists spare parts required for the installation process.

Repair Parts

Replacement Parts for Opener Unit

Lists replacement components for the opener unit itself.

Merik LiftMaster 7511LMK Specifications

General IconGeneral
BrandMerik
ModelLiftMaster 7511LMK
CategoryGarage Door Opener
LanguageEnglish

Related product manuals