EasyManua.ls Logo

Metra Electronics 99-7328 User Manual

Default Icon
8 pages
To Next Page IconTo Next Page
Page #1 background imageLoading...
Page #1 background image
INSTALLATION INSTRUCTIONS FOR PART 99-7328
99-7328
KIT FEATURES
Recessed DIN Radio Provision with Pocket
ISO Mount Radio Provision with Pocket
A) Radio Housing • B) ISO Brackets • C) ISO Trim Plate
KIT COMPONENTS
A
Flat Blade Screwdriver/ Panel Removal Tool
Phillips Screwdriver
1-800-221-0932
© COPYRIGHT 2007-2009 METRA ELECTRONICS CORPORATION
www.metraonline.com
APPLICATIONS
KIA Sorento
2007-2009
B C
WIRING AND ANTENNA CONNECTIONS (Sold Separately)
Harness:
70-7302 - Hyundai harness 2007-up
Antenna Adapter:
Not required
TOOLS REQUIRED:
Question and Answer IconNeed help?

Do you have a question about the Metra Electronics 99-7328 and is the answer not in the manual?

Metra Electronics 99-7328 Specifications

General IconGeneral
ManufacturerMetra Electronics
Part Number99-7328
ColorBlack
MaterialPlastic
ISO DDIN radio provisionYes
Painted scratch-resistant matte blackYes
Wiring HarnessNot included
Antenna AdapterNot included
Product TypeDash Kit
TypeDash Kit

Summary

Installation Overview and Kit Contents

Kit Features

Details the kit's provisions for recessed DIN and ISO mount radio installation.

Kit Components

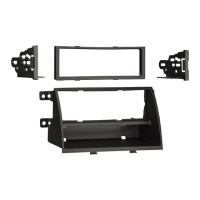
Lists the included components: Radio Housing, ISO Brackets, and ISO Trim Plate.

Wiring and Tools Required

Specifies required wiring harness and lists necessary installation tools.

Dash Disassembly

Kit Assembly: Recessed DIN Radio Provision

Slide DIN Cage into Housing

Securing the DIN cage into the radio housing by bending locking tabs outward.

Slide Radio into Assembly

Inserting the radio into the DIN cage/housing assembly until it snaps into place.

Kit Assembly: ISO Mount Radio Provision

Mount ISO Brackets to Radio

Aligning and mounting ISO snap-in brackets to the radio using supplied screws.

Slide Radio/Bracket Assembly into Housing

Inserting the radio and bracket assembly into the radio housing until it snaps.

Snap ISO Trim-plate

Attaching the ISO Trim-plate onto the assembled radio and housing.

Final Assembly and Wiring Connections

Final Assembly Steps

Reassembling radio and dash components in reverse order of disassembly.

Final Wiring Connections

Making wiring connections using EIA color code; strip, splice, solder, and tape.

Related product manuals